Introduction
Please see the up-to-date documentation for the most recent features.
This is the documentation for the Zellij terminal workspace for versions lower than 0.32.0.
- For installing Zellij, see: Installation
- For configuring Zellij, see: Configuration
- For Operating System Compatibility and Known Issues, see: Compatibility
- For setting up layouts: Layouts
- For developing plugins: Plugins
Installation
Please see the up-to-date documentation for the most recent features.
Currently Binaries are produced for both Linux and MacOS.
However it is available in some public repositories.
Rust - Cargo
For instructions on how to install Cargo see here:
Once installed run:
cargo install --locked zellij
If experiencing errors, if installed through rustup, please try running:
rustup update
Binary Download
Binaries are made available each release for the Linux and MacOS operating systems.
It is possible to download the binaries for these on the release page.
Once downloaded, untar the file:
tar -xvf zellij*.tar.gz
check for the execution bit:
chmod +x zellij
and then execute Zellij:
./zellij
Include the directory Zellij is in, in your PATH Variable if you wish to be able to execute it anywhere.
'Or'
move Zellij to a directory already included in your [$PATH] Variable.
Compiling Zellij From Source
Instructions on how to compile Zellij from source can be found here.
Third party repositories
Zellij is packaged in some third part repositories. Please keep in mind that they are not directly affiliated with zellij maintainers:
![]()
More information about third party installation can be found here.
Overview
Please see the up-to-date documentation for the most recent features.
Zellij is a workspace aimed at developers, ops-oriented people and anyone who loves the terminal. At its core, it is a terminal multiplexer (similar to tmux and screen), but this is merely its infrastructure layer.
Zellij has a native layout and plugin system. To understand Zellij a little bit better, let us take a look at the default configuration.
Default Configuration
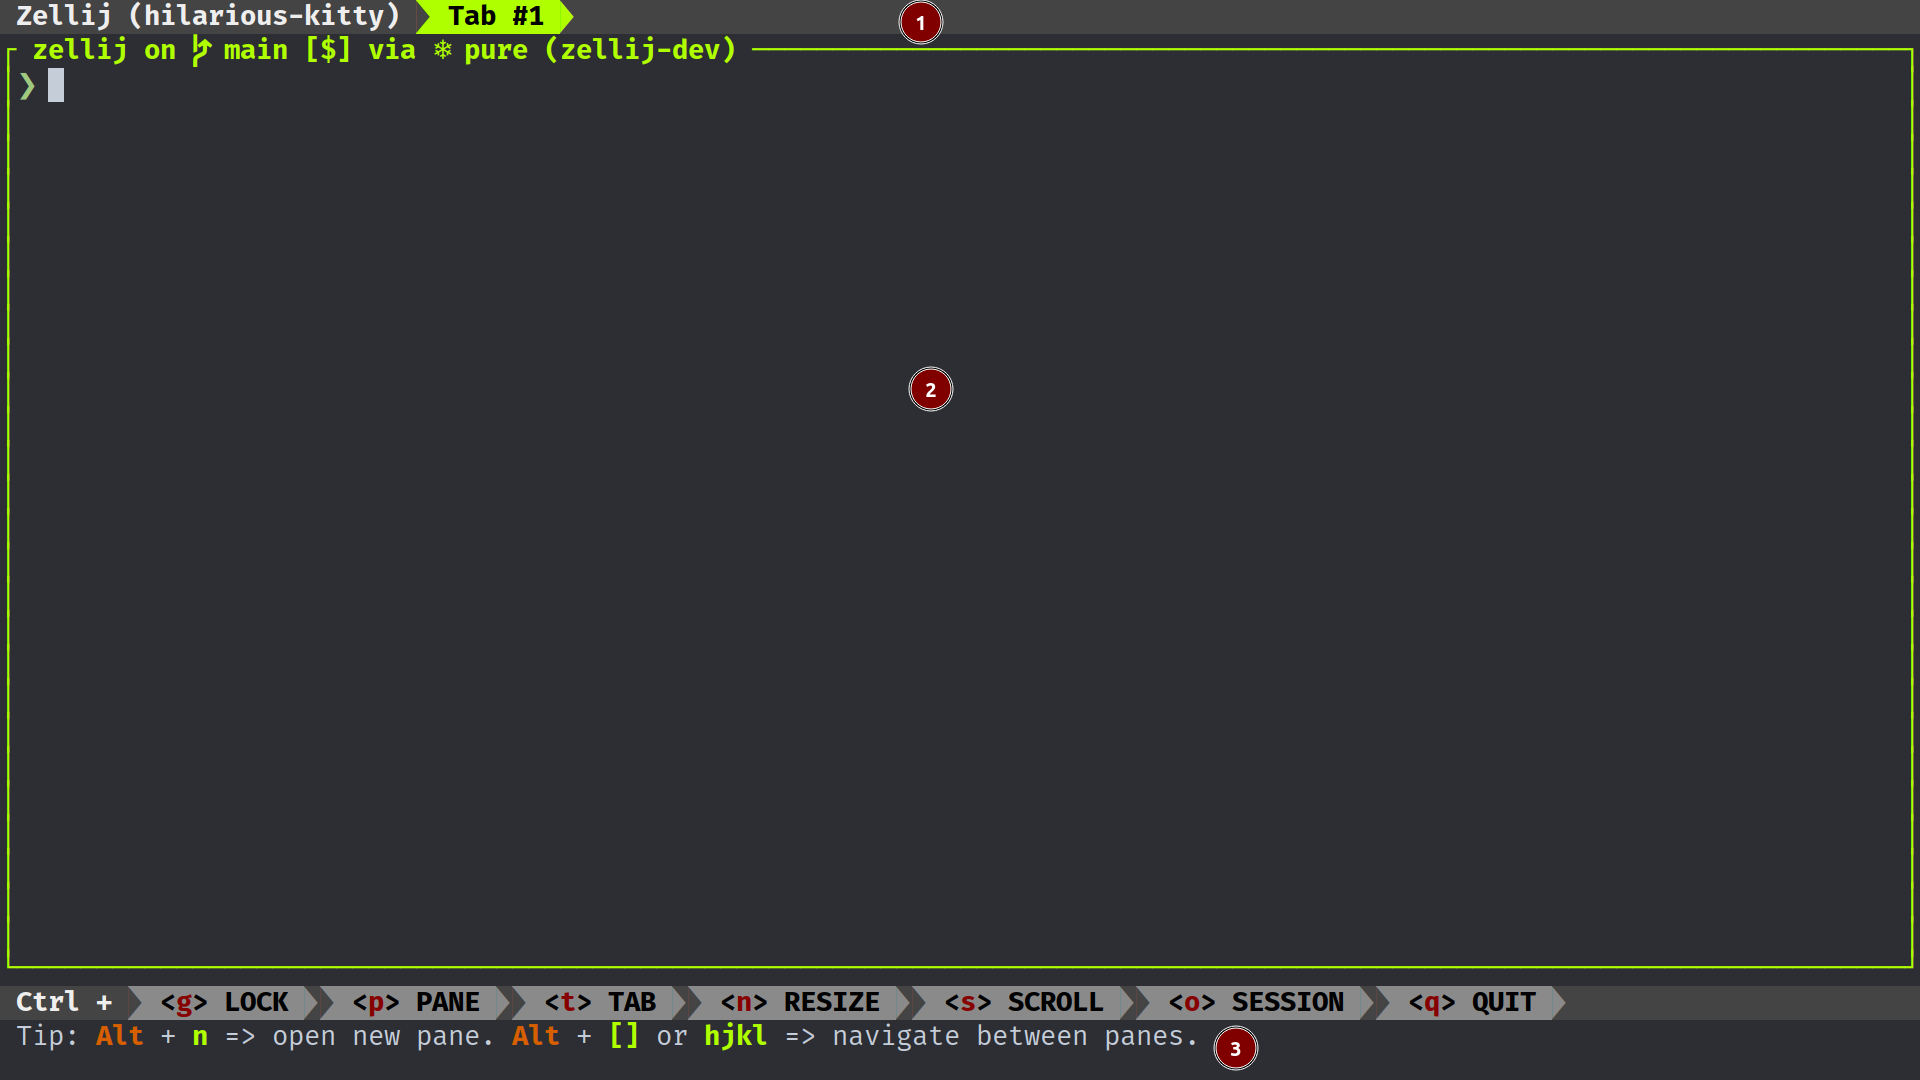
The default configuration consists of:
- The tab-bar plugin. It shows current tabs that are in use as well as the session name.
- The pane, in which the default shell is started. The title the shell sets can be seen in the upper left corner of the pane.
- The status-bar plugin. It gives an overview over current default keybindings, since Zellij is modal it can show hints based on modes it currently resides in.
To dive deeper in to how the layout-template that is behind the default layout works, consider checking out the relevant section.
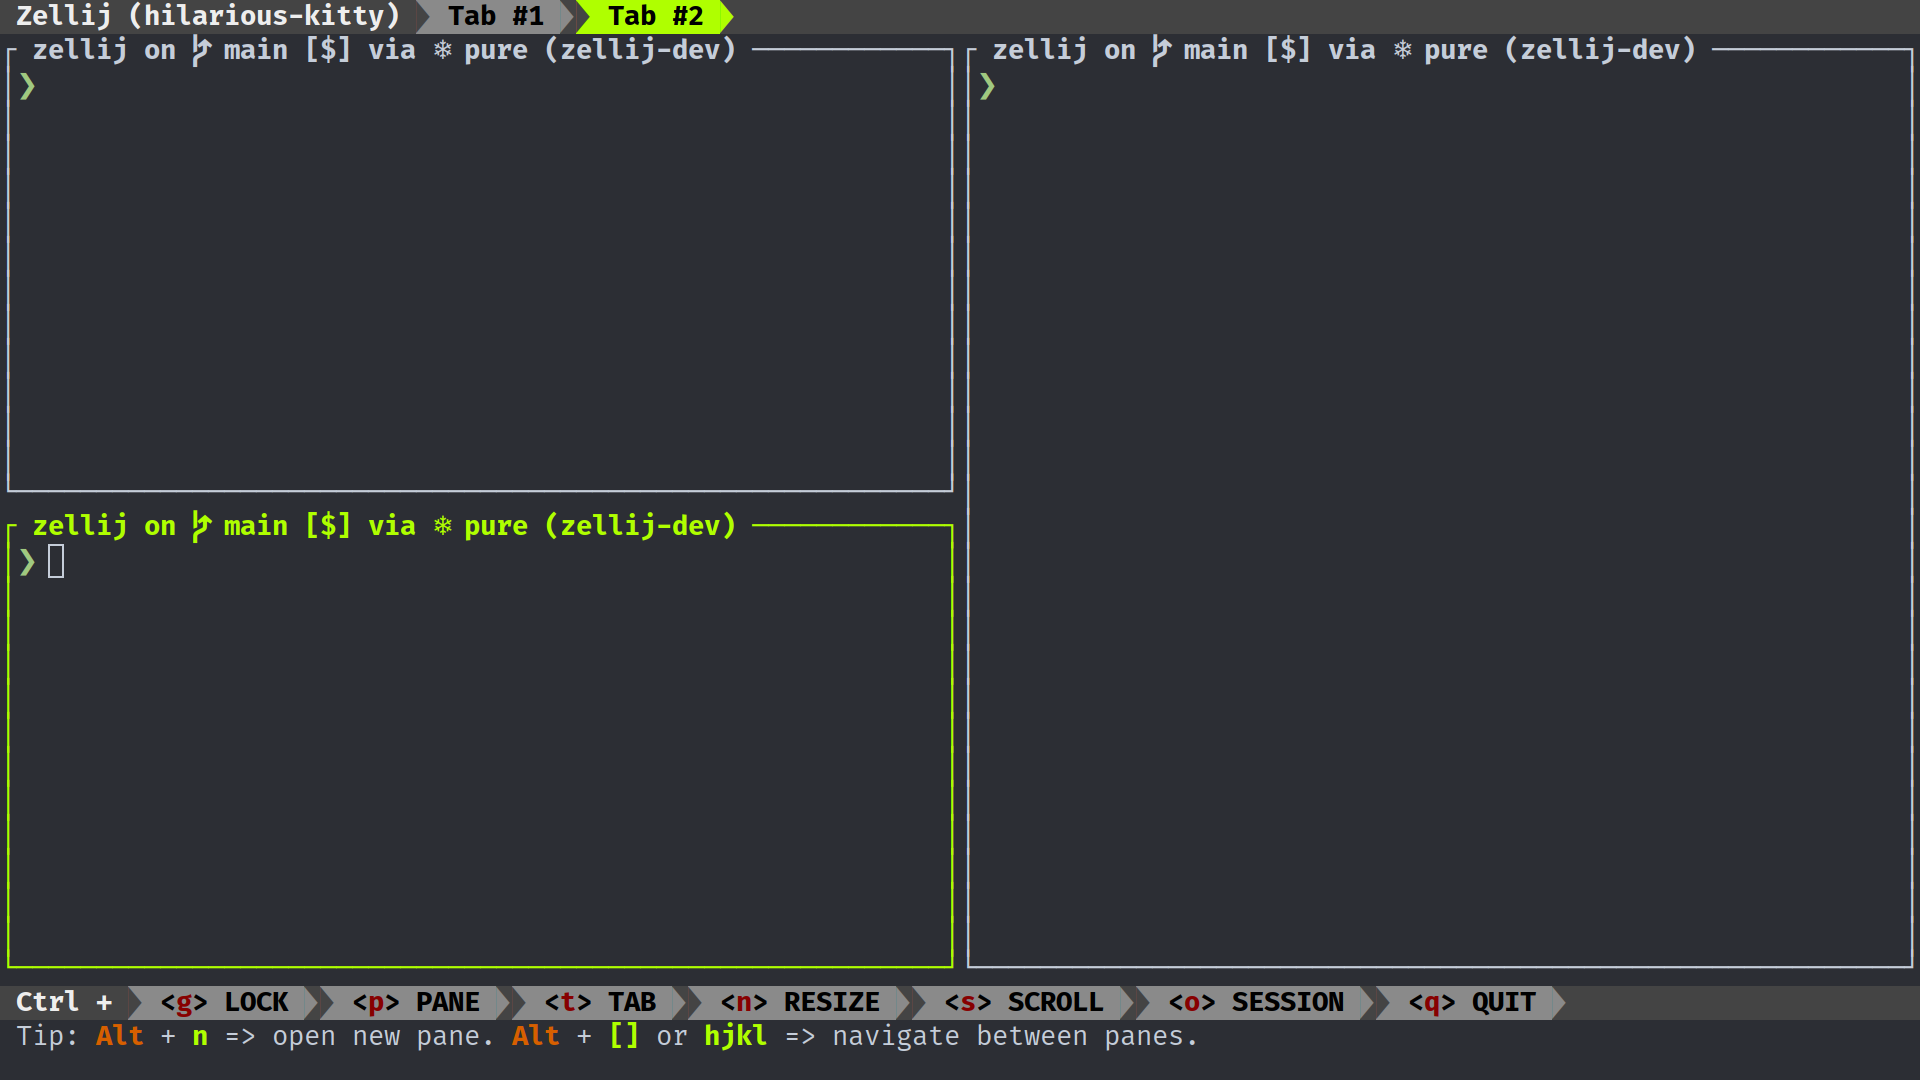
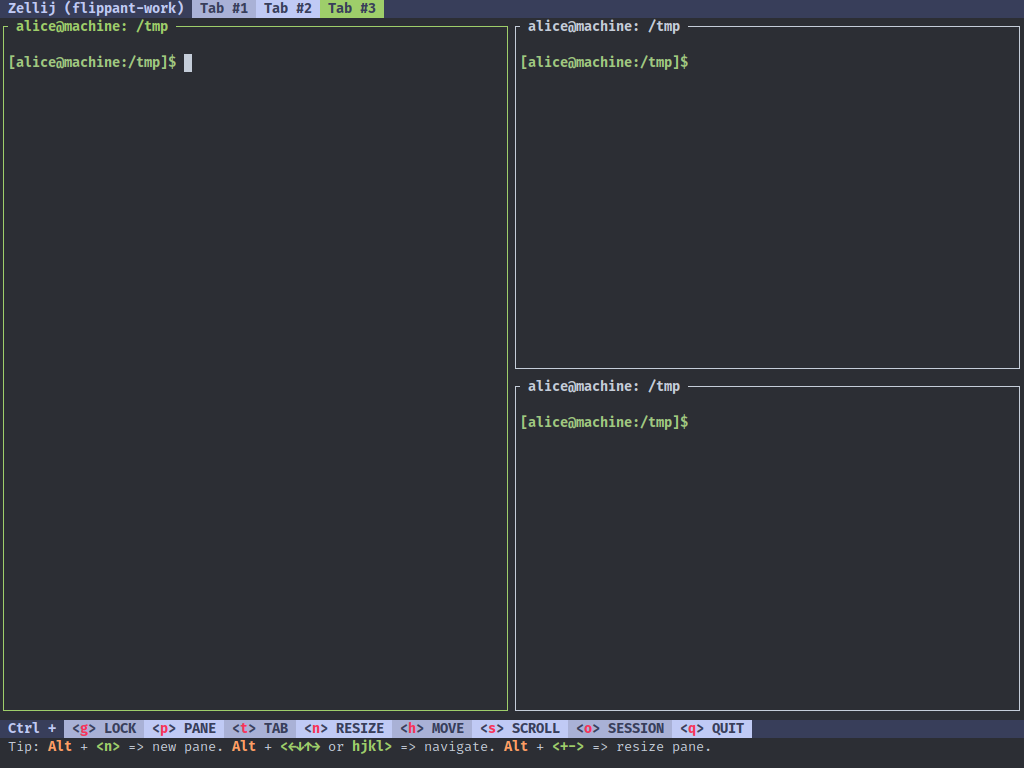
Let's open a new tab and then a couple panes inside that new tab:
- Ctrl + t
- n
- Ctrl + p
- n
- r
- Return
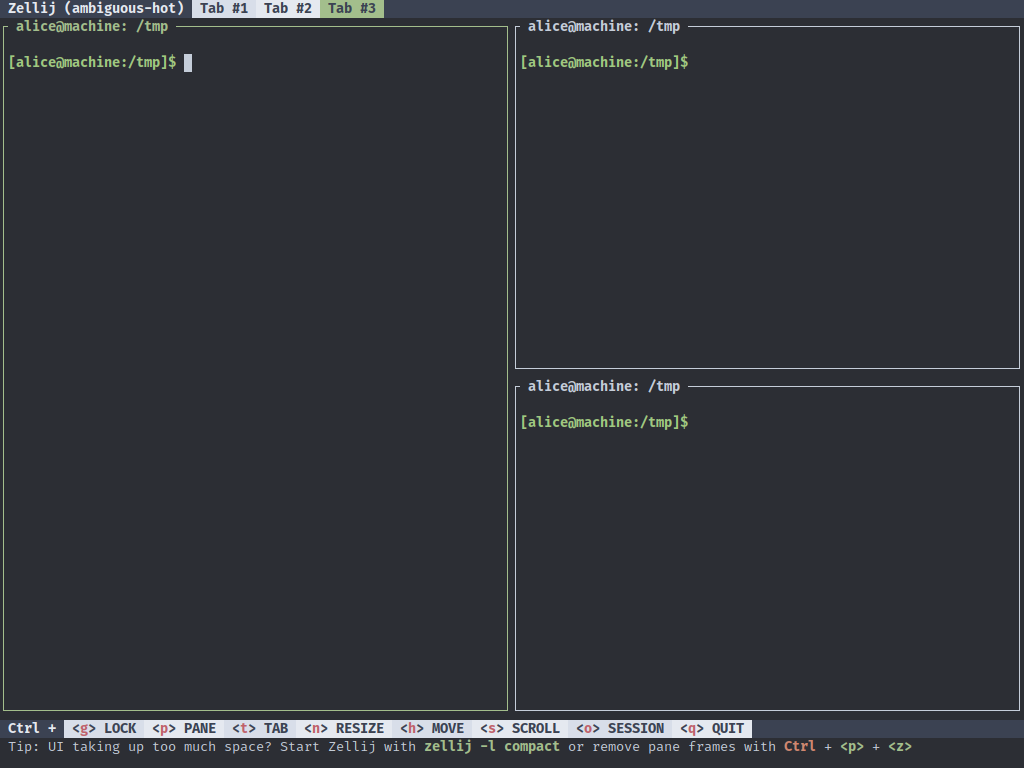
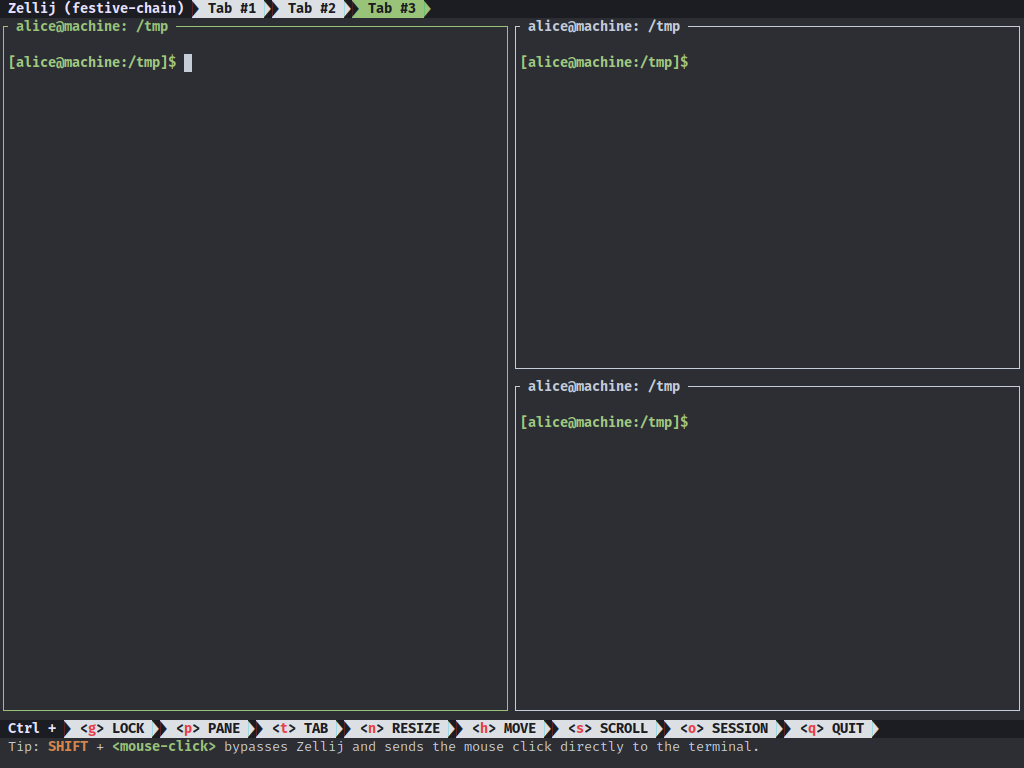
The status-bar should have guided us through:

 And this is our current state:
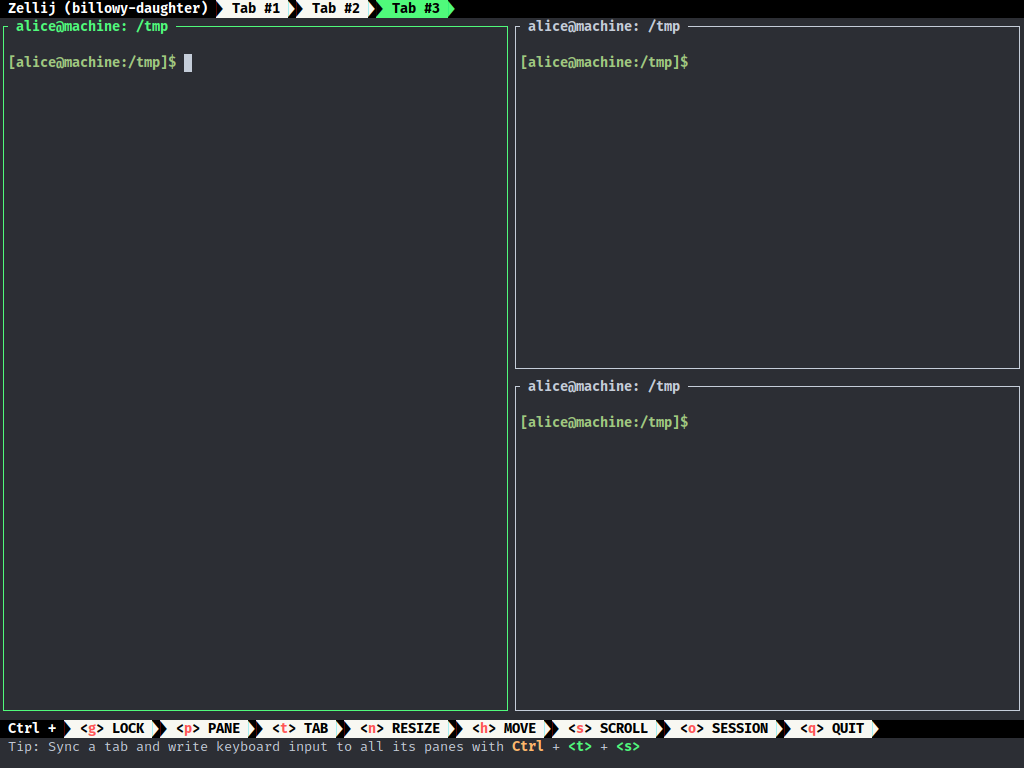
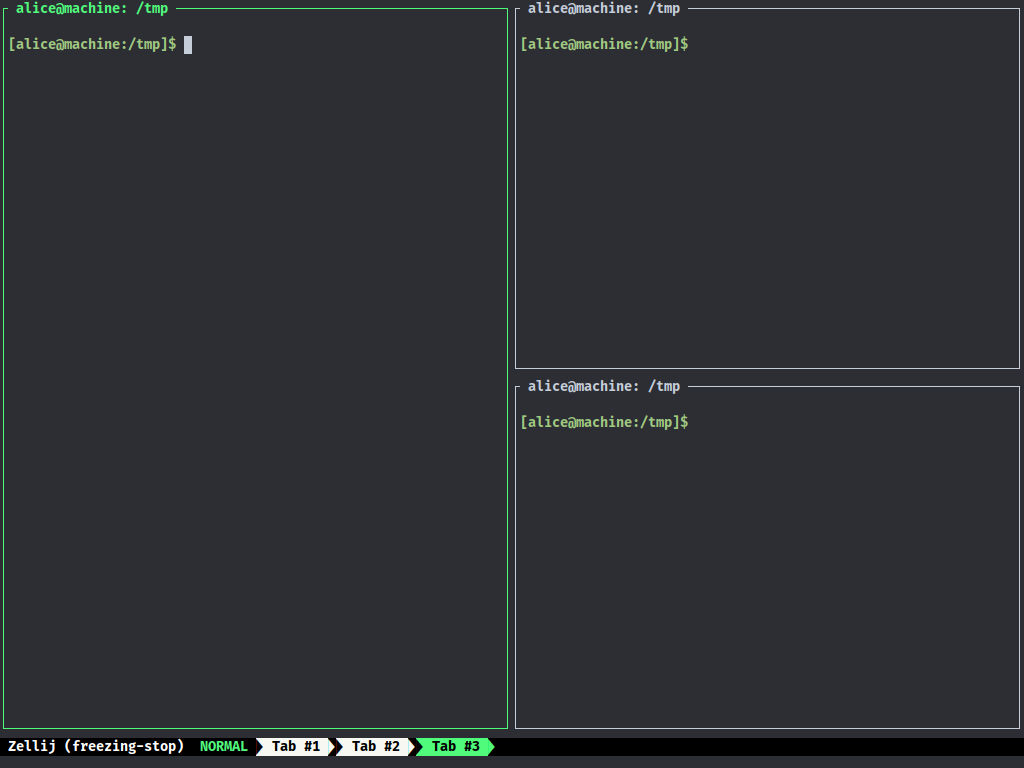
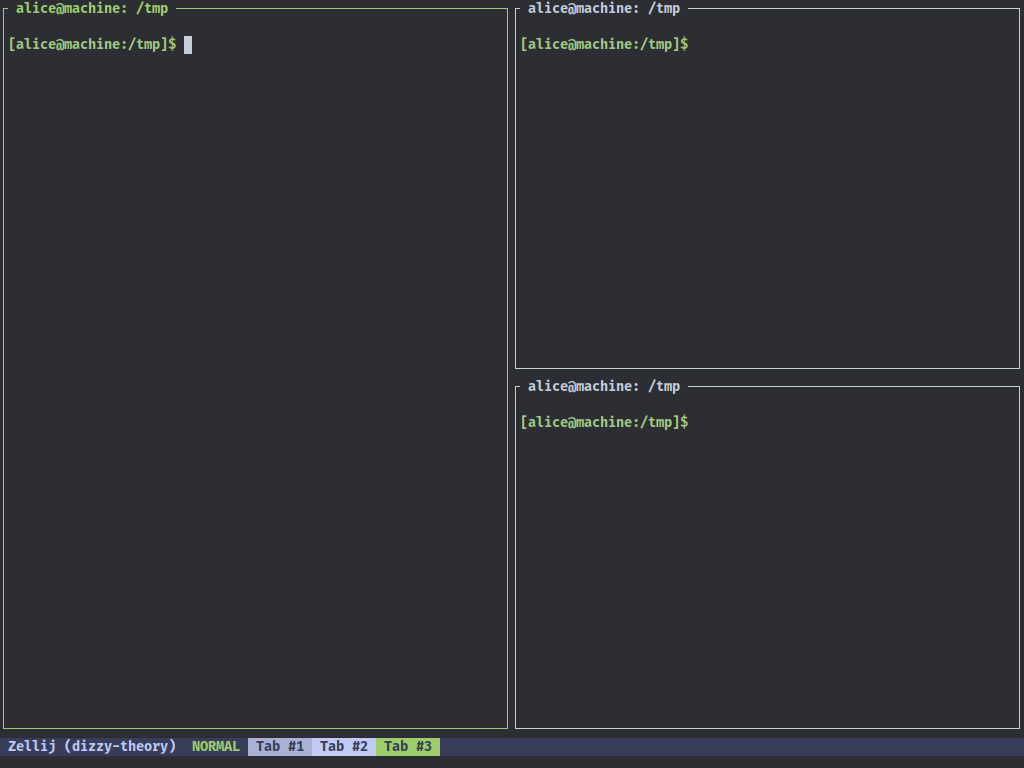
 Zellij doesn't need a terminal to keep commands running, because it uses a client
and server system. Let us disconnect and reconnect to the same session now:
Zellij doesn't need a terminal to keep commands running, because it uses a client
and server system. Let us disconnect and reconnect to the same session now:
- Ctrl + o
- d

If only one server session is running in the background zellij can restore the connection automatically, if not then we need a specific session name. We can get the name in the following way:
zellij list-sessions
And now we reattach to the currently running session:
zellij attach hilarious-kitty
Integration
Please see the up-to-date documentation for the most recent features.
Zellij provides some environment variables, that make Integration with existing tools possible.
echo $ZELLIJ
echo $ZELLIJ_SESSION_NAME
The ZELLIJ_SESSION_NAME has the session name as its value, and ZELLIJ gets
set to 0 inside a zellij session.
Arbitrary key value pairs can be set through configuration, or layouts.
Here are some limited examples to help get you started:
Autostart on shell creation
Autostart a new zellij shell, if not already inside one. Shell dependent, fish:
if set -q ZELLIJ
else
  zellij
end
other ways, zellij provides a pre-defined auto start scripts.
bash
echo 'eval "$(zellij setup --generate-auto-start bash)"' >> ~/.bashrc
zsh
echo 'eval "$(zellij setup --generate-auto-start zsh)"' >> ~/.zshrc
fish
⚠️ Depending on the version of the fish shell, the setting may not work. In that case, check out this issue.
Add
if status is-interactive
    ...
    eval (zellij setup --generate-auto-start fish | string collect)
end
to $HOME/.config/fish/config.fish file.
The following environment variables can also be used in the provided script.
| Variable | Description | default |
|---|---|---|
ZELLIJ_AUTO_ATTACH | If the zellij session already exists, attach to the default session. (not starting as a new session) | false |
ZELLIJ_AUTO_EXIT | When zellij exits, the shell exits as well. | false |
List current sessions
List current sessions, attach to a running session, or create a new one.
Depends on sk & bash
#!/usr/bin/env bash
ZJ_SESSIONS=$(zellij list-sessions)
NO_SESSIONS=$(echo "${ZJ_SESSIONS}" | wc -l)

if [ "${NO_SESSIONS}" -ge 2 ]; then
    zellij attach \
    "$(echo "${ZJ_SESSIONS}" | sk)"
else
   zellij attach -c
fi
List layout files and create a layout
List layout files saved in the default layout directory,
opens the selected layout file.
Depends on: tr, fd, sed, sk, grep & bash
#!/usr/bin/env bash
set -euo pipefail
ZJ_LAYOUT_DIR=$(zellij setup --check \
    | grep "LAYOUT DIR" - \
    | grep -o '".*"' - | tr -d '"')

if [[ -d "${ZJ_LAYOUT_DIR}" ]];then
        ZJ_LAYOUT="$(fd --type file . "${ZJ_LAYOUT_DIR}" \
        | sed 's|.*/||' \
        | sk \
        || exit)"
    zellij --layout "${ZJ_LAYOUT}"
fi
FAQ
Please see the up-to-date documentation for the most recent features.
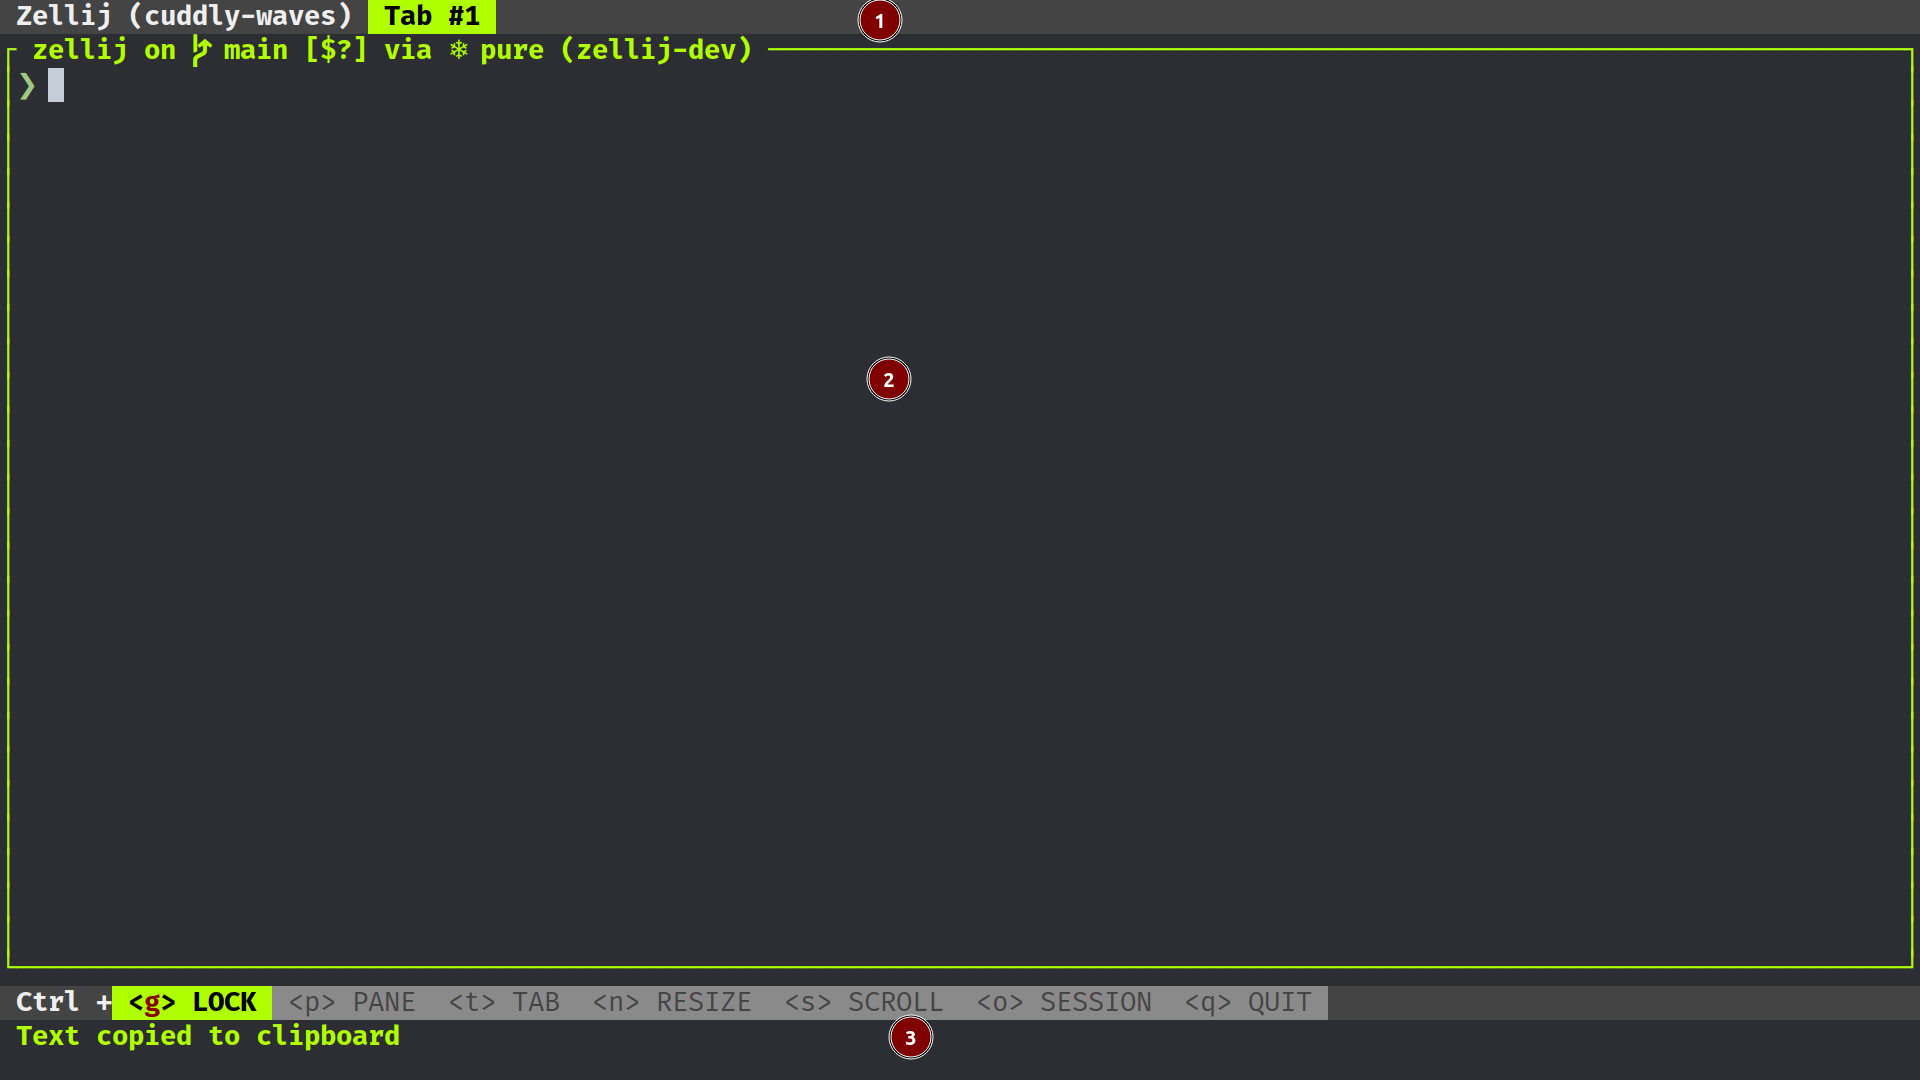
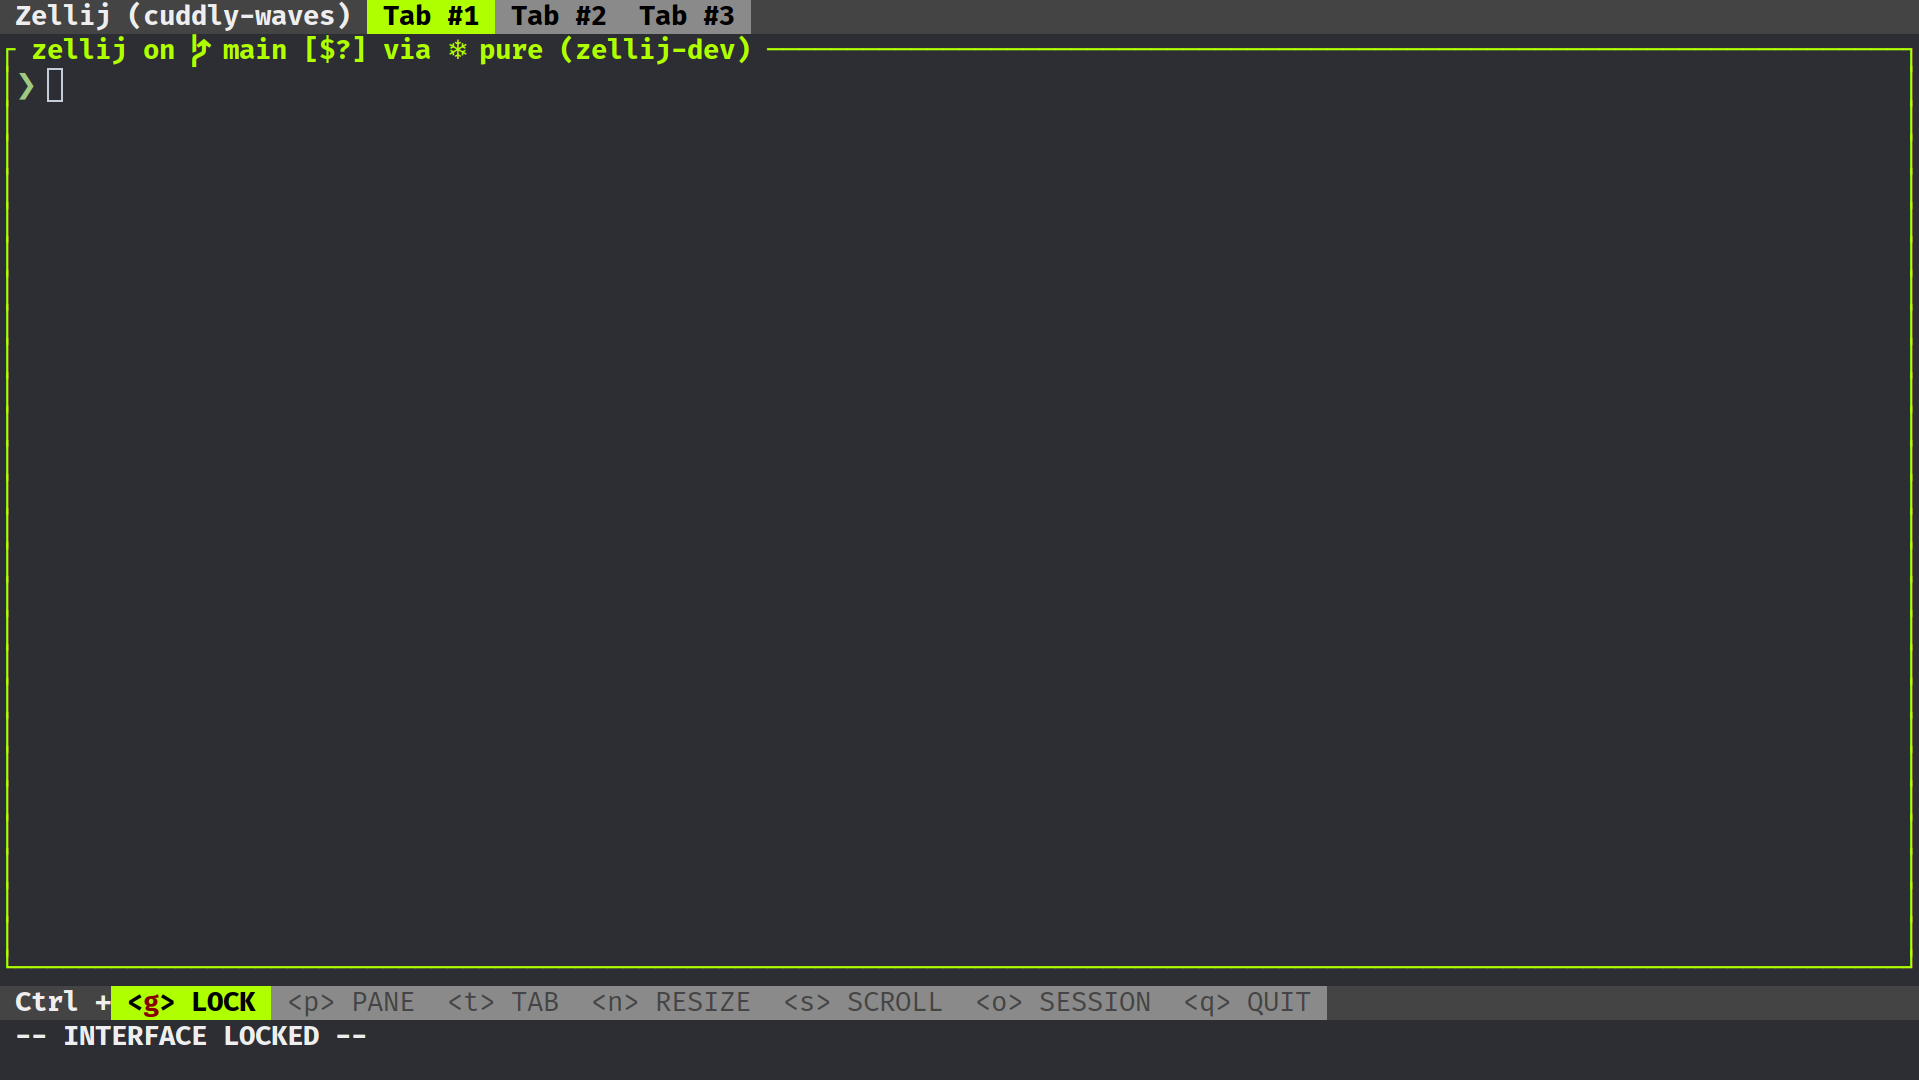
Zellij overrides certain key combinations that I use for other apps, what can I do?
As an "escape hatch" solution, you can lock the interface with Ctrl + g - at this point all keys will be sent to the focused pane.
You could also remap keys to work around this problem.
That being said, the maintainers are aware that this default set of keybindings is not an ideal solution. We tried to find a solution that would both be powerful, allowing few and memorable keypresses to be used for common actions, and also unobtrusive. Finding a solution that would do better in the latter while still maintaining the former is something we're actively thinking about and planning on changing in the future. If you have any thoughts, please do share them in an issue or in one of our chat servers.
The UI takes up too much space, what can I do about it?
You can load the compact layout with zellij --layout compact.
Additionally, you can disable pane frames either at runtime with Ctrl + <p> + <z> or through the config with pane_frames: false.
I see broken characters in the default UI, how can I fix this?
This means your default terminal font doesn't include some special characters used by Zellij. A safe bet would be to install and use a font from nerdfonts.
If you don't want to install a new font, you can also load the simplified UI that doesn't use these characters, with:
zellij options --simplified-ui true
Copy / Paste isn't working, how can I fix this?
Some terminals don't support the the OSC 52 signal, which is the method Zellij uses by default to copy text to the clipboard. To get around this, you can either switch to a supported terminal (eg. Alacritty or xterm) or configure Zellij to use an external utility when copy pasting (eg. xclip, wl-copy or pbcopy).
To do the latter, add one of the following to your Zellij Config:
copy_command: "xclip -selection clipboard" # x11
copy_command: "wl-copy"                    # wayland
copy_command: "pbcopy"                     # osx
Note that the only method that works when connecting to a remote Zellij session (eg. through SSH) is OSC 52. If you require this functionality, please consider using a terminal that supports it.
How can I use floating panes?
You can toggle showing/hiding floating panes with Ctrl + <p> + <w> (if no floating panes are open, one will be opened when they are shown).
In this mode you can create additional windows as you would normally create panes (eg. with Alt + <n>). Move them with the mouse or the keyboard, and resize them as you would normally resize or move Zellij panes.
You can also embed a floating pane with Ctrl + <p> + <e>, and float an embedded pane in the same way.
How can I sync input to multiple panes?
You can toggle sync input to all panes in a tab with Ctrl + <t> + <s>. Then everything you type will be sent to all panes in the tab.
Editing the pane scrollbuffer with ctrl + <s> + <e> doesn't work, what's wrong?
By default, Zellij looks for an editor defined in the EDITOR or VISUAL environment variables (in this order).
Make sure one is set (eg. export EDITOR=/usr/bin/vim) before Zellij starts.
Alternatively, you can set one in the Zellij config using scrollback-editor.
Commands
Please see the up-to-date documentation for the most recent features.
These commands can be invoked with zellij [SUBCOMMAND].
For more details, each subcommand has its own help section when run with the
--help flag (zellij [SUBCOMMAND] --help).
attach [session-name]
short: a
Zellij will attempt to attach to an already running session, with the name
[session-name].
If given no [session-name] and there is only one running session, it will attach to that session.
The attach subcommand will also accept the optional options subcommand.
list-sessions
short: ls
Will list all the names of currently running sessions.
kill-sessions [target-session]
short: k
Will kill the session with the name of [target-session], if it is currently
running.
kill-all-sessions
short: ka
Will prompt the user to kill all running sessions.
options
Can be used to change the behaviour of zellij on startup. Will supercede options defined in the config file. To see a list of options look here.
setup
Functionality to help with the setup of zellij.
| Flag | Description |
|---|---|
| --check | Check the configuration |
| --clean | Start with default configuration |
| --dump-config | Dump the default configuration file to stdout |
| --dump-layout [LAYOUT] | Dump a specified default layout file to stdout |
| --generate-completion [SHELL] | Generate completions for the specified shell |
Flags
These flags can be invoked with zellij --flag.
| Flag | Description |
|---|---|
| --help | Display the help prompt |
| --debug | Gather additional debug information |
| --version | Print version information |
Configuration
Please see the up-to-date documentation for the most recent features.
By default Zellij will look for config.yaml in the config directory.
Quickstart:
mkdir ~/.config/zellij
zellij setup --dump-config > ~/.config/zellij/config.yaml
The default config directory order is as follows:
-
--config-dirflag -
ZELLIJ_CONFIG_DIRenv variable -
$HOME/.config/zellij -
default location
- Linux:
/home/alice/.config/zellij - Mac:
/Users/Alice/Library/Application Support/org.Zellij-Contributors.Zellij
- Linux:
-
system location (
/etc/zellij)
In order to pass a config file directly to zellij:
zellij --config [FILE]
or use the ZELLIJ_CONFIG_FILE environment variable.
To start without loading configuration from default directories:
zellij options --clean
To show the current default configuration:
zellij setup --dump-config
Options
Please see the up-to-date documentation for the most recent features.
You can make use of these options either by invoking zellij with
zellij options [OPTION] or binding them in the configuration file.
Eg. zellij options --simplified-ui true is equivalent to simplified_ui: true in the config file.
| Option | Config | Default | Description |
|---|---|---|---|
| default-mode | default_mode | normal | The first mode on startup. |
| default-shell | default_shell | $SHELL | The default shell. |
| default-layout | default_layout | default | The name of the default layout. |
| mouse-mode | mouse_mode | true | Enable mouse mode. |
| disable-mouse-mode | - | false | Disable mouse mode. |
| simplified-ui | simplified_ui | false | Request the Plugins to use a more compatible ui. |
| pane-frames | pane_frames | true | Display frames around the panes. |
| no-pane-frames | - | false | Disable display of frames around the panes. |
| on-force-close | on_force_close | detach | What to do when receiving a SIGTERM, SIGINT, SIGQUIT or SIGHUP. |
| theme | theme | default | Switch to a theme configured under the themes section. |
| scroll-buffer-size | scroll_buffer_size | 10000 | The number of lines zellij stores for each pane in the scroll back buffer. |
| _ | env | empty | A map of key value pairs for environment variables. |
| copy-command | copy_command | _ | Command to execute when copying text, instead of using OSC52 (for example wl-copy, xclip, pbcopy). |
| copy-clipboard | copy_clipboard | system | Destination selection buffer (x11/linux) for OSC52 copy, can be system or primary. |
| copy-on-select | copy_on_select | true | Automatically copy when selecting text. If false, the Copy action should be bound in normal and scroll mode. |
| scrollback-editor | scrollback_editor | - | Path to the editor to use to edit scrollback (eg. /usr/bin/vim) |
A small example:
default_mode: locked
mouse_mode: false
env:
  RUST_BACKTRACE: 1 # set RUST_BACKTRACE=1
Configuring Keybindings
Please see the up-to-date documentation for the most recent features.
Zellij comes with a default set of keybindings that try to fit as many different users and use cases while trying to maximize comfort for everyone.
It is possible to add to these defaults or even override them with an external configuration. For more information about the file, see Configuration.
The structure of the keybinds section of the file is as follows:
keybinds:
    normal:
        - action: []
          key: []
Under the main keybinds section one can list the new bindings they'd like to add grouped under the different Modes (normal in this example).
The action is a sequence of one or more instructions sent to Zellij through this keybinding. The key is a list of one or more keys, any one of them alone would trigger the sequence of actions.
For example:
keybinds:
    normal:
        - action: [ NewTab, GoToTab: 1,]
          key: [ Char: 'c',]
Will create a new tab and then switch to tab number 1 on pressing the
c key.
Whereas:
keybinds:
    normal:
        - action: [ NewTab,]
          key: [ Char: 'c', Char: 'd',]
Will create a new tab on pressing either the c or the d key.
To unbind the default Keybindings
The default keybinds can be unbound either for a specific mode, or for every mode. It supports either a list of keybinds, or a bool indicating that every keybind should be unbound:
keybinds:
    unbind: true
Will unbind every default binding.
keybinds:
    unbind: [ Ctrl: 'p']
Will unbind every default ^P binding for each mode.
keybinds:
    normal:
        - unbind: true
Will unbind every default keybind for the normal mode.
keybinds:
    normal:
        - unbind: [ Alt: 'n', Ctrl: 'g']
Will unbind every default keybind for n and ^g for the normal mode.
Example
This configuration can be used to configure Zellij's default keybindings: default.yaml
Modes
Please see the up-to-date documentation for the most recent features.
The Zellij keybindings are grouped into different modes, which are a logical separation meant to reduce the mental overhead and allow to duplicate shortcuts in different situations.
normal
This is the default mode Zellij starts with. By default it provides the ability to switch to different modes, as well as some quick navigation shortcuts.
locked
This mode "locks" the interface, disabling all keybindings except one that would switch to "normal" mode (ctrl-g by default).
It is intended to give users a workaround in case one of the default keybindings overrides something they use in their terminal. (eg. ctrl-r for reverse history search in bash).
pane
This mode includes instructions that manipulate the different panes. Eg. adding new panes, closing panes and moving the focused pane.
tab
This mode includes instructions that manipulate the different tabs. Eg. adding new tabs, closing tabs, moving the active tab, and toggling a "sync" mode that sends text to all panes in the current tab.
resize
This mode allows the resizing of the focused pane.
scroll
This mode allows scrolling up/down within the focused pane.
session
This mode allows detaching from a session.
Keys
Please see the up-to-date documentation for the most recent features.
These are the possible keys and key combinations one can set in the Keybindings configuration. For more information, please see: https://docs.rs/termion/1.5.6/termion/event/enum.Key.html
Or some related Github Issues:
There's a table with an overview of valid key combinations at the bottom of this page.
Char: <character>
A single character with no modifier, eg. Char: 'f'
Note: Please also refer to the table at the bottom of this page
Alt: <character>
A single character preceded by the Alt modifier, eg. Alt: 'f'.
Note: Please also refer to the table at the bottom of this page
Ctrl: <character>
A single character preceded by the Ctrl modifier, eg. Ctrl: 'f'.
Note: Please also refer to the table at the bottom of this page
F: <1-12>
One of the F characters (usually at the top of the keyboard). eg. F: 11
Backspace
The Backspace key.
Left / Right / Up / Down
The arrow keys on the keyboard.
Home
The home key.
End
The End key.
PageUp / PageDown
The PageUp or PageDown keys.
BackTab
The backward Tab key.
Delete
The delete key.
Insert
The insert key.
Esc
The Esc key.
Valid character combinations
Following is a table that gives an overview of all the possible character combinations available for keybindings.
Note that combining any of the Ctrl, Alt or Char bindings with the
special keys mentioned above isn't possible.
| Keys | Ctrl: ' ' | Alt: ' ' | Char: ' ' |
|---|---|---|---|
a-z | yes | yes | yes |
A-Z | no | yes | yes |
0-9 | no | yes | yes |
| Space | no | yes | yes |
| Tab | no | yes | yes |
.:,;-_!? | no | yes | yes |
'"#$%&() | no | yes | yes |
*+/<=>@\ | no | yes | yes |
[]^_|{}~ | no | yes | yes |
äöüß | no | yes | yes |
Examples
Please see the up-to-date documentation for the most recent features.
Zellij's keybindings can be configured to behave in multiple ways. Here are example configurations to possibly inspire you.
Prefix Example
This certain example works as if it had a prefix key.
Zellij starts in locked mode and only the prefix key switches to normal mode, from then on it is possible to have a layer of shortcuts, or more special modes to switch to.
Eg:
- Open a pane: ^b - n
- Open a pane to the right: ^b - p - r
- Open a tab: ^b - N
- Open multiple tabs: ^b - t - N - n
- Switch to a specific pane or tab: ^b - h/j/k/l
- Switch to a specific tab: ^b - 1
- Resize: ^b - r - h/j/k/l
- Fullscreen: ^b - p - f
- Send the prefix key (^b): ^b - b
- Detach the session: ^b - o - d
- Quit zellij: ^b - ^q
- Rename a pane: ^b - c - [name] - enter
- Rename a tab: ^b - C - [name] - enter
Here is one possible example of that:
---
default_mode: locked
keybinds:
    unbind: true
    # the prefix key ^b
    locked:
        - action: [SwitchToMode: Normal,]
          key: [Ctrl: 'b',]
    normal:
        # send the prefix-key ^b on pressing b in normal mode
        # then switch back to locked mode
        - action: [Write: [2,], SwitchToMode: Locked]
          key: [Char: 'b']
        - action: [SwitchToMode: Locked,]
          key: [Ctrl: 'b', Char: ' ', Char: "\n"]
        - action: [SwitchToMode: Pane,]
          key: [Char: 'p',]
        - action: [SwitchToMode: Resize,]
          key: [Char: 'r',]
        - action: [SwitchToMode: Tab,]
          key: [Char: 't',]
        - action: [SwitchToMode: Scroll,]
          key: [Char: 's',]
        - action: [SwitchToMode: Session,]
          key: [Char: 'o',]
        - action: [Quit,]
          key: [Ctrl: 'q',]
        - action: [NewPane: , SwitchToMode: Locked, ]
          key: [ Alt: 'n',]
        - action: [NewTab: , SwitchToMode: Locked, ]
          key: [ Char: 'N',]
        - action: [NewPane: , SwitchToMode: Locked,]
          key: [ Char: 'n',]
        - action: [MoveFocusOrTab: Left, SwitchToMode: Locked]
          key: [ Char: 'h' ]
        - action: [MoveFocusOrTab: Right, SwitchToMode: Locked]
          key: [ Char: 'l', ]
        - action: [MoveFocus: Down, SwitchToMode: Locked]
          key: [ Char: 'j', ]
        - action: [MoveFocus: Up, SwitchToMode: Locked]
          key: [ Char: 'k', ]
        - action: [MoveFocusOrTab: Left,]
          key: [ Char: 'H', Alt: 'h' ]
        - action: [MoveFocusOrTab: Right,]
          key: [ Char: 'L', Alt: 'l',]
        - action: [MoveFocus: Down,]
          key: [ Char: 'J', Alt: 'j',]
        - action: [MoveFocus: Up,]
          key: [ Char: 'K', Alt: 'k',]
        - action: [FocusPreviousPane,]
          key: [ Char: '[', Alt: '[']
        - action: [FocusNextPane,]
          key: [ Char: ']', Alt: '[']
        - action: [NewPane: Down, SwitchToMode: Locked,]
          key: [Char: '-',]
        - action: [NewPane: Right, SwitchToMode: Locked,]
          key: [Char: '\',]
        - action: [GoToTab: 1,]
          key: [ Char: '1',]
        - action: [GoToTab: 2,]
          key: [ Char: '2',]
        - action: [GoToTab: 3,]
          key: [ Char: '3',]
        - action: [GoToTab: 4,]
          key: [ Char: '4',]
        - action: [GoToTab: 5,]
          key: [ Char: '5',]
        - action: [GoToTab: 6,]
          key: [ Char: '6',]
        - action: [GoToTab: 7,]
          key: [ Char: '7',]
        - action: [GoToTab: 8,]
          key: [ Char: '8',]
        - action: [GoToTab: 9,]
          key: [ Char: '9',]
        - action: [Resize: Increase,]
          key: [ Char: '=']
        - action: [Resize: Increase,]
          key: [ Char: '+']
        - action: [Resize: Decrease,]
          key: [ Char: '-']
        - action: [Resize: Left,]
          key: [Left, ]
        - action: [Resize: Down,]
          key: [Down, ]
        - action: [Resize: Up,]
          key: [ Up, ]
        - action: [Resize: Right,]
          key: [ Right, ]
        - action: [ToggleTab]
          key: [ Char: "\t", Char: 't' ]
        - action: [SwitchToMode: RenamePane, PaneNameInput: [0],]
          key: [Char: 'c']
        - action: [SwitchToMode: RenameTab, TabNameInput: [0],]
          key: [Char: 'C']
        - action: [EditScrollback, SwitchToMode: Locked]
          key: [Char: 'e']
    resize:
        - action: [SwitchToMode: Locked,]
          key: [Ctrl: 'b']
        - action: [SwitchToMode: Pane,]
          key: [Ctrl: 'p',]
        - action: [SwitchToMode: Tab,]
          key: [Ctrl: 't',]
        - action: [SwitchToMode: Locked,]
          key: [Ctrl: 'r', Char: "\n", Char: ' ',]
        - action: [SwitchToMode: Scroll,]
          key: [Ctrl: 's']
        - action: [Quit]
          key: [Ctrl: 'q']
        - action: [Resize: Left,]
          key: [Char: 'h', Left, ]
        - action: [Resize: Down,]
          key: [Char: 'j', Down, ]
        - action: [Resize: Up,]
          key: [Char: 'k', Up, ]
        - action: [Resize: Right,]
          key: [Char: 'l', Right, ]
        - action: [NewPane: ,]
          key: [ Alt: 'n',]
        - action: [MoveFocus: Left,]
          key: [ Alt: 'h', Left,]
        - action: [MoveFocus: Right,]
          key: [ Alt: 'l', Right,]
        - action: [MoveFocus: Down,]
          key: [ Alt: 'j', Down,]
        - action: [MoveFocus: Up,]
          key: [ Alt: 'k', Up,]
        - action: [FocusPreviousPane,]
          key: [ Alt: '[',]
        - action: [FocusNextPane,]
          key: [ Alt: ']',]
    pane:
        - action: [SwitchToMode: Locked,]
          key: [Ctrl: 'b']
        - action: [SwitchToMode: Normal,]
          key: [Ctrl: 'p',]
        - action: [SwitchToMode: Tab,]
          key: [Ctrl: 't',]
        - action: [SwitchToMode: Locked,]
          key: [Ctrl: 'r', Char: "\n", Char: ' ',]
        - action: [SwitchToMode: Scroll,]
          key: [Ctrl: 's']
        - action: [Quit,]
          key: [Ctrl: 'q',]
        - action: [MoveFocus: Left,]
          key: [ Alt: 'h', Left,]
        - action: [MoveFocus: Right,]
          key: [ Alt: 'l', Right,]
        - action: [MoveFocus: Down,]
          key: [ Alt: 'j', Down,]
        - action: [MoveFocus: Up,]
          key: [ Alt: 'k', Up,]
        - action: [SwitchFocus,]
          key: [Char: 'p']
        - action: [NewPane: , SwitchToMode: Locked,]
          key: [Char: 'n', Alt: 'n',]
        - action: [NewPane: ,]
          key: [Char: 'N', ]
        - action: [NewPane: Down, SwitchToMode: Locked,]
          key: [Char: 'd',]
        - action: [NewPane: Right, SwitchToMode: Locked,]
          key: [Char: 'r',]
        - action: [TogglePaneFrames, SwitchToMode: Locked,]
          key: [Char: 'z',]
        - action: [TogglePaneFrames,]
          key: [Char: 'Z',]
        - action: [NewPane: Down,]
          key: [Char: 'D',]
        - action: [NewPane: Right,]
          key: [Char: 'R',]
        - action: [CloseFocus, SwitchToMode: Locked,]
          key: [Char: 'x',]
        - action: [CloseFocus,]
          key: [Char: 'X',]
        - action: [ToggleFocusFullscreen, SwitchToMode: Locked,]
          key: [Char: 'f',]
        - action: [ToggleFocusFullscreen,]
          key: [Char: 'F',]
        - action: [FocusPreviousPane,]
          key: [ Alt: '[',]
        - action: [FocusNextPane,]
          key: [ Alt: ']',]
        - action: [ToggleFocusFullscreen, SwitchToMode: Normal,]
          key: [Char: 'f',]
        - action: [TogglePaneFrames, SwitchToMode: Normal,]
          key: [Char: 'z',]
        - action: [ToggleFloatingPanes, SwitchToMode: Normal,]
          key: [Char: 'w']
        - action: [TogglePaneEmbedOrFloating, SwitchToMode: Normal,]
          key: [Char: 'e']
        - action: [SwitchToMode: RenamePane, PaneNameInput: [0],]
          key: [Char: 'c']
    tab:
        - action: [SwitchToMode: Normal,]
          key: [Ctrl: 't']
        - action: [SwitchToMode: Pane,]
          key: [Ctrl: 'p',]
        - action: [SwitchToMode: Locked,]
          key: [Ctrl: 'b', Char: "\n", Char: ' ',]
        - action: [SwitchToMode: Scroll,]
          key: [Ctrl: 's']
        - action: [SwitchToMode: RenameTab, TabNameInput: [0],]
          key: [Char: 'r']
        - action: [Quit,]
          key: [Ctrl: 'q',]
        - action: [FocusPreviousPane,]
          key: [ Alt: '[',]
        - action: [FocusNextPane,]
          key: [ Alt: ']',]
        - action: [GoToPreviousTab,]
          key: [ Char: 'h',]
        - action: [GoToNextTab,]
          key: [ Char: 'l',]
        - action: [GoToNextTab,]
          key: [ Char: 'j',]
        - action: [GoToPreviousTab,]
          key: [ Char: 'k',]
        - action: [NewTab: ]
          key: [ Char: 'n',]
        - action: [CloseTab,]
          key: [ Char: 'x',]
        - action: [MoveFocus: Left,]
          key: [ Alt: 'h',]
        - action: [MoveFocus: Right,]
          key: [ Alt: 'l',]
        - action: [MoveFocus: Down,]
          key: [ Alt: 'j',]
        - action: [MoveFocus: Up,]
          key: [ Alt: 'k',]
        - action: [GoToTab: 1,]
          key: [ Char: '1',]
        - action: [GoToTab: 2,]
          key: [ Char: '2',]
        - action: [GoToTab: 3,]
          key: [ Char: '3',]
        - action: [GoToTab: 4,]
          key: [ Char: '4',]
        - action: [GoToTab: 5,]
          key: [ Char: '5',]
        - action: [GoToTab: 6,]
          key: [ Char: '6',]
        - action: [GoToTab: 7,]
          key: [ Char: '7',]
        - action: [GoToTab: 8,]
          key: [ Char: '8',]
        - action: [GoToTab: 9,]
          key: [ Char: '9',]
    scroll:
        - action: [SwitchToMode: Locked,]
          key: [Ctrl: 'r', Ctrl: 's', Char: ' ',
          Char: "\n",]
        - action: [SwitchToMode: Tab,]
          key: [Ctrl: 't',]
        - action: [SwitchToMode: Normal,]
          key: [Ctrl: 's',]
        - action: [SwitchToMode: Pane,]
          key: [Ctrl: 'p',]
        - action: [Quit,]
          key: [Ctrl: 'q',]
        - action: [ScrollDown,]
          key: [Char: 'j', Down,]
        - action: [ScrollUp,]
          key: [Char: 'k', Up,]
        - action: [PageScrollDown,]
          key: [Ctrl: 'f', PageDown,]
        - action: [PageScrollUp,]
          key: [Ctrl: 'b', PageUp,]
        - action: [NewPane: ,]
          key: [ Alt: 'n',]
        - action: [MoveFocus: Left,]
          key: [ Alt: 'h',]
        - action: [MoveFocus: Right,]
          key: [ Alt: 'l',]
        - action: [MoveFocus: Down,]
          key: [ Alt: 'j',]
        - action: [MoveFocus: Up,]
          key: [ Alt: 'k',]
        - action: [FocusPreviousPane,]
          key: [ Alt: '[',]
        - action: [FocusNextPane,]
          key: [ Alt: ']',]
        - action: [EditScrollback, SwitchToMode: Locked]
          key: [Char: 'e']
    renametab:
        - action: [SwitchToMode: Normal,]
          key: [Ctrl: 'r']
        - action: [SwitchToMode: Locked,]
          key: [Ctrl: 'b', Ctrl: 's', Char: ' ',]
        - action: [SwitchToMode: Tab,]
          key: [Char: "\n",]
        - action: [TabNameInput: [27] , SwitchToMode: Tab,]
          key: [Esc,]
        - action: [NewPane: ,]
          key: [ Alt: 'n',]
        - action: [MoveFocus: Left,]
          key: [ Alt: 'h',]
        - action: [MoveFocus: Right,]
          key: [ Alt: 'l',]
        - action: [MoveFocus: Down,]
          key: [ Alt: 'j',]
        - action: [MoveFocus: Up,]
          key: [ Alt: 'k',]
        - action: [FocusPreviousPane,]
          key: [ Alt: '[',]
        - action: [FocusNextPane,]
          key: [ Alt: ']',]
    renamepane:
        - action: [SwitchToMode: Normal,]
          key: [Char: "\n", Ctrl: 'c', Esc]
        - action: [PaneNameInput: [27] , SwitchToMode: Pane,]
          key: [Esc,]
        - action: [NewPane: ,]
          key: [ Alt: 'n',]
        - action: [MoveFocus: Left,]
          key: [ Alt: 'h',]
        - action: [MoveFocus: Right,]
          key: [ Alt: 'l',]
        - action: [MoveFocus: Down,]
          key: [ Alt: 'j',]
        - action: [MoveFocus: Up,]
          key: [ Alt: 'k',]
        - action: [FocusPreviousPane,]
          key: [ Alt: '[',]
        - action: [FocusNextPane,]
          key: [ Alt: ']',]
        - action: [Resize: Increase,]
          key: [ Alt: '=']
        - action: [Resize: Increase,]
          key: [ Alt: '+']
        - action: [Resize: Decrease,]
          key: [ Alt: '-']
    session:
        - action: [SwitchToMode: Normal,]
          key: [Ctrl: 'o']
        - action: [SwitchToMode: Resize,]
          key: [Ctrl: 'r',]
        - action: [SwitchToMode: Pane,]
          key: [Ctrl: 'p',]
        - action: [SwitchToMode: Tab,]
          key: [Ctrl: 't',]
        - action: [SwitchToMode: Locked,]
          key: [Ctrl: 'b', Char: "\n", Char: ' ',]
        - action: [SwitchToMode: Scroll,]
          key: [Ctrl: 's']
        - action: [Quit,]
          key: [Ctrl: 'q',]
        - action: [Detach,]
          key: [Char: 'd',]
Themes
Please see the up-to-date documentation for the most recent features.
Color
You can specify a color theme, that will be picked up by zellij in the following way:
themes:
  default:
    fg: [0,0,0]
    bg: [0,0,0]
    black: [0,0,0]
    red: [0,0,0]
    green: [0,0,0]
    yellow: [0,0,0]
    blue: [0,0,0]
    magenta: [0,0,0]
    cyan: [0,0,0]
    white: [0,0,0]
    orange: [0,0,0]
for truecolor, or:
themes:
  default:
    fg: 0
    bg: 0
    black: 0
    red: 0
    green: 0
    yellow: 0
    blue: 0
    magenta: 0
    cyan: 0
    white: 0
    orange: 0
for 256 color, or you can use hexdecimal color:
themes:
  default:
    fg: "#000000"
    bg: "#000000"
    black: "#000000"
    red: "#000000"
    green: "#000000"
    yellow: "#000000"
    blue: "#000000"
    magenta: "#000000"
    cyan: "#000000"
    white: "#000000"
    orange: "#000000"
If the theme is called default, then zellij will pick it on startup.
To specify a different theme, run zellij with:
zellij options --theme [NAME]
or put the name in the configuration file with theme: [NAME] as follows:
keybinds:
  ...

# Choose the theme that is specified in the themes section.
theme: default

themes:
  default:
    fg: #000000
    ...
or If you don't want to modify the configuration file, just add a theme, you can use the themes directory.
themes is located in CONFIG_DIR/themes by default. You can check it through zellij setup --check.
If you place the theme file in this folder, zelij will automatically merge the themes.
And you can set the theme through the options (options --theme) as in the first method.
Here are some example themes.
UI
Certain non-color aspects of Zellij's interface can also be customized.
Rounded Pane Corners
If your font has support for rounded corners (most do), then you can enable them by adding the following to your configuration file:
ui:
  pane_frames:
    rounded_corners: true
Zellij should pick up this change automatically next time the config is loaded.
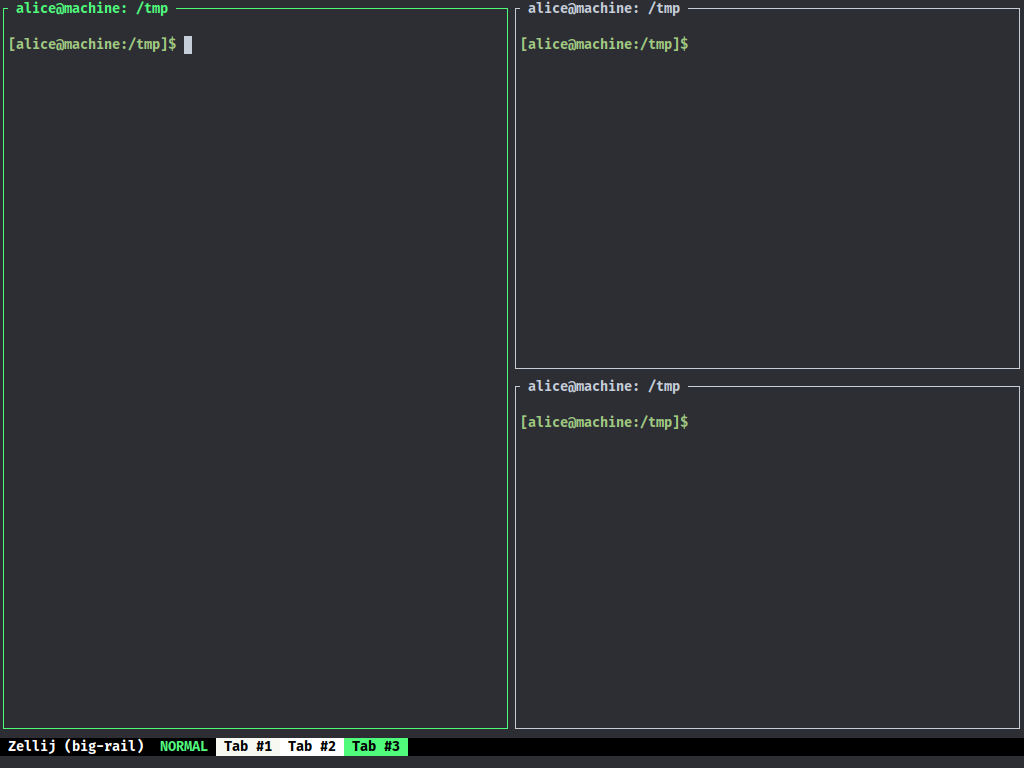
Theme Gallery
Please see the up-to-date documentation for the most recent features.
This page showcases the example themes that are included inside of the main zellij repository.
Dracula
More Dracula

Gruvbox Dark

More Gruvbox Dark

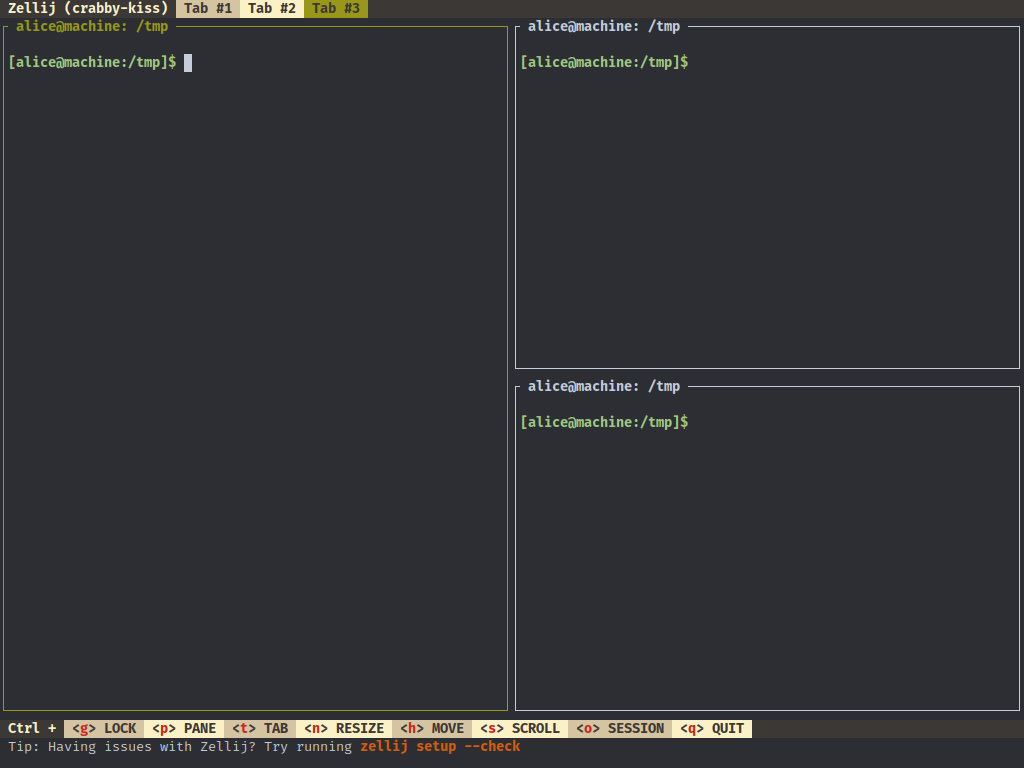
Gruvbox Light
More Gruvbox Light
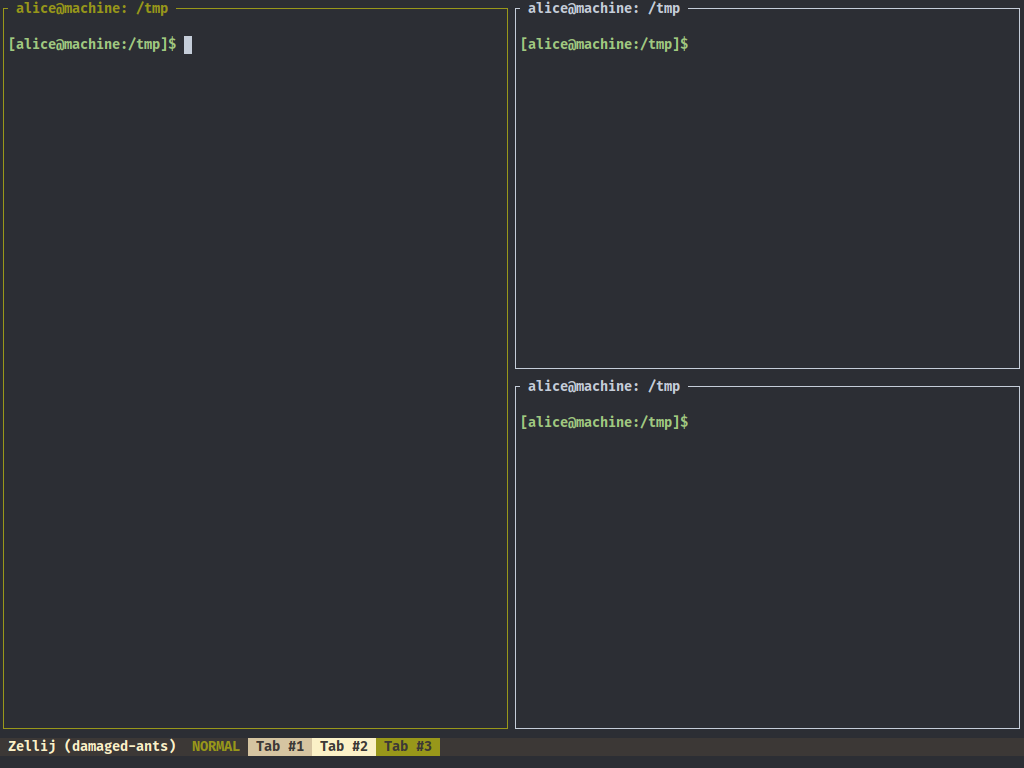
Molokai Dark
More Molokai Dark
Nord
More Nord

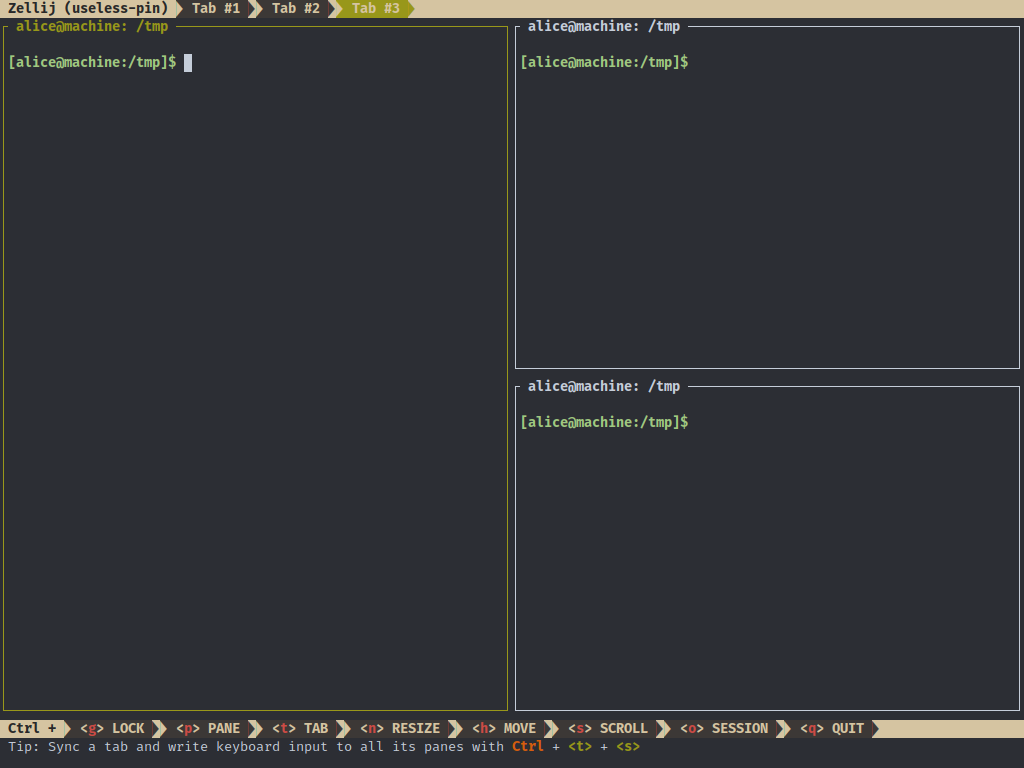
One Half Dark
More One Half Dark

Solarized Dark
More Solarized Dark


Tokyo Night
More Tokyo Night
Tokyo Night Light

More Tokyo Night Light
Tokyo Night Storm
More Tokyo Night Storm
Actions
Please see the up-to-date documentation for the most recent features.
These are the actions that can be assigned to key sequences when configuring keybindings.
Or that can be invoked by the zellij action command.
Quit
Quit Zellij.
Detach
Detach from the currently running Zellij session.
MovePane: <Direction>
Move the currently focused pane in a direction.
SwitchToMode: <InputMode>
Switch to the specified input mode.
The mode should be capitalized, eg. SwitchToMode: Normal.
Note that there's a "hidden" mode called RenameTab which can be used in order to trigger the renaming of a tab.
Resize: <Direction>
Resize focused pane in the specified direction.
Direction should be one of Left, Right, Up, Down, Increase, or Decrease.
Example: Resize: Down
FocusNextPane
Switch focus to next pane to the right or below if on screen edge.
FocusPreviousPane
Switch focus to next pane to the left or above if on screen edge.
SwitchFocus
Switch focus to pane with the next ID (this is mostly left around for legacy support, FocusNextPane or FocusPreviousPane should be preferred).
MoveFocus: <Direction>
Move focus to the pane with the greatest overlap with the current pane in the specified direction.
Direction should be one of Left, Right, Up or Down.
eg. MoveFocus: Left
ScrollUp
Scroll up 1 line inside the focused pane.
ScrollDown
Scroll down 1 line inside the focused pane.
PageScrollUp
Scroll up one page in the focused pane.
PageScrollDown
Scroll down one page in the focused pane.
ToggleFocusFullscreen
Toggle between fullscreen focus pane and normal layout.
TogglePaneFrames
Toggle between pane frames and normal layout.
ToggleActiveSyncTab
Toggle between sending text commands to all panes on the current tab and just the focused pane.
ToggleTab
Switch between the most recently used tabs.
ToggleFloatingPanes
Toggle between floating, and embedded panes.
TogglePaneEmbedOrFloating
Toggle a specific pane between floating, and embedded mode.
NewPane: <Direction>
Open a new pane in the specified direction (relative to focus).
If no direction is specified, will try to use the biggest available space.
Direction should be one of Left, Right, Up or Down.
Specifying no direction should be done by introducing a space character (this is a bug and should be fixed).
eg. NewPane: Left or NewPane:
CloseFocus
Close the focused pane.
NewTab: <TabLayout>
Create a new tab. Optionally with the provided tab-layout.
Example:
NewTab:
or
NewTab: {
  direction: Vertical,
  parts: [
  direction: Vertical,
  direction: Horizontal,
  ],}
a slightly more expansive example:
        - action: [
          NewTab: {
  name: "a new tab",
  parts: [
    {direction: Vertical, parts: [ pane_name: "testing", pane_name: "building" ]},
    {pane_name: "I should have focus", focus: true},
  ],},
        ]
          key: [ Char: '7',]
GoToNextTab
Go to the next tab.
GoToPreviousTab
Go to the previous tab.
CloseTab
Close the current tab.
GoToTab: <index>
Go to the tab of the specified index.
Run: {cmd: <path>}
Run the specified command in a new pane. A comma separated list of arguments, or the split direction is optional:
Run: {cmd: <path>, args: [ARGS], direction: <direction>}
Write: [bytes]
Write the specified bytes in the focused pane.
WriteChars: <characters>
Write the specified characters in the focused pane.
DumpScreen: <path>
Dump the scrollback of the currently selected pane inside of a selected file.
EditScrollback
Edit the scrollback buffer inside of your specified $EDITOR, or $VISUAL.
Layouts
Please see the up-to-date documentation for the most recent features.
Layouts are yaml configuration files which Zellij can load on startup. These files can describe a layout of terminal panes and plugins that Zellij will create when it loads. To load a layout with Zellij:
zellij --layout /path/to/your/layout_file.yaml
By default Zellij will load the default.yaml layout, that is found in the
layouts directory (by default a subdirectory of the config
directory [config/layouts]). Falling back to an internal default layout,
if not found.
Layouts residing in the default directory can be accessed as follows:
zellij --layout [layout_name]
The difference being: if a path (either absolute or relative) is supplied to --layout, it will load the layout from that path. If a bare name is supplied, it will load a built-in layout from the default directory.
Example
This file:
---
tabs:
  - direction: Vertical
    parts:
      - direction: Horizontal
        parts:
          - direction: Vertical
          - direction: Vertical
      - direction: Horizontal
Will instruct Zellij to create this layout:
┌─────┬─────┐
│     │     │
├─────┤     │
│     │     │
└─────┴─────┘
Creating a layout file
A layout file is a nested tree structure.
Each node describes either a pane, or a space in which its parts (children) will be created.
The layout file is divided in to two sections: templates and tabs.
The templates describe the structure of the layout and what part of the ui
should be tab agnostic.
The tabs describe which part of the layout should be tab specific.
For this mechanism the templates make use of an extra attribute called body,
if it is specified each single tab will be inserted in to the template and then
started by zellij.
parts: <layout>
Layouts are composed through the optional parts section, if a layout has a non empty parts section
it is a node that is split up into these respective parts.
Example:
parts:
  - direction: Vertical
  - direction: Vertical
Each node has the following fields:
direction: Horizontal / Vertical
If the node has children, they will be created as splits in this direction.
split_size: Percent: <1-100> / Fixed: <lines/columns>
This indicates either a percentage of the node's parent's space or a fixed size of columns/rows from its parent's space. By default the splits are proportional.
Example:
parts:
  - direction: Vertical
    split_size:
      Percent: 50
  - direction: Vertical
    split_size:
      Percent: 50
run: plugin: <plugin> / command: <command>
This is an optional instruction to either run a command, or a plugin. If indicated, instead of loading the default shell in a terminal pane, the run action will be executed.
plugin: </path/to/plugin.wasm>
This is an optional path to a compiled Zellij plugin.
If indicated, instead of loading a terminal, this plugin will be loaded.
For more information, please see the plugin documentation of this guide.
In case the plugin resides in the plugin directory, specifying the name of the plugin is sufficient.
Example:
run:
  plugin:
    location: "zellij:status-bar"
    _allow_exec_host_cmd: false # Optional and false by default
For more information, please see the plugin documentation of this guide.
The _allow_exec_host_cmd is preliminary and allows plugins to run commands
on the host system, if the plugins need that functionality the user can opt in
to it.
command: {cmd: <path/to/command> , args: <optional-arguments> }
This is an optional path to a command. If indicated, instead of loading a pane with the default shell, this command will be executed. Optionally it's arguments can be passed as a vector of strings.
Example:
run:
  command: {cmd: htop, args: ["-C"]}
This can be used to open a pane in a specified directory by making use of your shell's command flag and cd path/to/directory && <shell>. The following command is only for zsh. It may work for other shells, but it is not guaranteed. Check your shell's documentation for how to use the command flag.
Example:
run:
  command: { cmd: zsh, args: ["-c", "cd ~/Documents/code/zellij && zsh"] }
name: <name-of-the-tab>
This is an optional command that can be used to name the tab in the tab layout
section.
Example:
tabs:
  - name: "<name-of-the-tab>"
This is currently limited to the tabs section.
session: <session-configuration>
This is an optional configuration option that can be used to modify the session behavior of the layout.
Current options include:
session:
  name: "zellij" # a string, that names the session
  attach: true # default `true`. If session exists, re-attach.
Example:
session:
  name: "zellij"
Adding this to the layout would name the session zellij and upon loading
the layout again will try to attach to an existing session that is called
zellij.
If the attach configuration is false, then zellij will show an error
message on trying to create the layout, if the layout name already exists.
focus: <bool>
This is an optional configuration option that can be used to specify the initial focus of
the tab or pane.
This option is not set by default. So, every tab and pane basically
focus the first target.
Example one:
tabs:
- direction: Vertical
- direction: Vertical
  focus: true # focus second tab.
  parts:
  - direction: Vertical
    split_size:
      Percent: 50
  - direction: Vertical
    focus: true # focus right pane.
    split_size:
      Percent: 50
If the option is duplicated, the first declared focus has priority.
This applies to both tab and pane.
Example two:
tabs:
- direction: Vertical
  focus: true # [duplicated] focus first tab.
- direction: Vertical
  focus: true # [duplicated] ignored.
  parts:
  - direction: Vertical
    split_size:
      Percent: 50
  - direction: Vertical
    focus: true # focus right pane.
    split_size:
      Percent: 50
- direction: Vertical
configuration
The layout supports all the configuration options from the Configuration page.
If an option is specified in a layout, it has precedence over the config file itself.
Example:
default_shell: fish
Further examples
Please take a look at the default layouts that come with Zellij, or the layouts that reside in the example directory for more complete layouts.
Layout Templates
Please see the up-to-date documentation for the most recent features.
The templates section of the layout file describes the structure of the layout. To understand how it works let us look at the default layout a little bit closer.
zellij setup --dump-layout default:
---
template:
  direction: Horizontal
  parts:
    - direction: Vertical  # part 1
      borderless: true
      split_size:
        Fixed: 1
      run:
        plugin:
          location: "zellij:tab-bar"
    - direction: Vertical # part 2
      body: true
    - direction: Vertical # part 3
      borderless: true
      split_size:
        Fixed: 2
      run:
        plugin:
          location: "zellij:status-bar"
The default layout consists of three parts. The plugin tab-bar (part 1), a body (part 2) and the status-bar plugin (part 3).
Since the tabs section is empty, a default pane will be inserted in to the
body section
Let us now use the default layout and build upon it:
---
template:
direction: Horizontal
parts:
- direction: Vertical # part 1
borderless: true
split_size:
Fixed: 1
run:
plugin:
location: "zellij:tab-bar"
- direction: Vertical # part 2
body: true
- direction: Vertical # part 3
borderless: true
split_size:
Fixed: 2
run:
plugin:
location: "zellij:status-bar"
tabs:
- name: "tab 1" # tab 1
- name: "tab 2" # tab 2
direction: Vertical
parts:
- direction: Horizontal
- direction: Horizontal
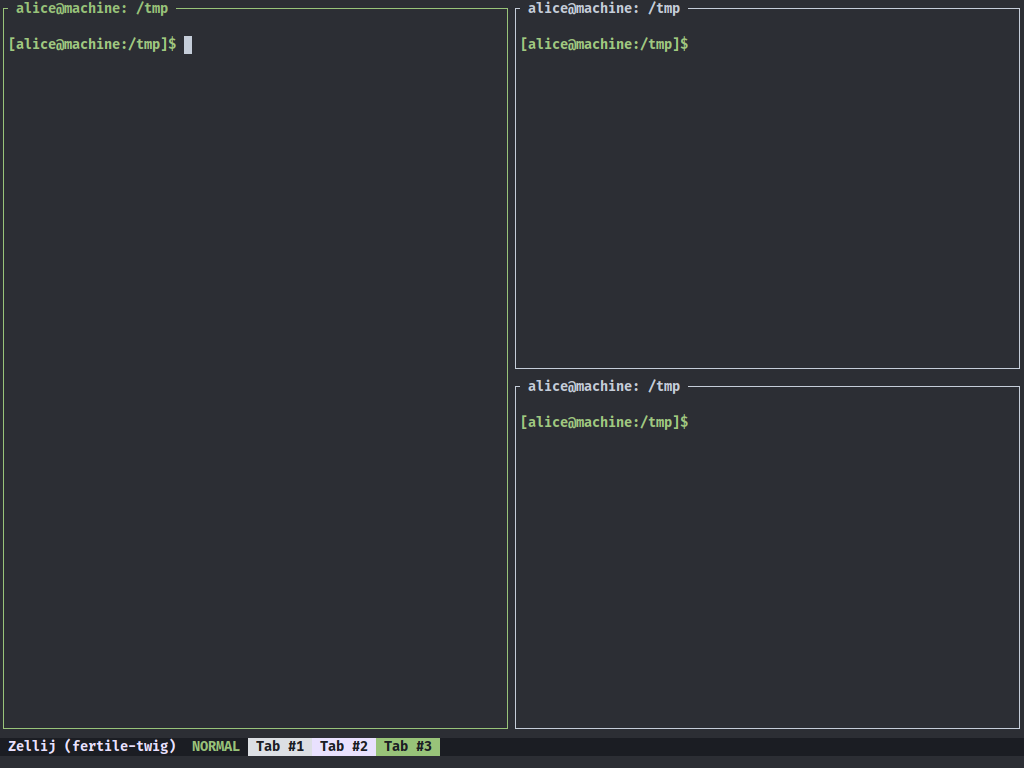
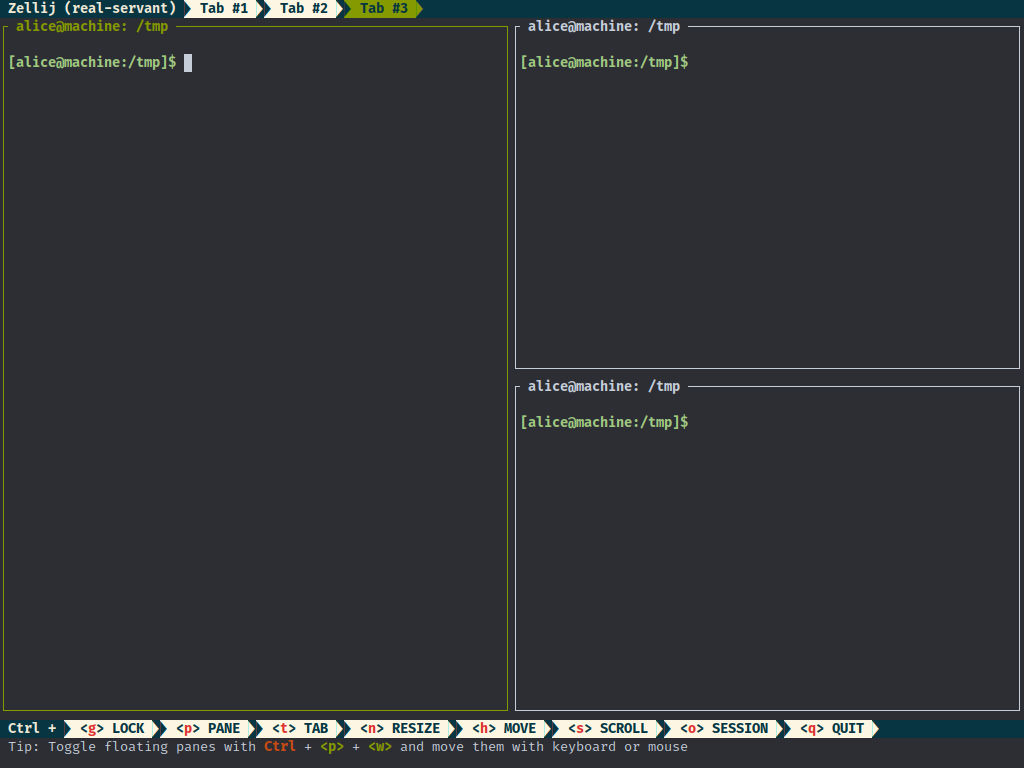
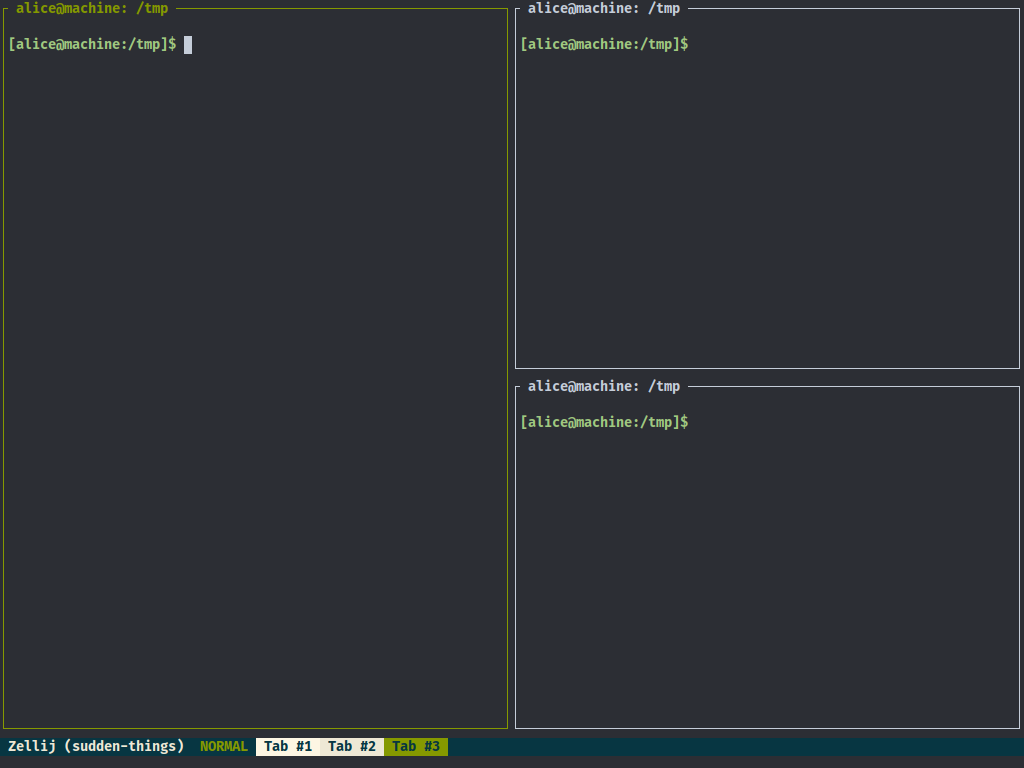
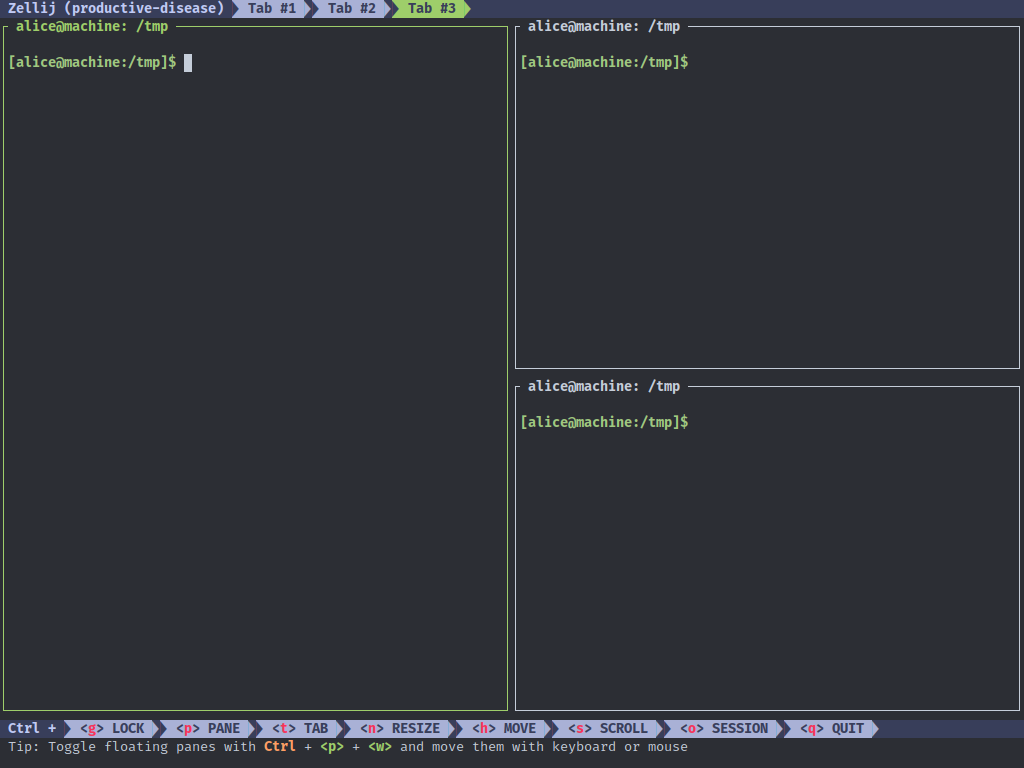
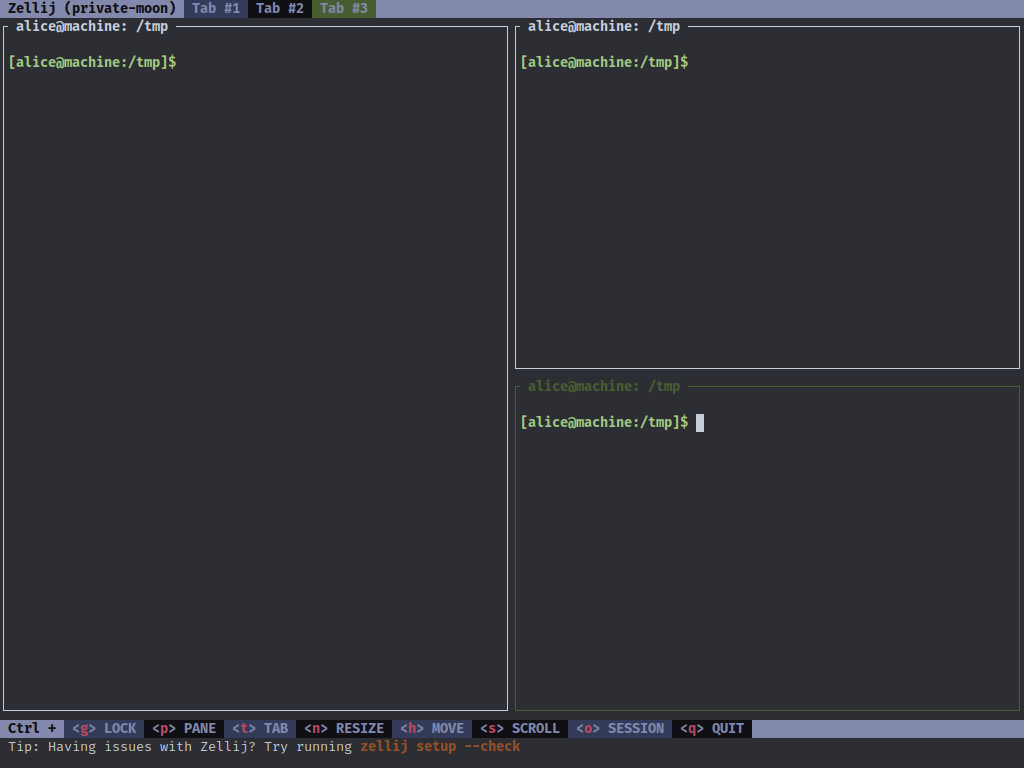
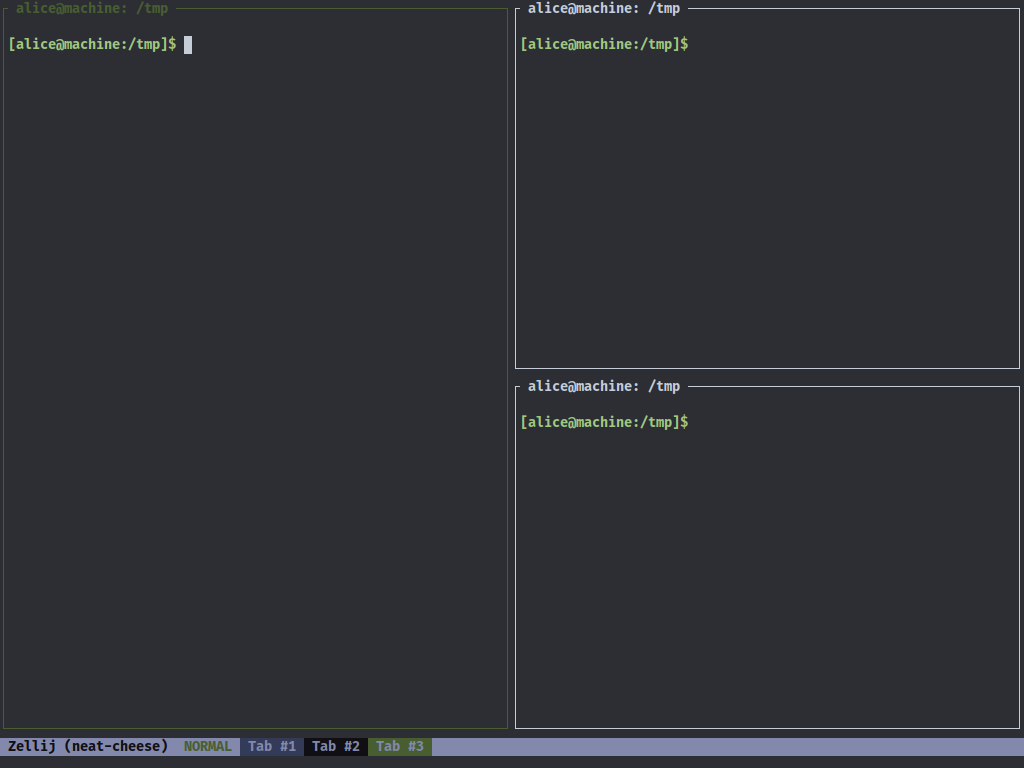
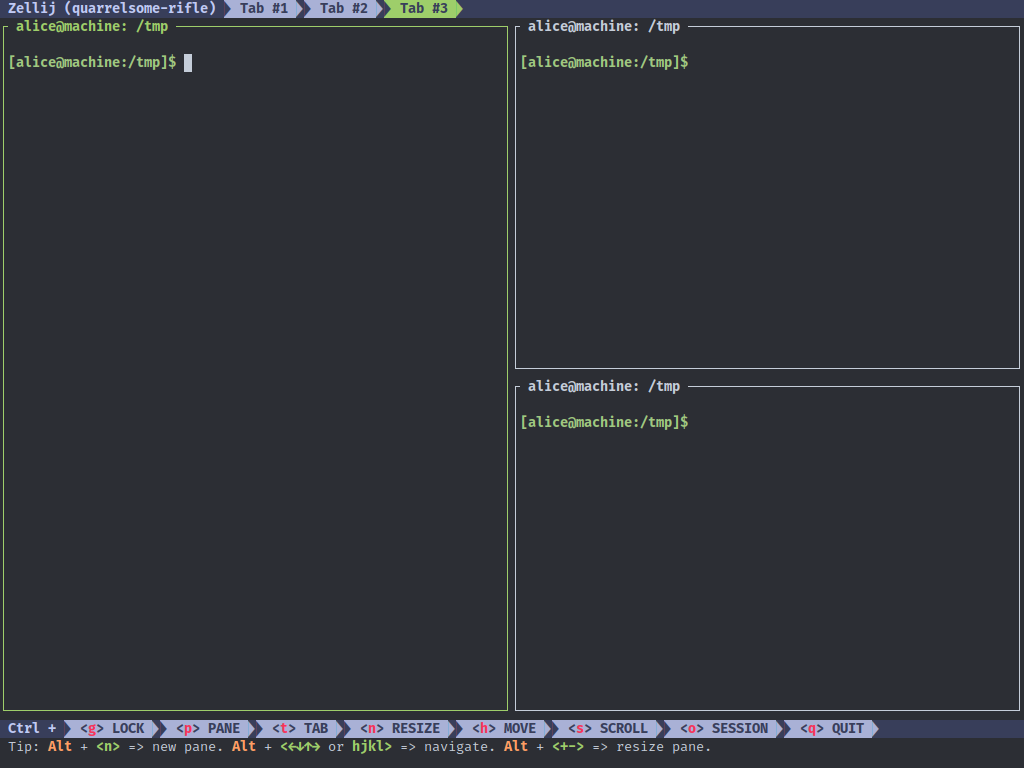
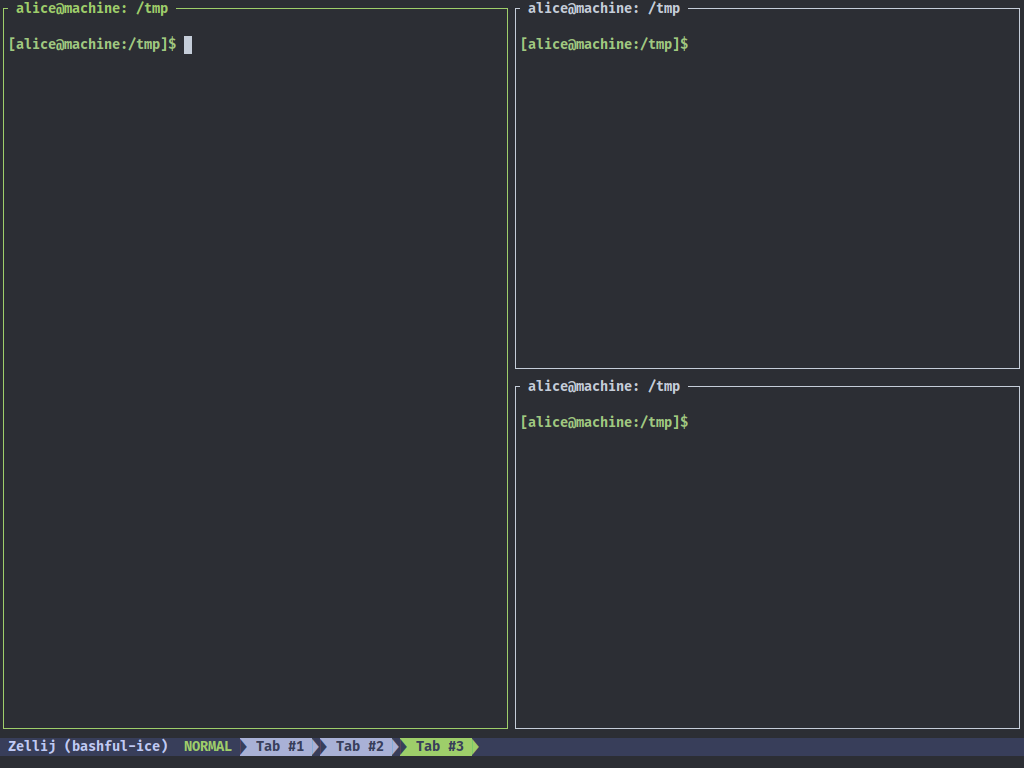
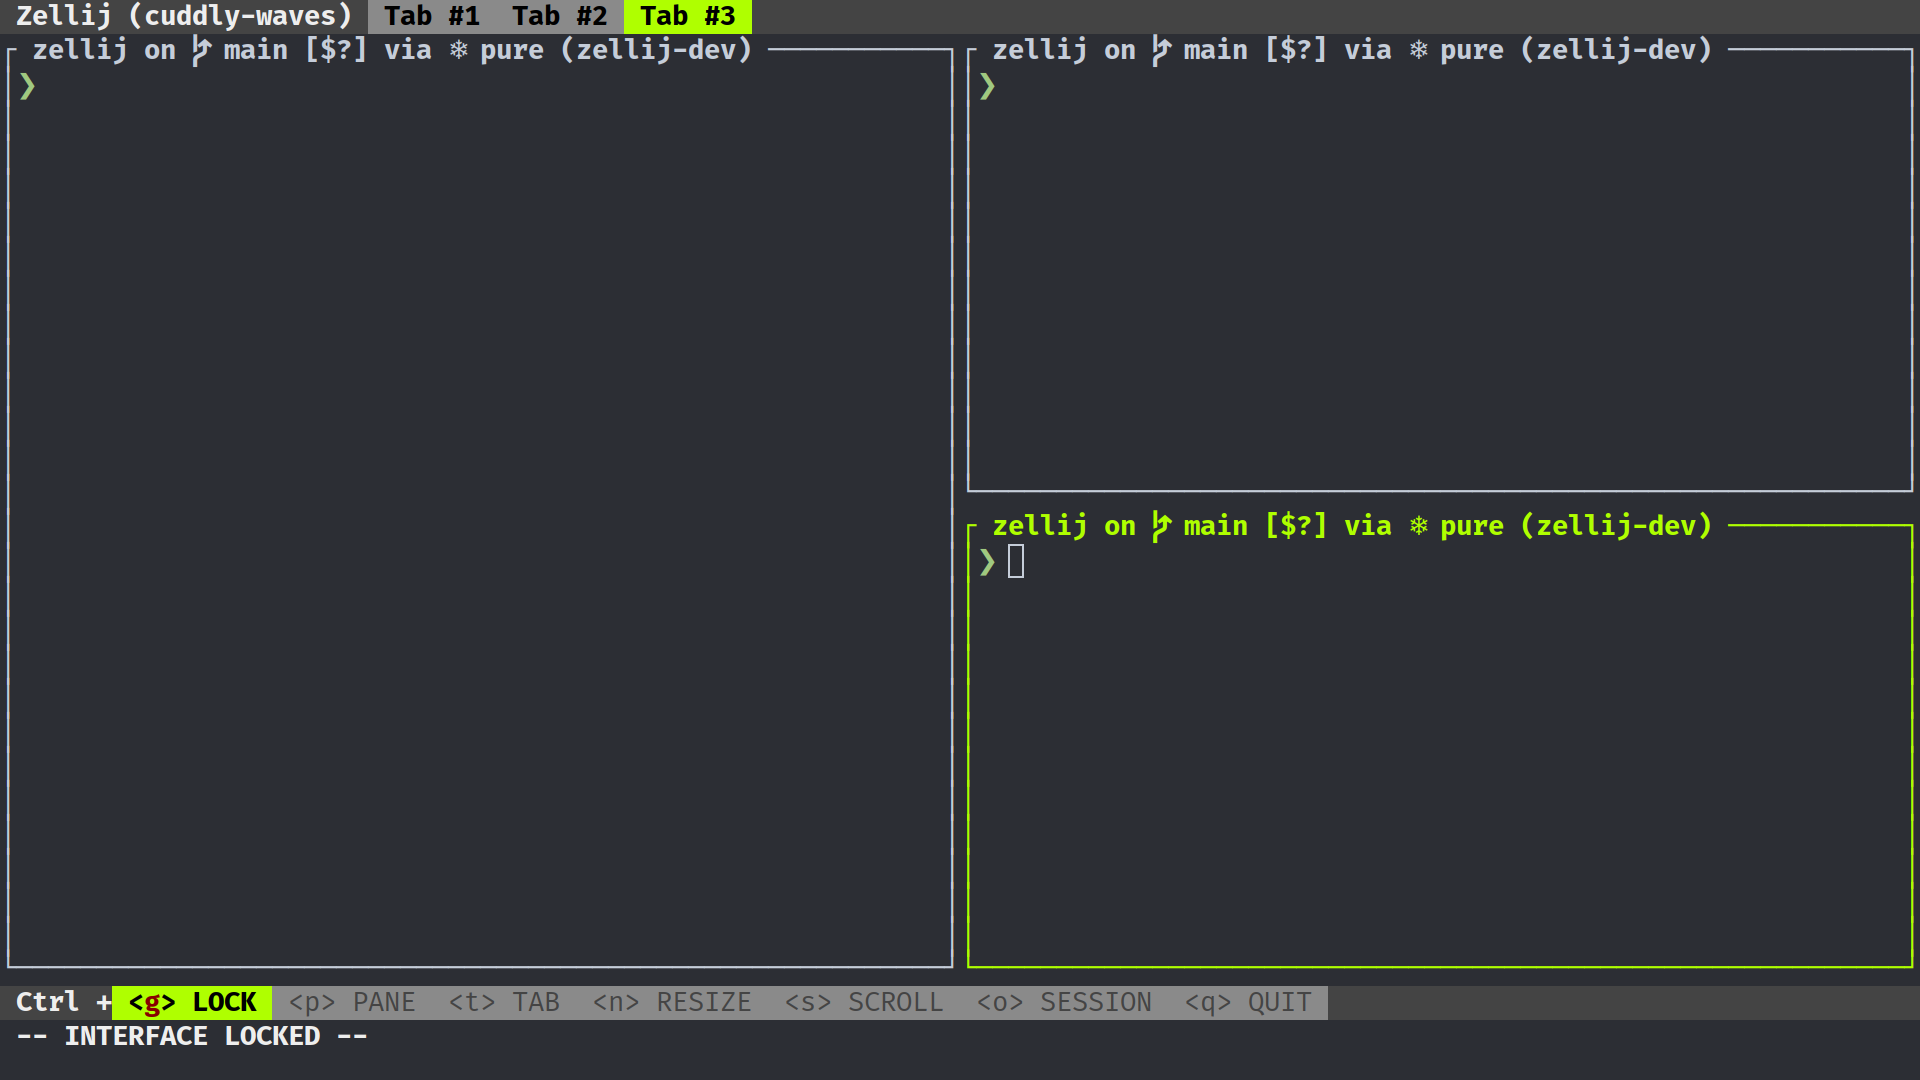
- name: "tab 3" # tab 3
direction: Vertical
parts:
- direction: Horizontal
- direction: Horizontal
parts:
- direction: Horizontal
- direction: Vertical
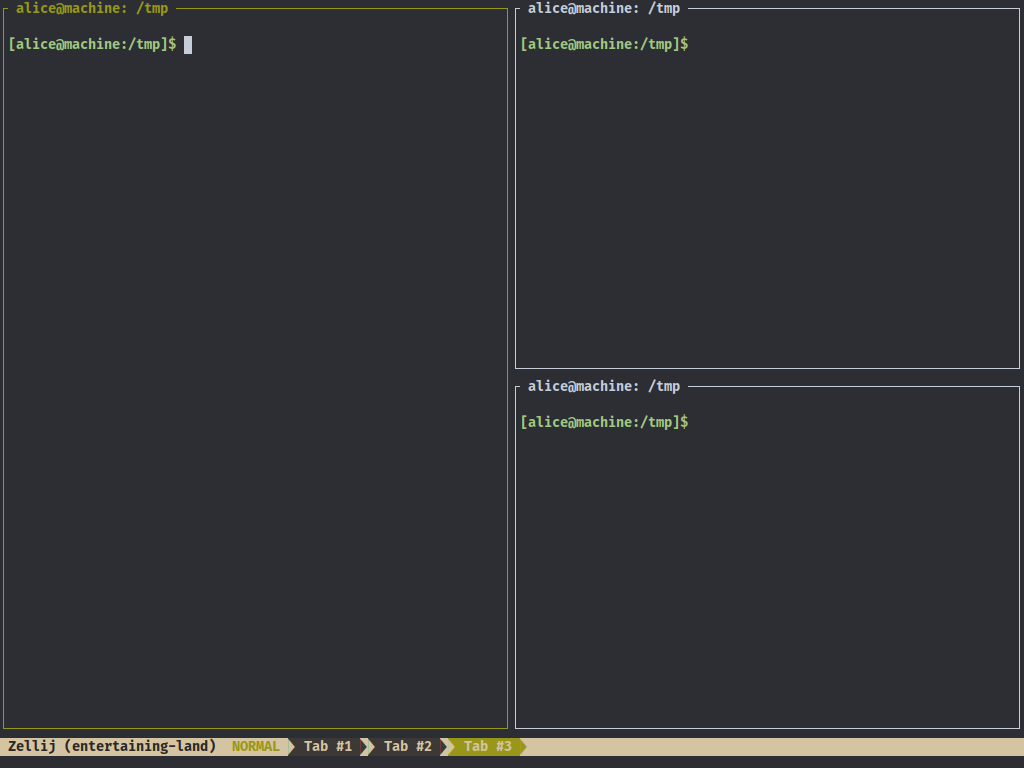
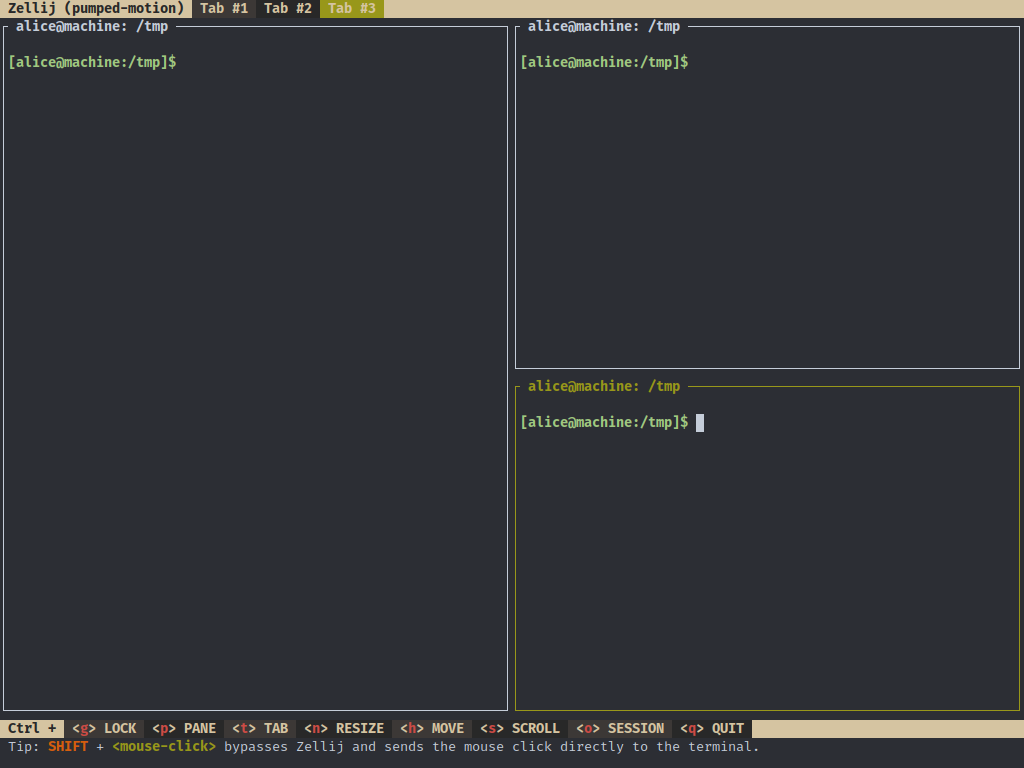
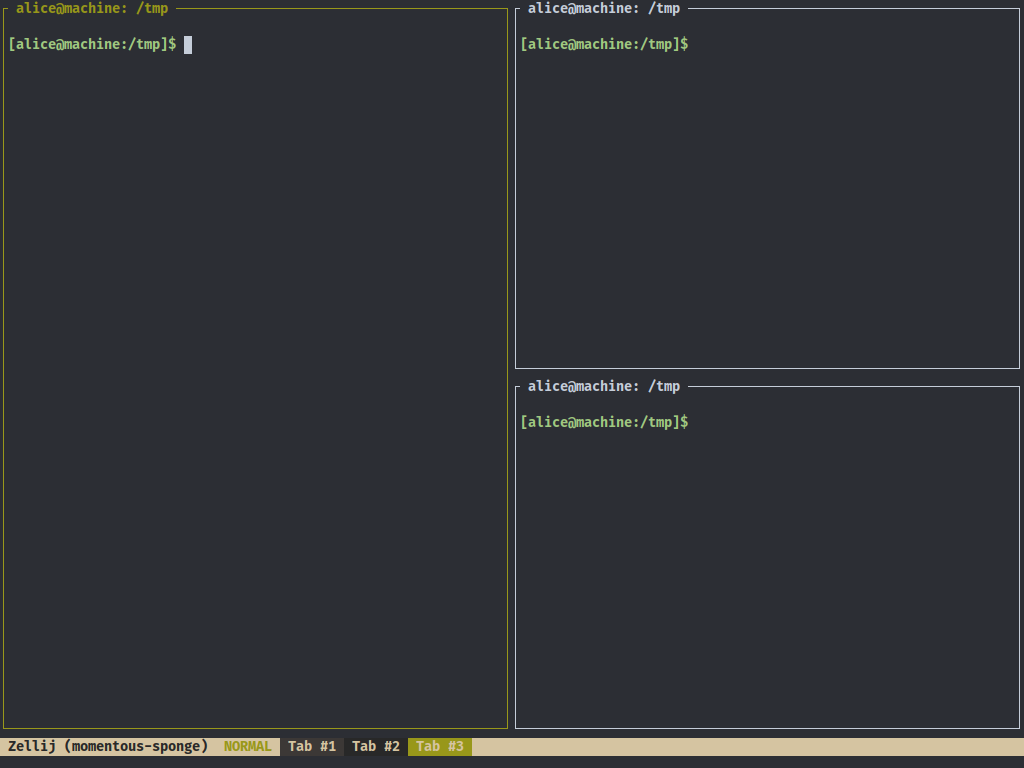
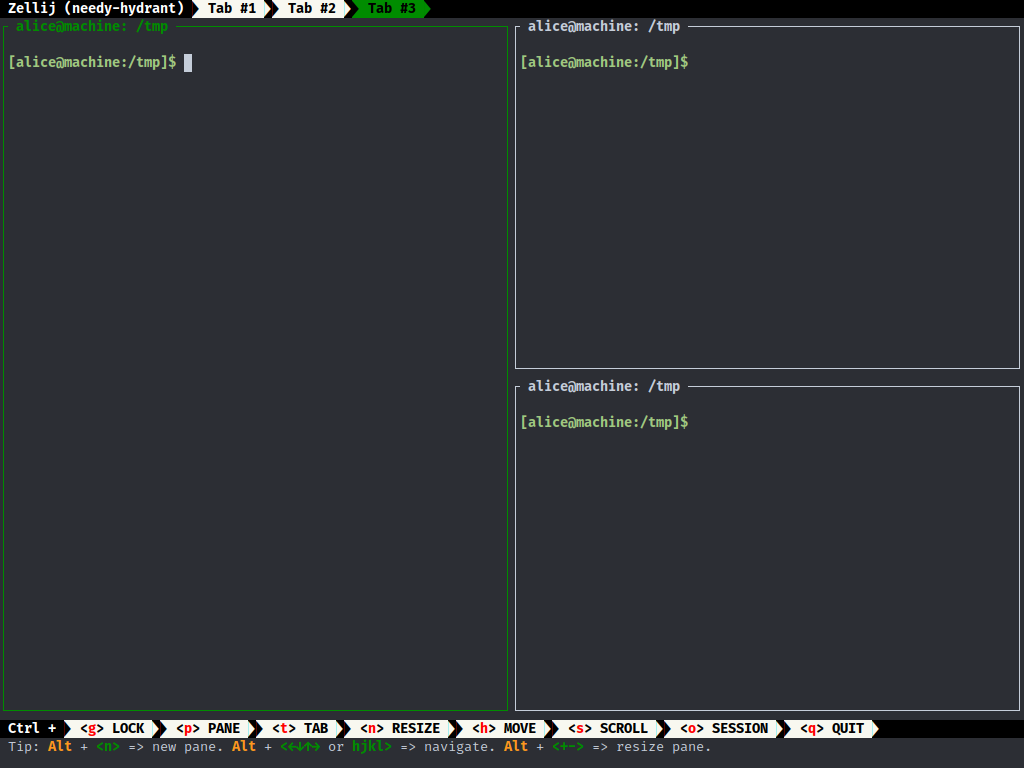
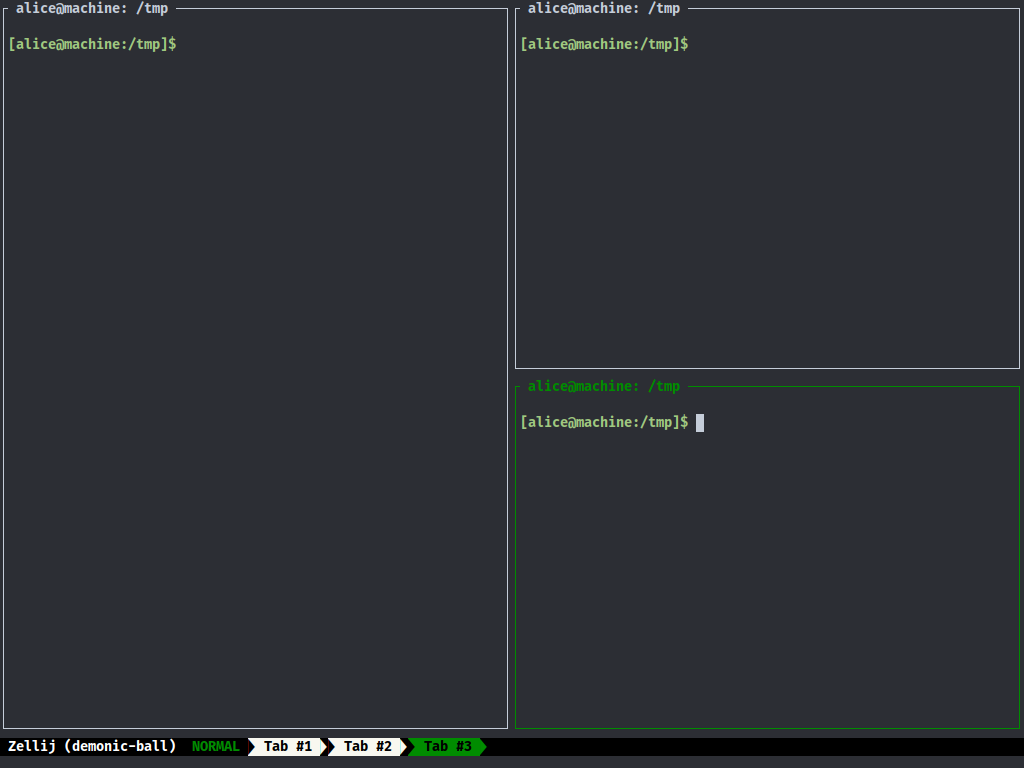
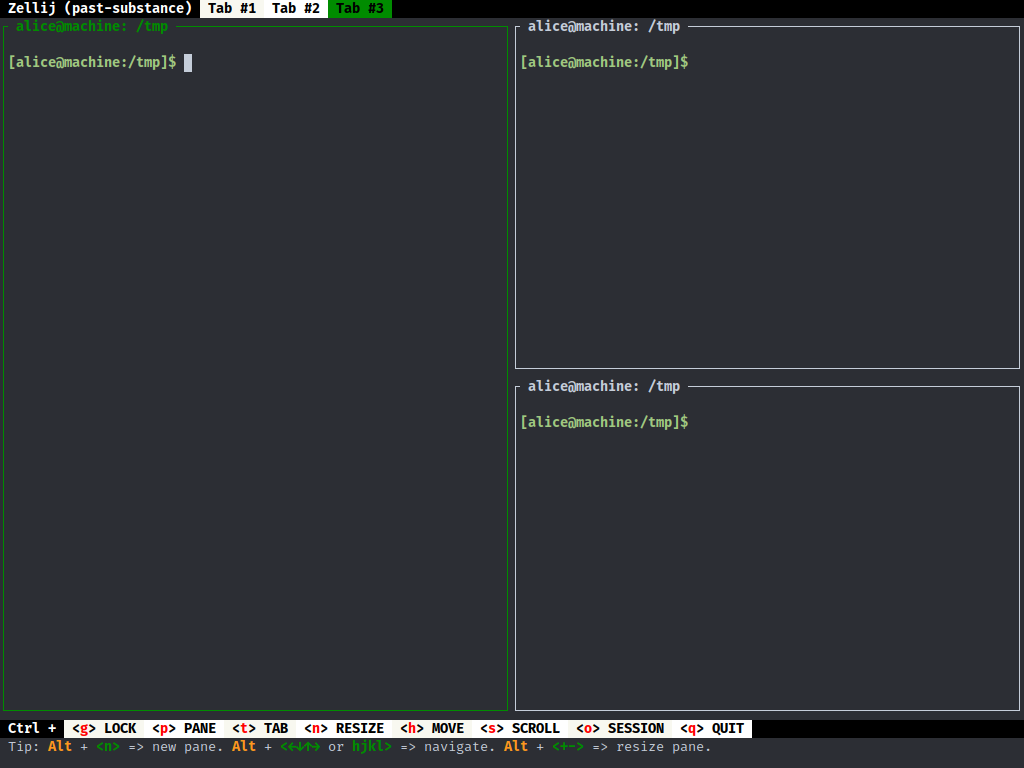
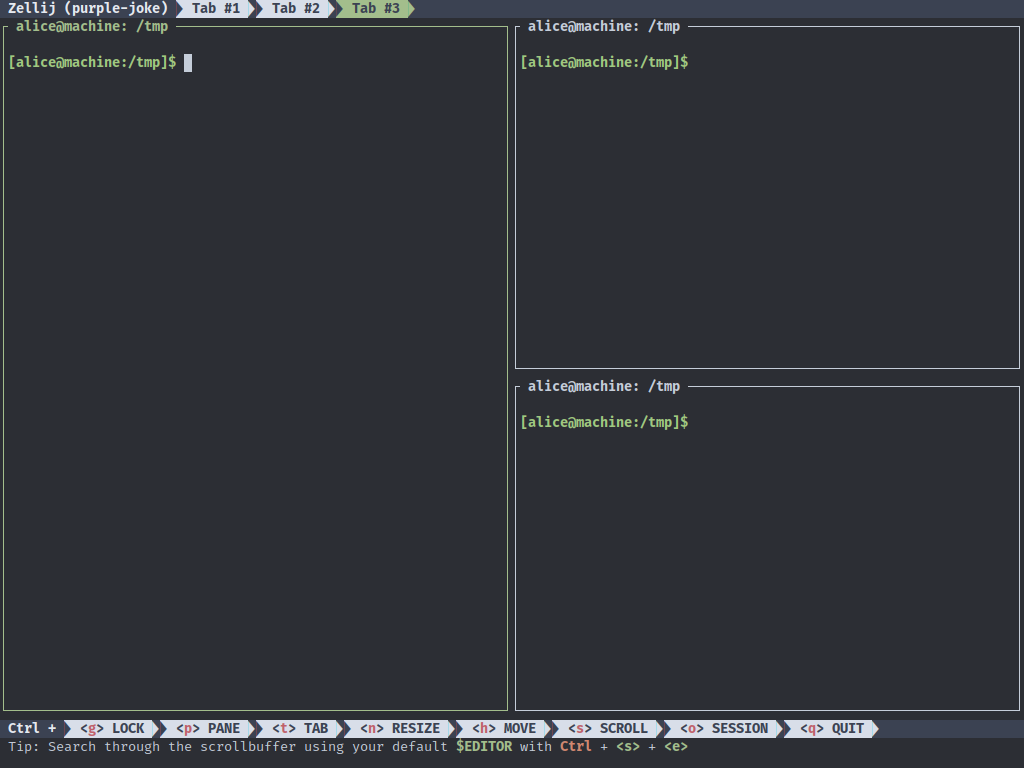
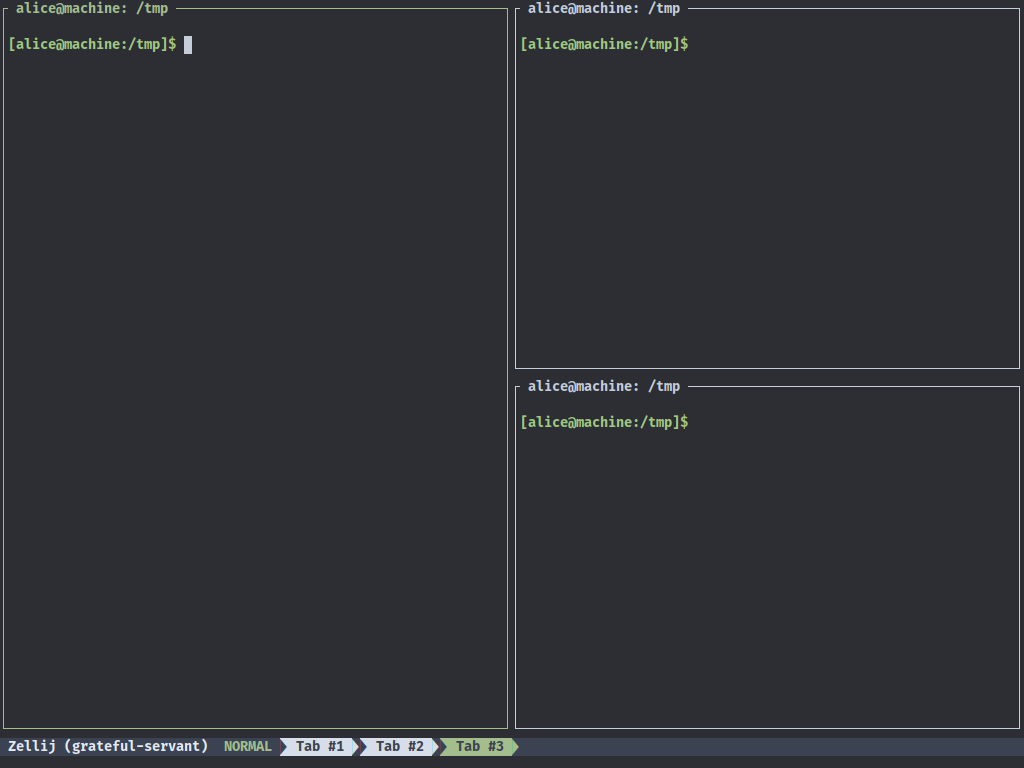
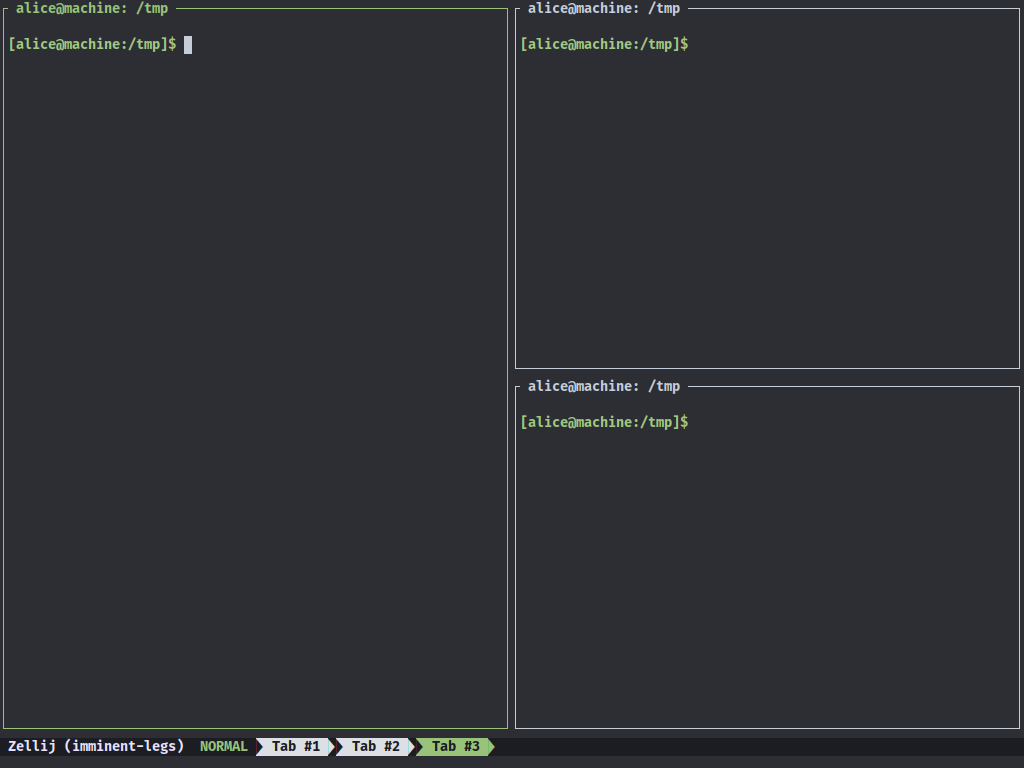
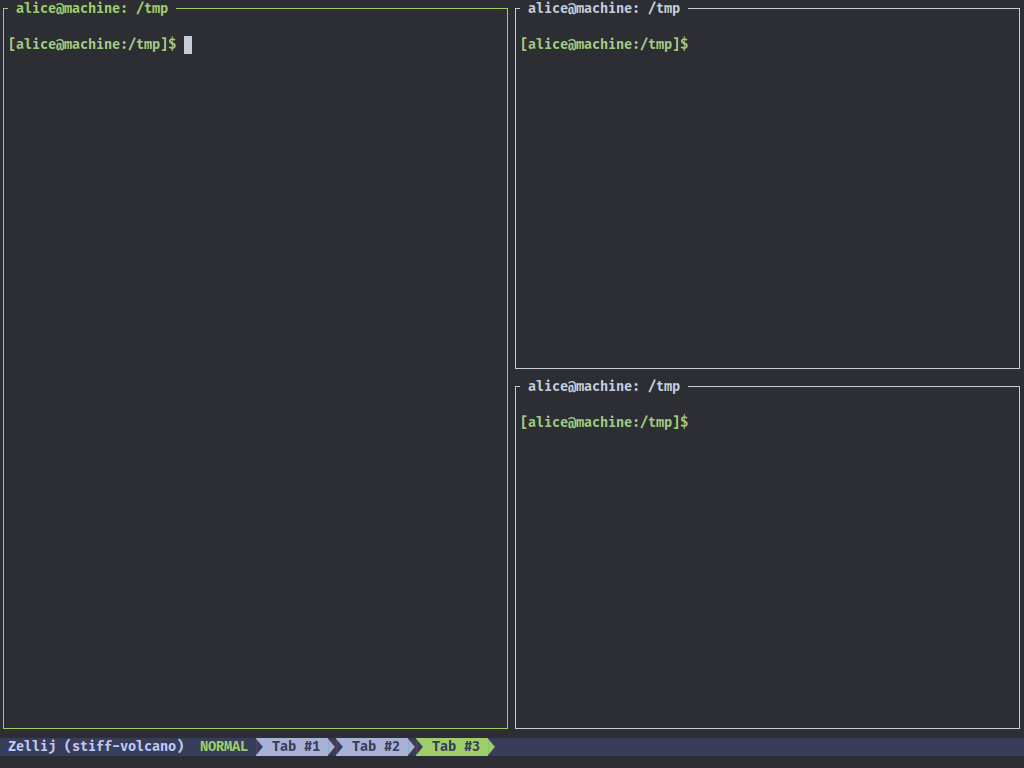
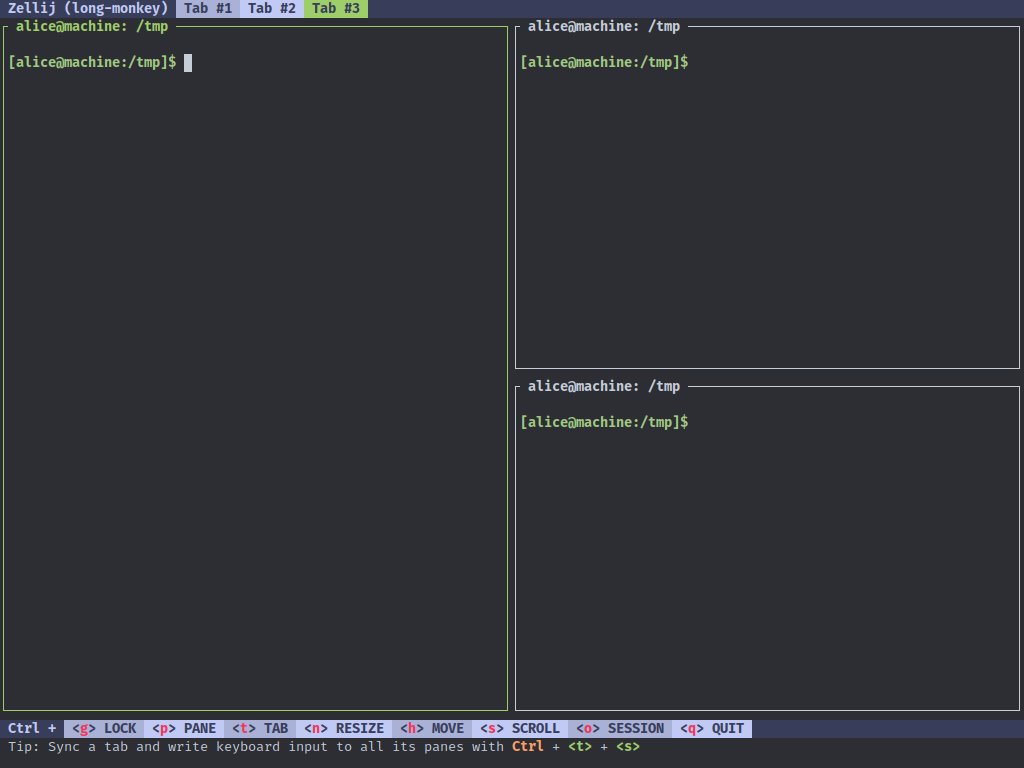
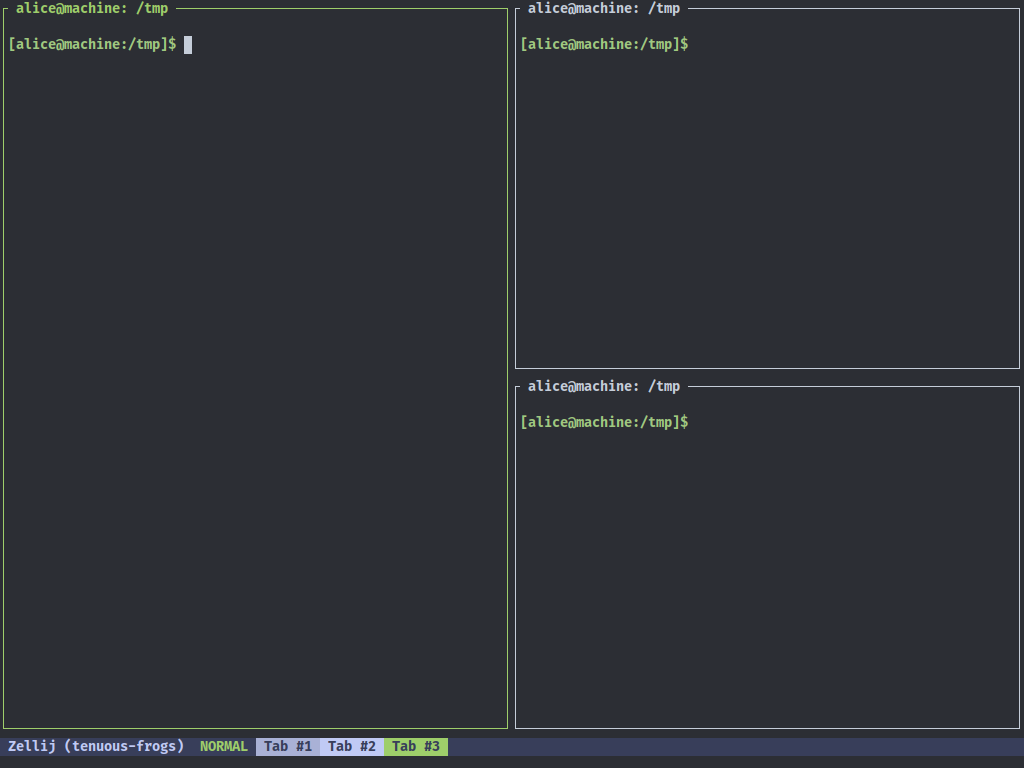
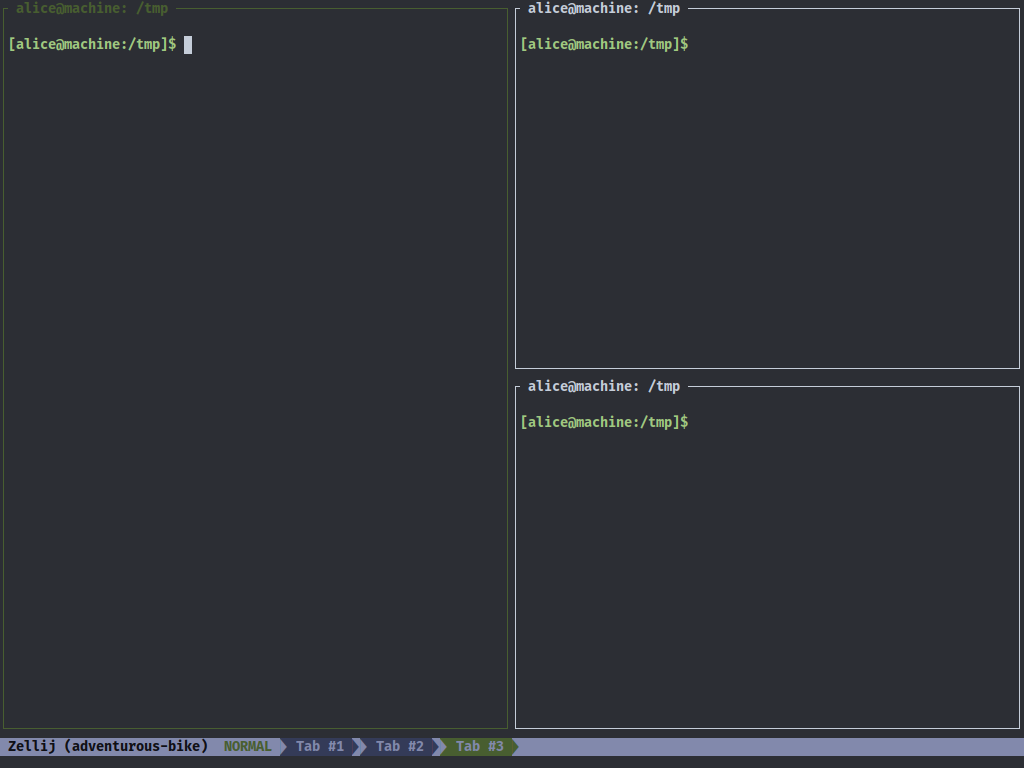
This layout will create the following tabs upon loading.
Tab 1:
 Tab 2:
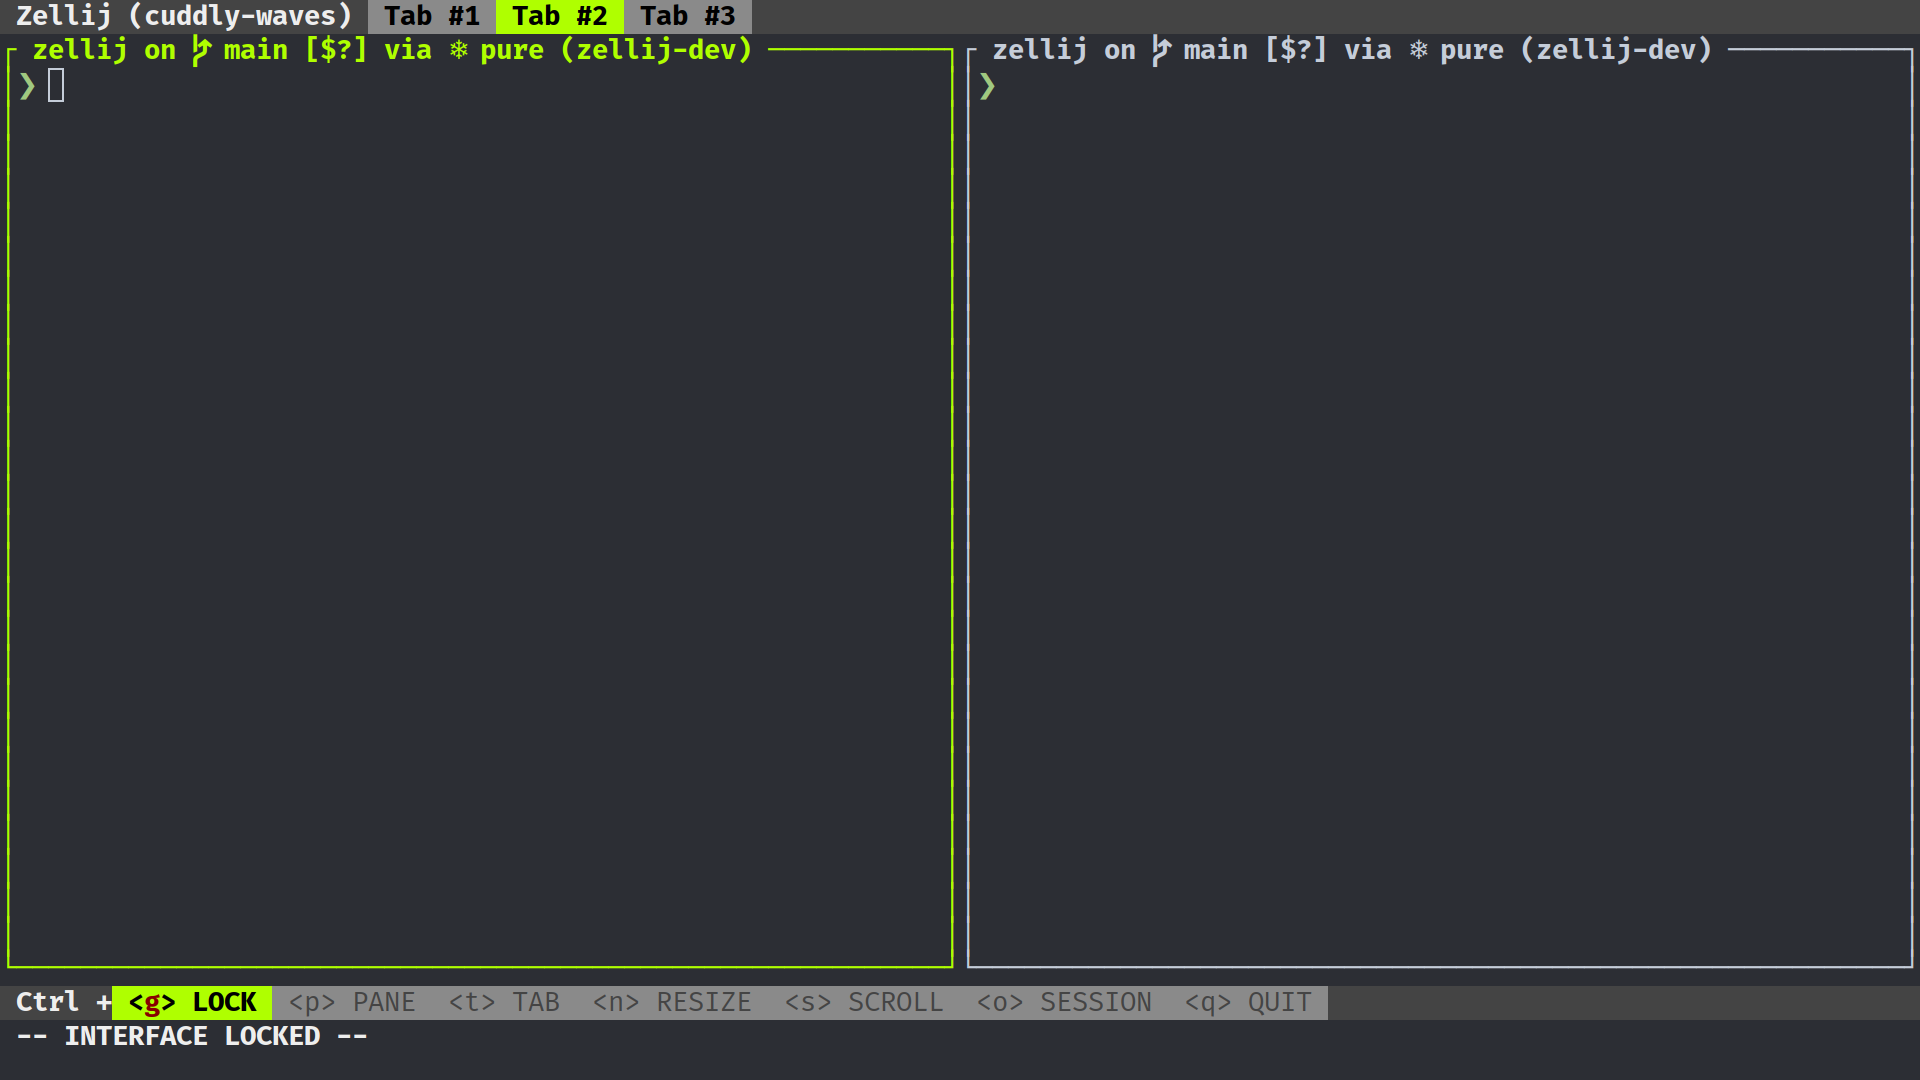 Tab 3:
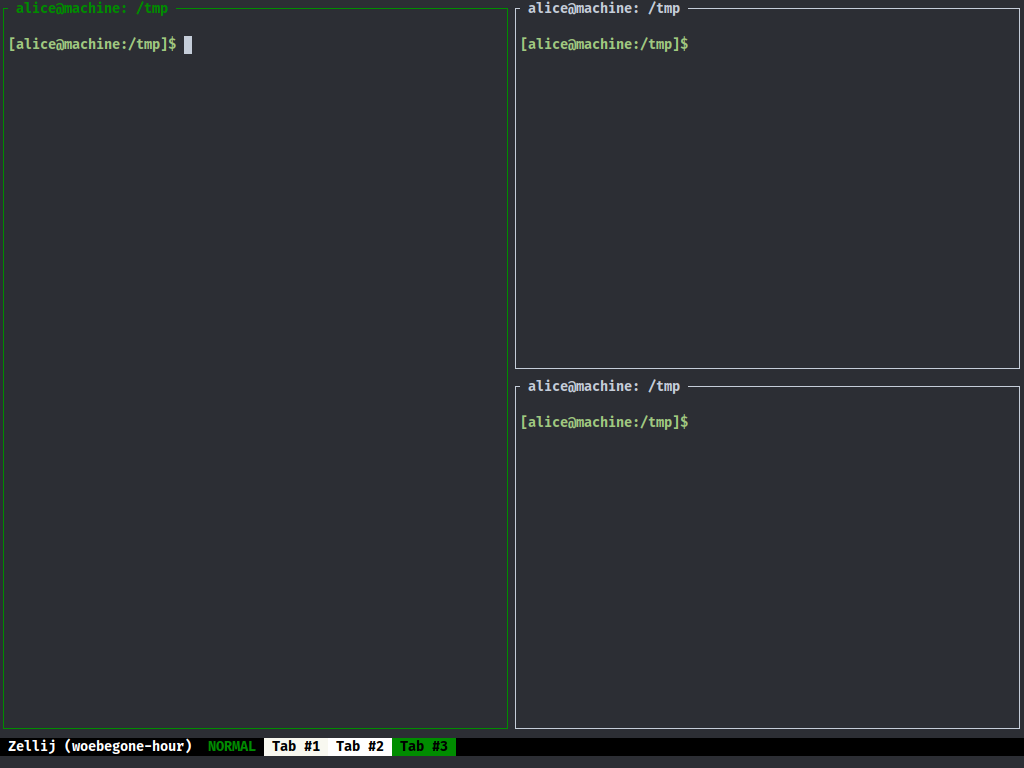
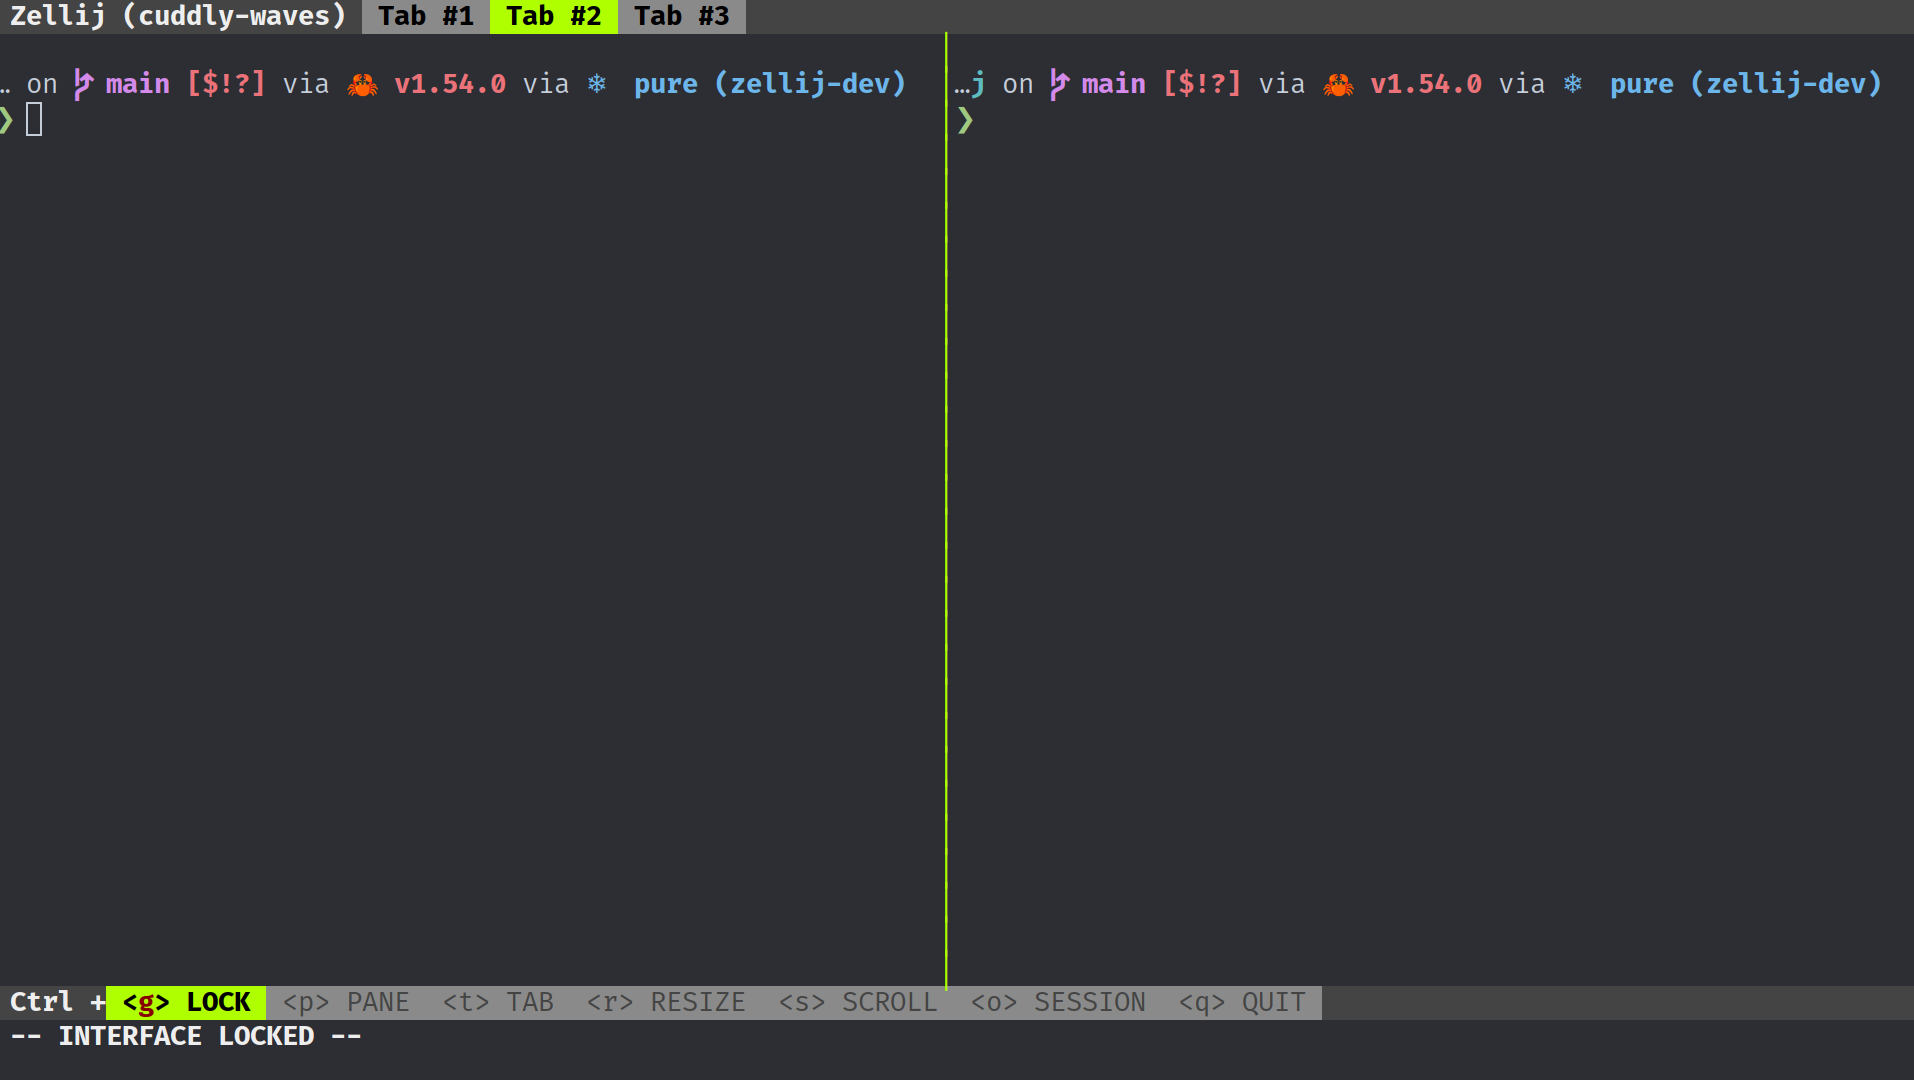
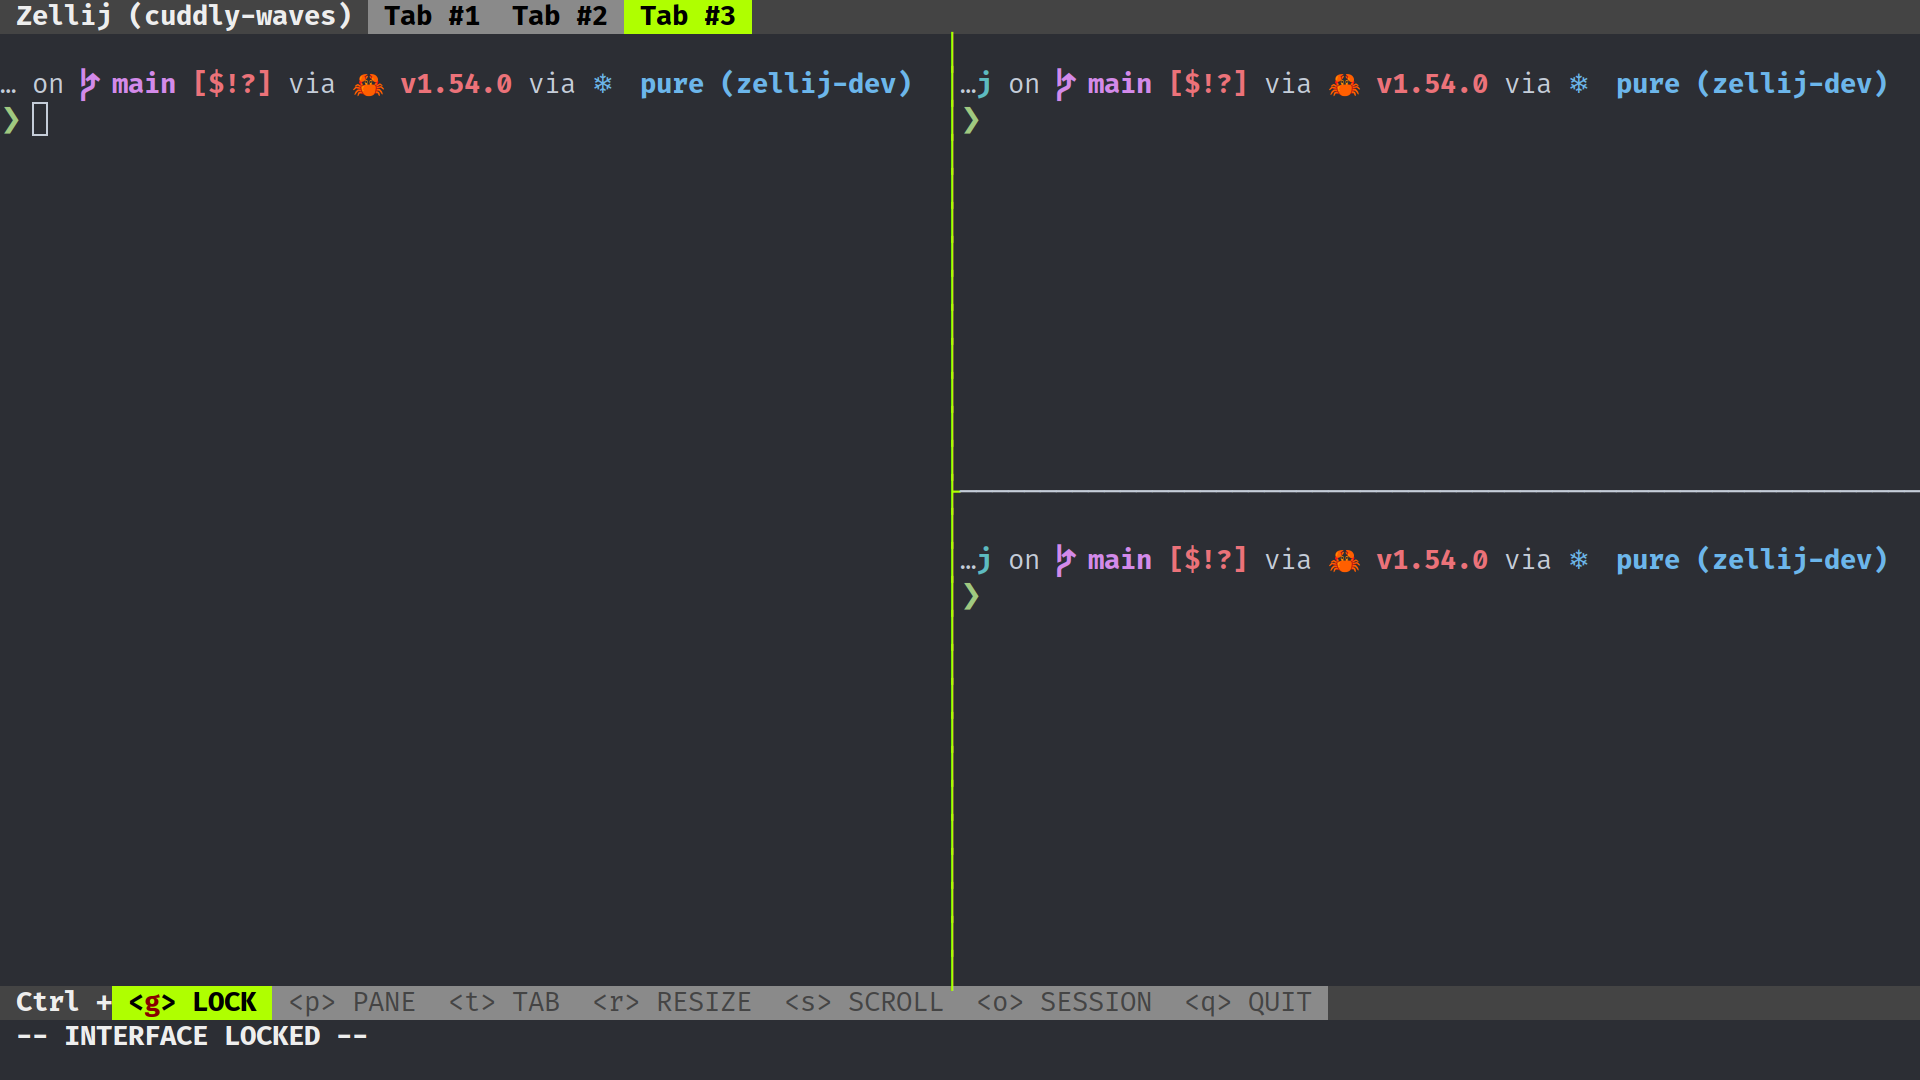
This is how the tabs would look like with pane frames disabled.
Tab 1:
 Tab 2:
 Tab 3:
Plugins
Please see the up-to-date documentation for the most recent features.
One feature that makes Zellij unique is its WebAssembly plugin system. This allows plugin developers to write their plugin in any language that can run on WASI! Rust offers first-class support for WASI, but other languages like C/C++, AssemblyScript, even Python should be supported.
Disclaimer: The API for plugins is very much a work in progress. Don't be shy to request new features on our tracking issue!
Plugin Overview
Please see the up-to-date documentation for the most recent features.
This is a small list of default plugins that zellij ships with:
This is an overview of zellij plugins, please do keep in mind that they are not necessarily connected to zellij maintainers:
- zellij-pomodoro-plugin
- z-tab-bar: a tmux-like tab-bar.
- zellij-compact-status: a compact status bar.
Developing a Plugin
Please see the up-to-date documentation for the most recent features.
Currently we have a complete guide for developing plugins in Rust and in Zig. We plan to add more guides for other languages in the future. If you are feeling particularly brave, you can try to write plugins in another language today! The Other Languages section will get you started.
Writing a Plugin in Rust
Please see the up-to-date documentation for the most recent features.
Writing a Zellij plugin in Rust is incredibly easy thanks to Rust's first-class support for WebAssembly and the simple zellij-tile scaffolding library. This guide will walk through implementing the rust-plugin-example, a simple event logger that records mode-changes within Zellij.
Getting Started
Installing Rust & Zellij
First things first, to develop a plugin in Rust, you'll need Rust installed! The easiest way to do this is by using rustup.
Once you have Rust and Cargo installed, getting the latest version of Zellij is as easy as running:
cargo install zellij
You'll also want to add the installed binary to your path!
Cloning The Template Repository
To streamline the development experience, we provide a template repository that contains everything you need to get started quickly!
You can use a tool called cargo-generate to fill in a couple of the gaps automatically:
# First install `cargo-generate`
cargo install cargo-generate
# Then clone the rust-plugin template
cargo generate --git https://github.com/zellij-org/rust-plugin-template.git --name mode-logger
cd mode-logger
The Basic Structure of a Rust Plugin
After cloning the template repository, you should have a directory that looks a little bit like this:
.
├── .cargo
│   └── config.toml
├── Cargo.toml
├── plugin.yaml
├── README.md
└── src
    └── main.rs
.cargo/config.toml
[build]
target = "wasm32-wasi"
This file specifies a default target for our project. In this case, the correct WASI target is wasm32-wasi.
Cargo.toml
[package]
name = "mode-logger"
version = "0.1.0"
authors = ["Brooks J Rady <b.j.rady@gmail.com>"]
edition = "2018"

[dependencies]
zellij-tile = "1.0.0"
This is a quite standard package file that cargo-generate has partially filled in for us. Note the dependency on zellij-tile which provides some helpful functionality for avoiding boilerplate and writing unsafe code.
plugin.yaml
---
direction: Horizontal
parts:
  - direction: Vertical
    split_size:
      Fixed: 1
    plugin: tab-bar
  - direction: Vertical
    plugin: target/wasm32-wasi/debug/mode-logger.wasm
  - direction: Vertical
    split_size:
      Fixed: 2
    plugin: status-bar
This is a Zellij Layout that loads a mostly default instance of Zellij, but with the middle terminal pane replaced by the plugin being developed. The plugin: target/wasm32-wasi/debug/mode-logger.wasm line should point Zellij to the development version of our plugin.
There will likely be a better way of loading plugins in the future, but custom Layouts are currently the only way to do so.
src/main.rs
use zellij_tile::prelude::*;

#[derive(Default)]
struct State;

register_plugin!(State);

impl ZellijPlugin for State {
    fn load(&mut self) {}

    fn update(&mut self, event: Event) {}

    fn render(&mut self, rows: usize, cols: usize) {}
}
When using the zellij-tile library, plugins are written as Structs that implement the ZellijPlugin trait. The magic line here is register_plugin!(State), which wraps up the State struct in a way that neatly exposes its ZellijPlugin implementation for Zellij to find.
Note that load(), update(), and render() have default implementations, so you only need to define the callbacks used by your plugin.
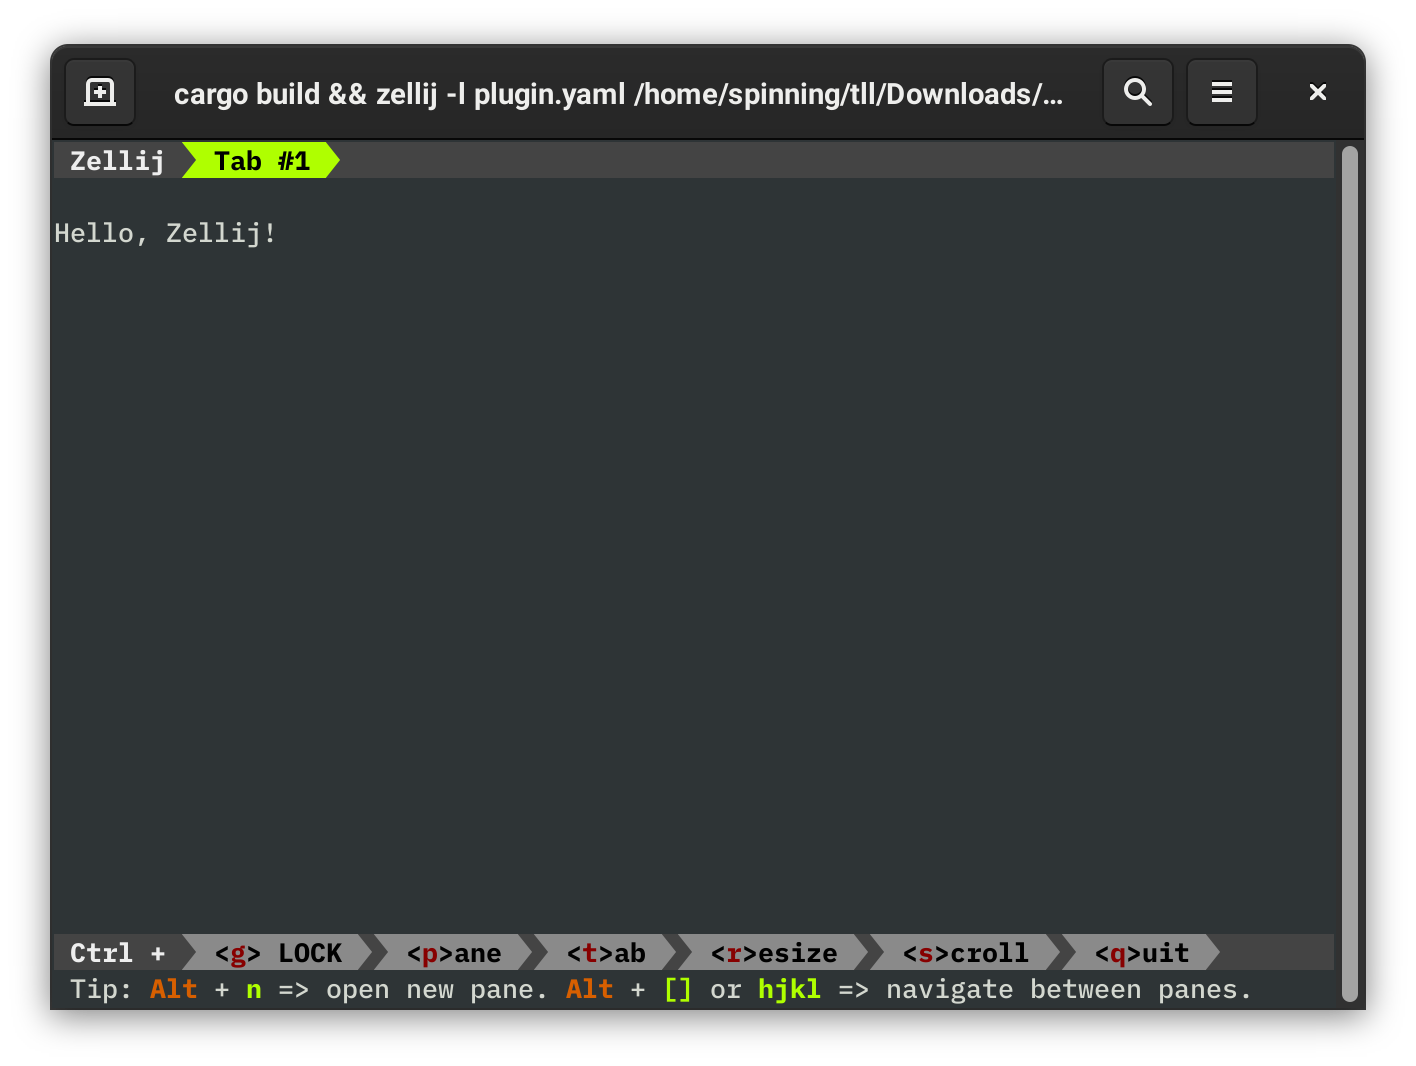
Hello, Zellij!
Let's tweak our main.rs a little to say hello!
use zellij_tile::prelude::*;

#[derive(Default)]
struct State;

register_plugin!(State);

impl ZellijPlugin for State {
    fn load(&mut self) {}

    fn update(&mut self, event: Event) {}

    fn render(&mut self, rows: usize, cols: usize) {
        println!("Hello, Zellij!");
    }
}
It really is as simple as that! Anything printed to stdout by the render() method will be automatically drawn to the screen in the pane where the plugin is active.
Let's build our plugin and test things out:
cargo build
zellij --layout-path plugin.yaml
Implementing the Event Logger
That was pretty easy, so let's try to do something a bit more interesting! Let's subscribe to some Events by adding the following code to load():
fn load(&mut self) {
    subscribe(&[EventType::ModeUpdate]);
}
Code in load() is called once the first time your plugin is loaded. Aside from that, it's nothing special. Anything that you can do in the load() method should be possible from within the update() and render() methods as well.
The subscribe() function is part of zellij-tile::prelude and sends a message to Zellij asking to be notified when certain Events occur. In this case, we're subscribing to ModeUpdate events. The documentation for Event tells us that a ModeUpdate contains the ModeInfo struct, which stores the current mode as well as some additional information.
To actually handle these events, we'll need to add some code to our update() method:
fn update(&mut self, event: Event) {
    if let Event::ModeUpdate(mode_info) = event {
        dbg!(mode_info.mode);
    }
}
Here we are checking for ModeUpdates and destructuring them to get the current mode. Currently, the dbg!() macro is being used to dump this information to stderr. If we want to actually see this debug info, we'll need to run our plugin slightly differently:
cargo build
# The 2> redirects stderr to dbg.log
zellij -l plugin.yaml 2> dbg.log
Do some faffing about in Zellij, changing modes a couple of times, then take a look at dbg.log:
[src/main.rs:15] mode_info.mode = Normal
[src/main.rs:15] mode_info.mode = Pane
[src/main.rs:15] mode_info.mode = Tab
[src/main.rs:15] mode_info.mode = Resize
[src/main.rs:15] mode_info.mode = Scroll
[src/main.rs:15] mode_info.mode = Locked
[src/main.rs:15] mode_info.mode = Normal
Excellent! It looks like our plugin is receiving mode updates! If you'd like to see these sorts of logs live, try opening a second terminal and running tail -f dbg.log.
The next thing to do is properly store a log of events and print them to the screen. Let's start by tweaking our State struct:
use std::collections::VecDeque;

#[derive(Default)]
struct State {
    log: VecDeque<String>,
}
We've gone with a VecDeque so that we can efficiently push Strings to the front of log and so we can show off how easy it is to use standard library components from within a plugin.
Let's change the update() method again to grow our log:
fn update(&mut self, event: Event) {
    if let Event::ModeUpdate(mode_info) = event {
        let mode = format!("{:?}", mode_info.mode);
        self.log.push_front(mode);
    }
}
Recall that the {:?} format specifier simply debug-prints a value and that log.push_front(mode) adds a mode String to the front of our log messages.
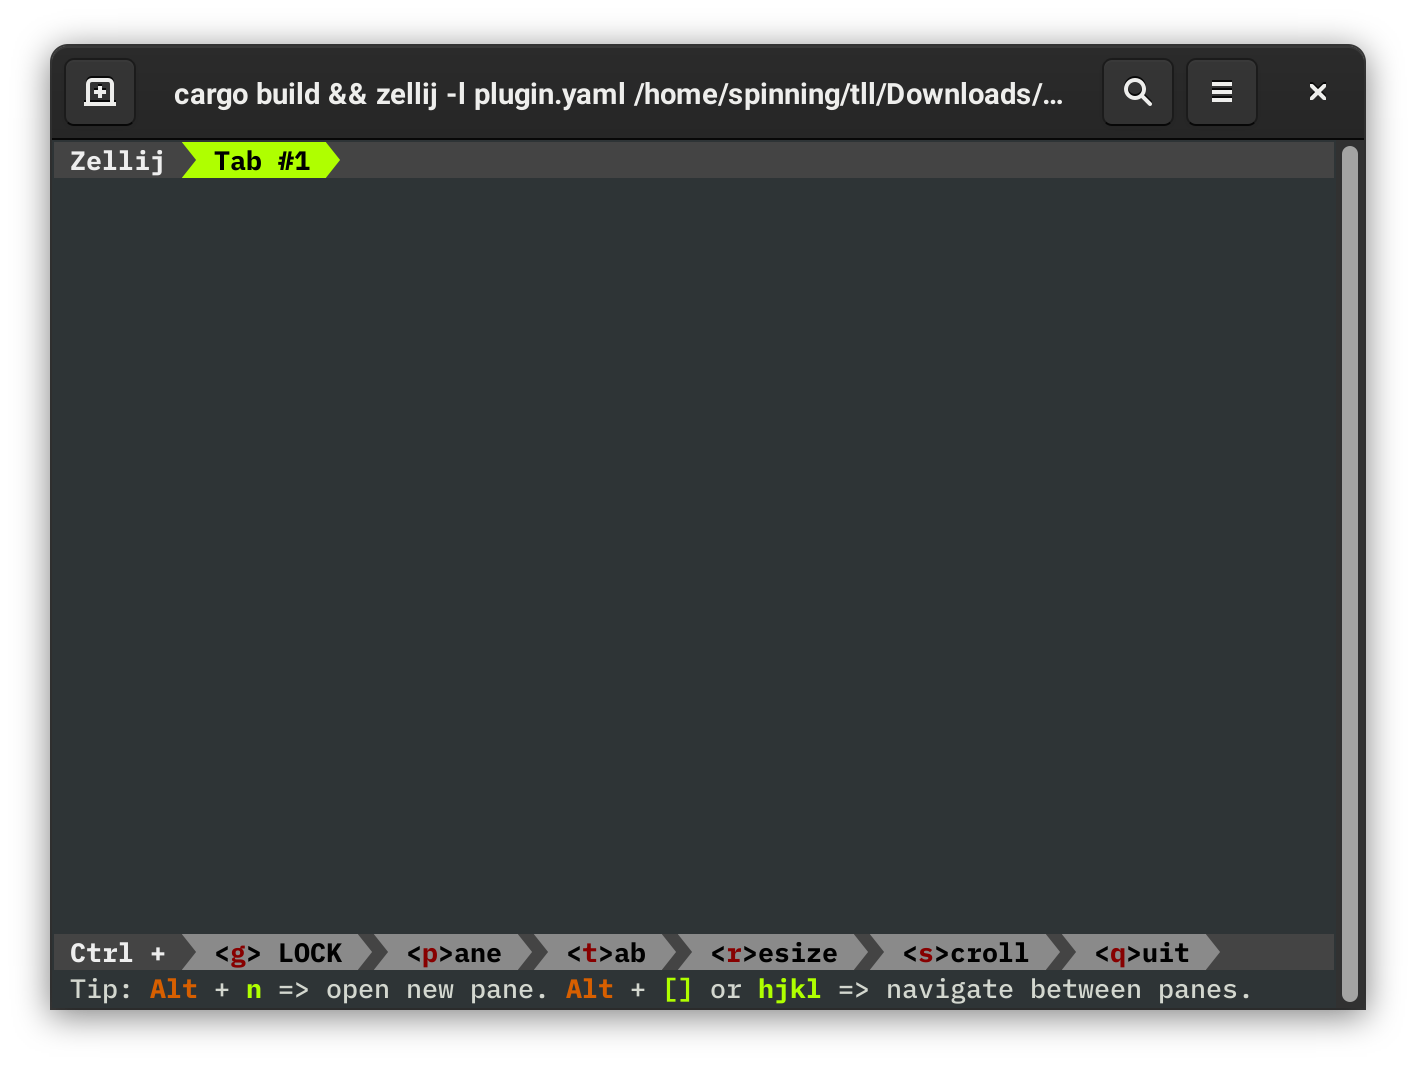
Finally, let's update render() to print out all of our log messages:
fn render(&mut self, rows: usize, cols: usize) {
    for mode in &self.log {
        println!("Mode: {}", mode);
    }
}
Let's give things a run with cargo build && zellij -l plugin.yaml and test it out!
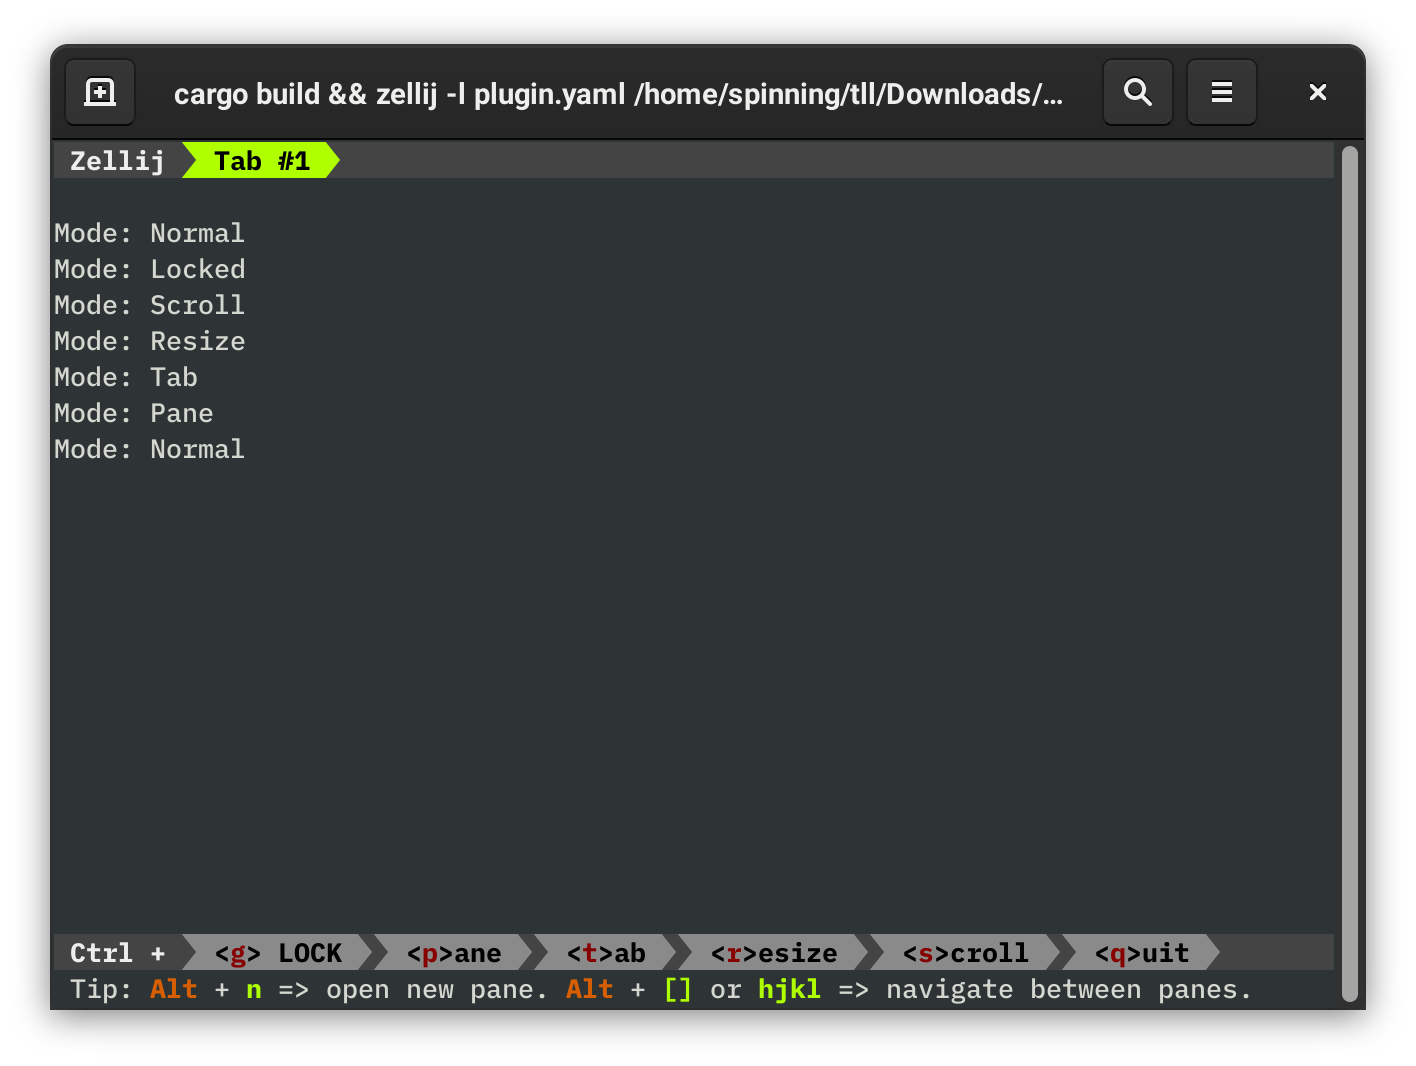
Excellent! You should notice that, as you cycle through different modes in Zellij, that those updates are being logged on-screen.
This is a good start, but no logger is complete without storing timestamps! Let's import the chrono crate for working with time. First we'll need to add it to our Cargo.toml:
[package]
name = "mode-logger"
version = "0.1.0"
authors = ["Brooks J Rady <b.j.rady@gmail.com>"]
edition = "2018"

[dependencies]
zellij-tile = "1.0.0"
chrono = "0.4"
Quite a few Rust libraries can compile to WebAssembly without any issue – this is one of them! Let's import it and update State to store timestamps:
use chrono::{DateTime,Local};

#[derive(Default)]
struct State {
    log: VecDeque<(String, DateTime<Local>)>,
}
Next we'll need to actually store these timestamps in update():
fn update(&mut self, event: Event) {
    if let Event::ModeUpdate(mode_info) = event {
        let mode = format!("{:?}", mode_info.mode);
        // Local::now() gets the current time and date
        self.log.push_front((mode, Local::now()));
    }
}
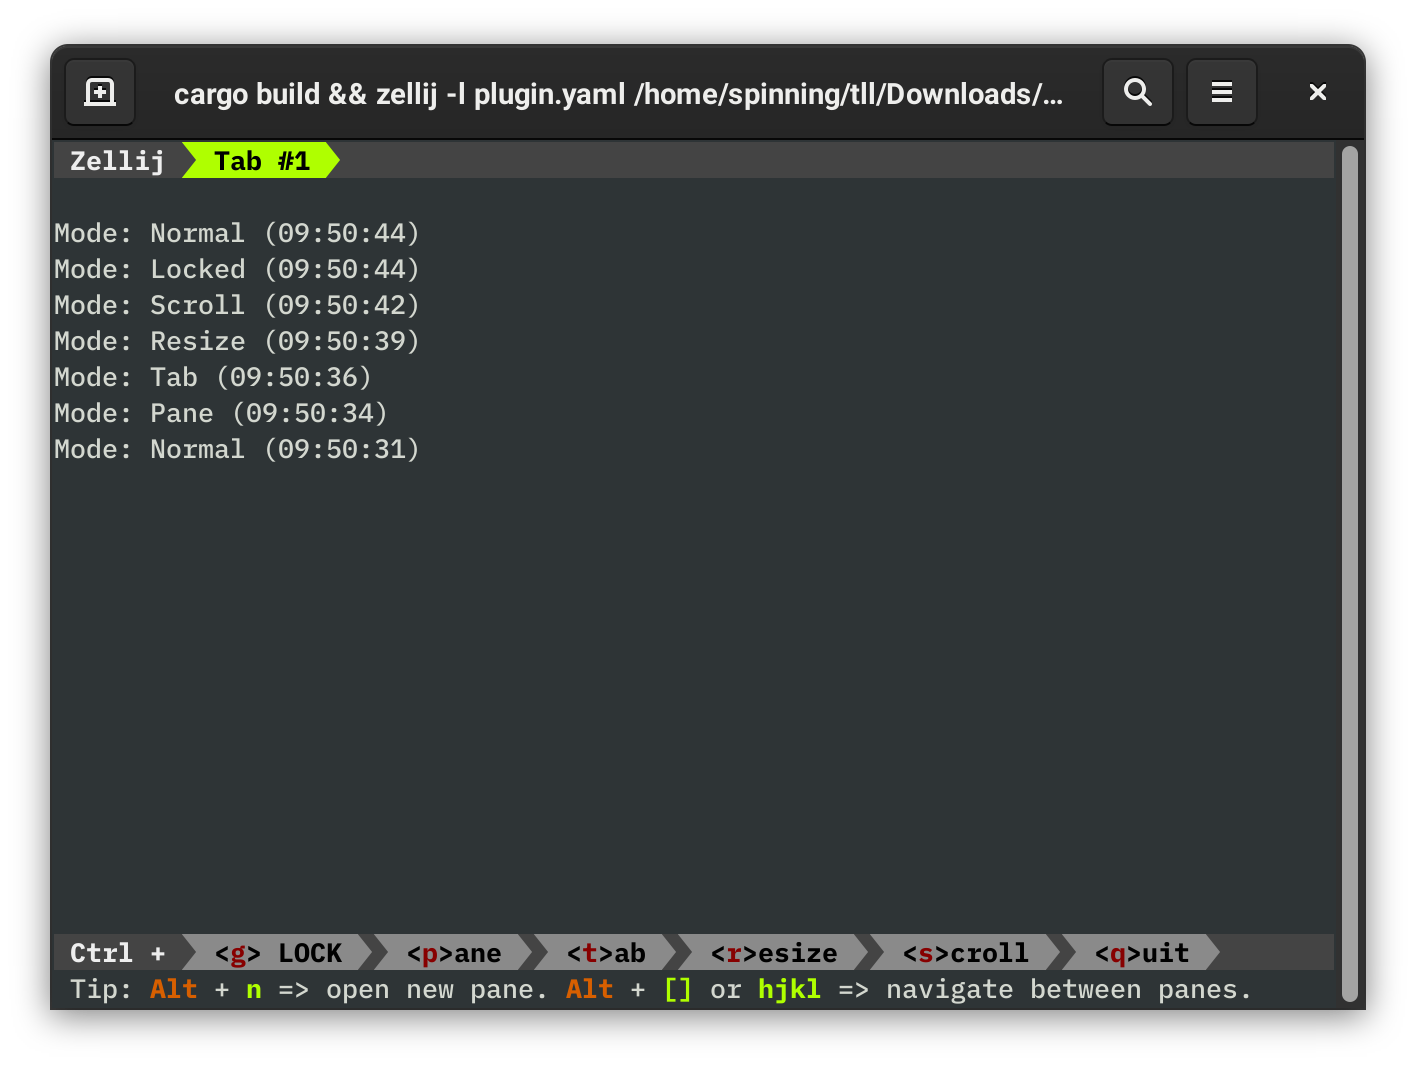
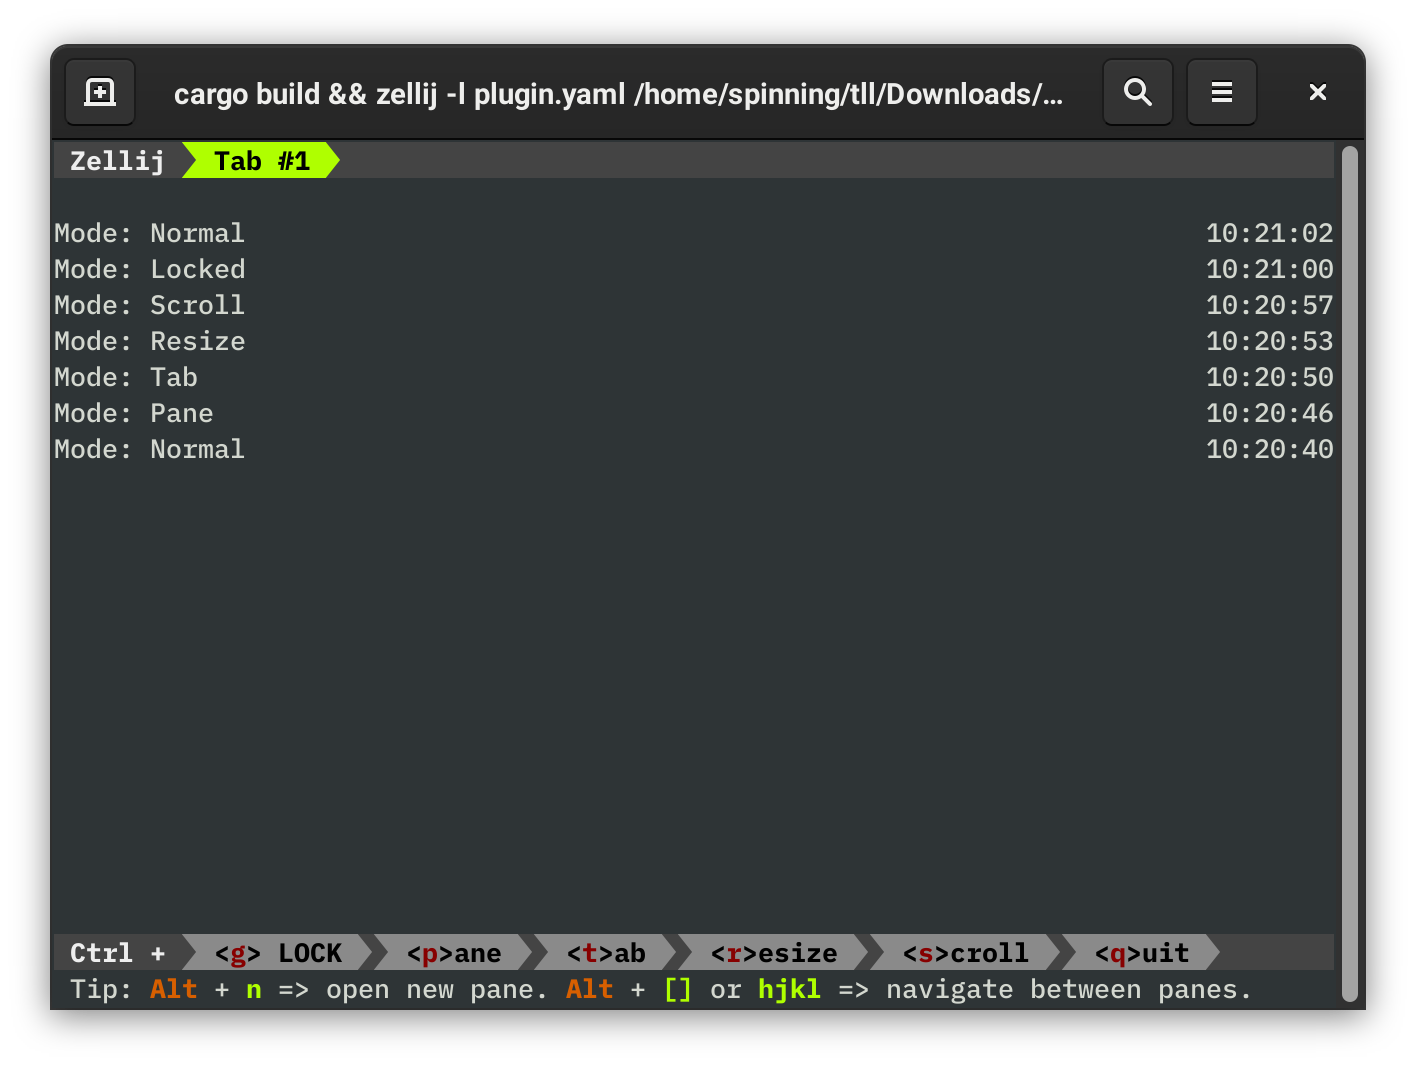
Finally, we can render() the timestamps to the screen:
fn render(&mut self, rows: usize, cols: usize) {
    for (mode, time) in &self.log {
        println!("Mode: {} ({})", mode, time.format("%T"));
    }
}
The different options for time.format() can be found in the chrono::format::strftime module; %T shows the time in HH:MM:SS format.
Finally, let's test this out!
It looks like getting the time is working perfectly! Unfortunately, because our different mode names are different lengths, it looks a bit messy at the moment. Luckily, every time that render() is called, it passes the size of plugin pane. Let's use the cols value to right-align the timestamp:
fn render(&mut self, _rows: usize, cols: usize) {
    for (mode, time) in &self.log {
        let mode = format!("Mode: {}", mode);
        let time = time.format("%T").to_string();
        let padding = " ".repeat(cols - mode.len() - time.len());
        println!("{}{}{}", mode, padding, time);
    }
}
By separately storing the left-aligned mode String and the right-aligned timestamp, we can calculate (using cols) exactly how much padding we need to fill the screen. Once we've done that, it's just a matter of printing the left half, the padding, then the right half.
If we run this code, we now get the much nicer:
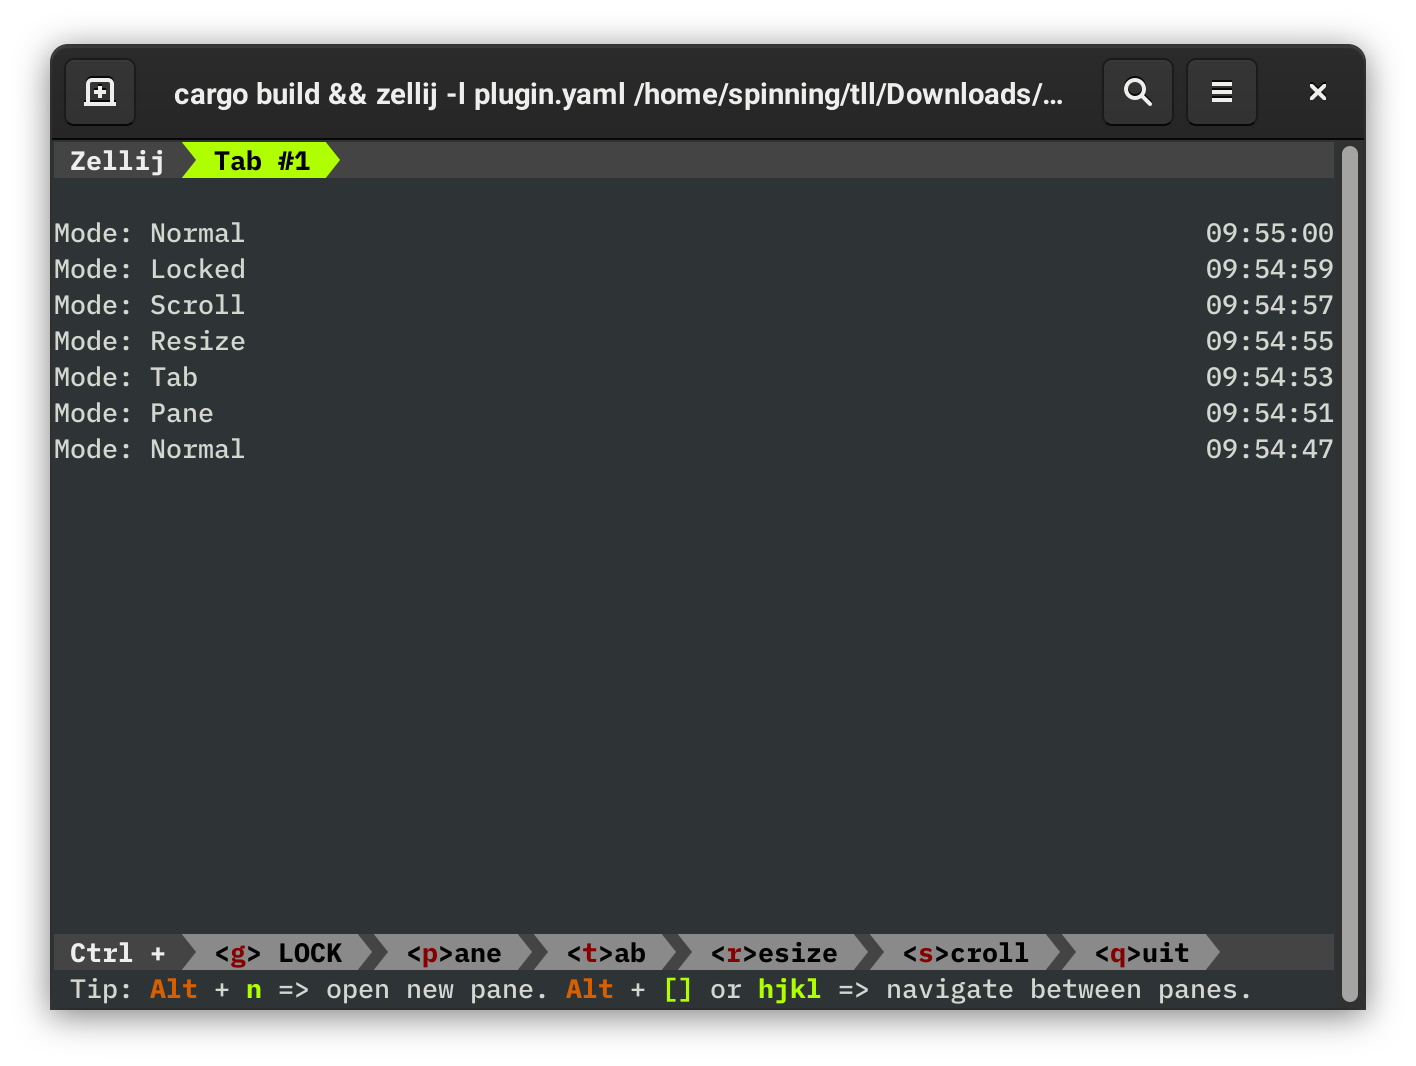
Try resizing your terminal window or the plugin pane and watch how things stay properly justified!
As a final step, let's add a couple of commands that allow the user to clear their history or save their log to a file. To do this, we'll need our plugin to receive KeyPress events:
fn load(&mut self) {
    subscribe(&[EventType::ModeUpdate, EventType::KeyPress]);
}
Now we can expand update() to handle ModeUpdate and KeyPress events. Let's make Ctrl-L the command for clearing the logs:
fn update(&mut self, event: Event) {
    match event {
        Event::ModeUpdate(mode_info) => {
            let mode = format!("{:?}", mode_info.mode);
            self.log.push_front((mode, Local::now()));
        }
        Event::KeyPress(Key::Ctrl('l')) => self.log.clear(),
        _ => (),
    }
}
When matching against KeyPress events, you might find it helpful to explore the zellij_tile::Key enum.
Also note that we need the catch-all case _ => () because, even though we've only subscribed to the ModeUpdate and KeyPress events, the Rust compiler on its own can't guarantee that only those events will be passed to update().
Let's try running this, changing modes a couple of times, then pressing Ctrl-L:
Incredibly blank! Nicely done!
As one final feature, we'll dump a log of the captured events to mode-log.txt when Ctrl-W is pressed:
use std::{fs::File, io::Write};

// ... snip ...

fn update(&mut self, event: Event) {
    match event {
        Event::ModeUpdate(mode_info) => {
            let mode = format!("{:?}", mode_info.mode);
            self.log.push_front((mode, Local::now()));
        }
        Event::KeyPress(Key::Ctrl('l')) => self.log.clear(),
        Event::KeyPress(Key::Ctrl('w')) => {
            if let Ok(mut f) = File::create("mode-log.txt") {
                for (mode, time) in self.log.iter().rev() {
                    writeln!(f, "{}: Entered {} Mode", time.format("%c"), mode).unwrap();
                }
            }
        }
        _ => (),
    }
}
A couple of new things here, but all of them are vanilla Rust – nothing changes when writing a plugin! File::create("mode-log.txt") is just normal code for creating a file named mode-log.txt in the current directory. After the file is created, we're again looping through all of the log events and writing them out (but this time to a file!). The format of the log file is also a bit different from the log we show on-screen. First of all, we're writing things to the log file in chronological order (that's why we're reversing our log with self.log.iter().rev()), and we've also changed to a more verbose timestamp. The %c should look something like this: Tue Apr 20 10:21:02 2021.
Let's run Zellij again, change some modes, then press Ctrl-W:
We can then look at mode-log.txt, which should look something like this:
Tue Apr 20 10:20:40 2021: Entered Normal Mode
Tue Apr 20 10:20:46 2021: Entered Pane Mode
Tue Apr 20 10:20:50 2021: Entered Tab Mode
Tue Apr 20 10:20:53 2021: Entered Resize Mode
Tue Apr 20 10:20:57 2021: Entered Scroll Mode
Tue Apr 20 10:21:00 2021: Entered Locked Mode
Tue Apr 20 10:21:02 2021: Entered Normal Mode
And that's all, folks! The full code for this example can be found in the rust-plugin-example repository.
Further Steps
There are a lot of ways that this plugin could be improved! Here are a couple of the things that you might want to try implementing if you're looking for the extra practice:
- Support for scrolling :: you'll need to use
rowsand save a cursor position inState - Make it pretty :: our default plugins use the
coloredcrate for fancy formatting - Make it more stable :: if you make the logger pane too small, the plugin will crash!
- Add a help bar :: there is currently no UI telling the user about the clear and save features
Have fun, and don't hesitate to get in touch if you find any bugs or would like some guidance :)
Zig
Please see the up-to-date documentation for the most recent features.
Writing a zellij plugin in Zig should be just as easy as it is in Rust, thanks to zellzig. This guide should walk you through the basics of using it. Some basic knowledge of Zig is assumed.
This guide will get you set up with all the tools you need. We'll be using the zellzig example, which is a simple status bar as a starting point.
Getting Started
First of all, you'll need to install the Zig compiler. Due to Zig being rather early in development, most of the ecosystem, including zellzig, currently revolves around the master version of the compiler. This means that, to install the compiler, you might have to build it yourself.
If you're on Arch Linux, this should be as simple as installing the zig-git AUR package. On other systems, you should check out Zig's guide on building the compiler.
Along with zig, you'll also need gyro. Gyro is a package manager for Zig. It is used by zellzig to manage dependencies.
Creating the project
Now that you've got the necessary tooling up and running, we're ready to actually start coding!
First, create a directory for your plugin, cd into it, and initialize zig and gyro:
mkdir zellzig_plugin
cd zellzig_plugin
zig init-lib
gyro init
Next up, open gyro.zzz and add info about your project and the zellzig dependency:
pkgs:
  zellzig_plugin:
    version: 0.0.0
    description: "My cool zellzig plugin!"
    license: GPL-3.0 # Your license here
    source_url: "https://git.example.com/your_name/zellzig_plugin"
    root: src/main.zig

deps:
  zellzig:
    git:
      url: "https://mzte.de/git/LordMZTE/zellzig.git"
      ref: master
      root: src/main.zig
We'll also need to make some changes on the build.zig build script. Namely,
- set the target to wasm,
- set the system API to wasi,
- switch from a static to a shared libary,
- and register the gyro dependencies.
This is the diff from the default build.zig file:
const std = @import("std");
+const pkgs = @import("deps.zig").pkgs;

pub fn build(b: *std.build.Builder) void {
    // Standard release options allow the person running `zig build` to select
    // between Debug, ReleaseSafe, ReleaseFast, and ReleaseSmall.
    const mode = b.standardReleaseOptions();

-   const lib = b.addStaticLibrary("zellzig_plugin", "src/main.zig");
+   const lib = b.addSharedLibrary("zellzig_plugin", "src/main.zig", .{ .unversioned = {} });
    lib.setBuildMode(mode);
+
+   lib.target.cpu_arch = .wasm32;
+   lib.target.os_tag = .wasi;
+
+   pkgs.addAllTo(lib);
+
    lib.install();

    const main_tests = b.addTest("src/main.zig");
    main_tests.setBuildMode(mode);

    const test_step = b.step("test", "Run library tests");
    test_step.dependOn(&main_tests.step);
}
Now, you might be asking where this deps.zig file is. Well, It'll be generated by gyro in a second.
If you're using git, you should also add a .gitignore:
zig-cache/
zig-out/
.gyro
gyro.lock
deps.zig
Last but not least, we'll also add a zellij layout file for our plugin. Since we're writing a status bar, we'll create a layout that replaces the default status bar with our bar:
---
template:
  direction: Horizontal
  parts:
    - direction: Vertical
      borderless: true
      split_size:
        Fixed: 1
      run:
        plugin:
          location: "zellij:tab-bar"

    - direction: Vertical
      plugin: "zig-out/lib/example.wasm"

    - direction: Vertical
      borderless: true
      split_size:
        Fixed: 1
      run:
        plugin:
          location: "file:zig-out/lib/zellzig_plugin.wasm"
Writing the plugin
Before we actually get coding, we should check if what we've just created actually is correct. We can test if the default Zig template compiles by running gyro build. This should also download all dependencies.
If everything went well, we should also have the plugin file (which won't work just yet) in zig-out/lib/.
Now that we got all the preparation out the way, we can finally jump in. Let's open src/main.zig!
Zig will have generated some boilerplate in there, but except for the first line, which imports the standard library, we can get rid of everything.
Registering the plugin
We'll now start by importing zellzig, and saving the import in a variable called zz:
const std = @import("std");
const zz = @import("zellzig");
This won't do much on its own, but now we can call zellzig functions.
The first one we should call is one that creates all the exported symbols that zellij will call, alongside some communication handling.
This function actually needs to be called at compile time, as all it does is give the compiler some functions to be exported by the wasm file. Because of this, It goes in a comptime block.
const std = @import("std");
const zz = @import("zellzig");

comptime {
    zz.createPlugin(@This());
}
We pass in @This(), which is the struct of the current scope.
Since namespaces in zig are just structs, this return our root struct.
createPlugin needs this, so it can get access to the functions we'll define next.
There are 3 functions that zellzig calls:
- init
- called on plugin initialization
- update
- called on an event
- render
- called to draw the plugin
The init function
In the init function, we should set zellzig's allocator, which it uses for deseralization of zellij's messages.
var gpa = std.heap.GeneralPurposeAllocator(.{}){};

pub fn init() void {
    zz.allocator = gpa.allocator();
}
Here, we create a GeneralPurposeAllocator. It's assigned to a global variable, so it's not dropped once init returns.
Then, we assign the allocator to zz.allocator. Now the allocator is set.
Next, we'll make sure zellij doesnt stay open because of our plugin. To do this, we'll make our plugin unselectable:
zz.api.setSelectable(false);
The last thing we'll put in init is a call to subscribe. This tells zellij what events we're interested in:
zz.api.subscribe(&[_]zz.types.EventType{.ModeUpdate}) catch unreachable;
The subscribe function takes a slice of EventTypes we want to receive. Since we're making a status bar, we only care about mode updates, but you can add more if you wish.
This function can return an error, since sending data to zellij might fail. But since we can't recover from it, we'll use catch unreachable, so the program crashes if this fails.
Our code should now look like this:
const std = @import("std");
const zz = @import("zellzig");

comptime {
    zz.createPlugin(@This());
}

var gpa = std.heap.GeneralPurposeAllocator(.{}){};

pub fn init() void {
    zz.allocator = gpa.allocator();
    zz.api.setSelectable(false);
    zz.api.subscribe(&[_]zz.types.EventType{.ModeUpdate}) catch unreachable;
}
The update function
This function is responsible for handling the events we've subscribed to. In our case, that's only ModeUpdates.
First, this is what the function looks like:
pub fn update(ev: zz.Event) void {

}
As a parameter, it takes an event. Since we've only subscribed to ModeUpdate events, that's the only event we'll get.
Since we want to render the current mode, we need to save it when we receive it in update. Thus, we'll create a global variable that holds the current mode, and assign it in update.
var mode: ?zz.types.InputMode = null;

pub fn update(ev: zz.Event) void {
    switch (ev) {
        .ModeUpdate => |mode_info| mode = mode_info.mode,
        else => {},
    }
}
We also make mode optional, since we don't know it once the plugin is initalized, but we'll get a mode event right away, so it doesn't really matter.
The render functio
render is the last function we need. In it, we display the current mode (which we saved in mode, remember?).
pub fn render(rows: i32, cols: i32) void {
    _ = rows;
    _ = cols;

    if (mode) |m| {
        var out = std.io.getStdOut();
        var writer = out.writer();
        writer.writeAll(@tagName(m)) catch {};
    }
}
We assign rows and cols to _, since we don't need them. Next we check if mode is set, and if it is, we print it out.
@tagName returns the string name of an enum variable.
With the last function in place, our plugin should be all done. This is what the finished code looks like:
const std = @import("std");
const zz = @import("zellzig");

comptime {
    zz.createPlugin(@This());
}

var gpa = std.heap.GeneralPurposeAllocator(.{}){};
var mode: ?zz.types.InputMode = null;

pub fn init() void {
    zz.allocator = gpa.allocator();
    zz.api.setSelectable(false);
    zz.api.subscribe(&[_]zz.types.EventType{.ModeUpdate}) catch unreachable;
}

pub fn update(ev: zz.Event) void {
    switch (ev) {
        .ModeUpdate => |mode_info| mode = mode_info.mode,
        else => {},
    }
}

pub fn render(rows: i32, cols: i32) void {
    _ = rows;
    _ = cols;

    if (mode) |m| {
        var out = std.io.getStdOut();
        var writer = out.writer();
        writer.writeAll(@tagName(m)) catch {};
    }
}
Now, all that's left is to build with gyro build -Drelease-fast (you should do a release build, since debug builds tend to be buggy sometimes) and run zellij with our layout file: zellij --layout-path plugin.yaml.
Writing a Plugin in Another Language
Please see the up-to-date documentation for the most recent features.
This page is very much a work in progress! If you're familiar with WASM and Rust, then understanding the zellij-tile library is a great place to start.
In short, Zellij expects your WASI module to export three functions:
main():: called once on plugin loadupdate():: called after event subscriptions are triggeredrender(i32, i32):: called when the plugin needs to be rendered
The render(i32, i32) function is passed the size of the plugin pane, first the rows, then the columns – e.g. render(rows, cols).
Complex types are sent over stdin as JSON objects. Before update() is called, Zellij writes an event to the plugin's stdin that can be read back in the update() function.
Host functions, for communicating with Zellij, are best documented by the extern section of zellij-tile::shim and are found in a WASM module named zellij.
Help Add More Language Guides! If you'd like to contribute, either drop us a line on Discord or open a PR improving these docs!
Compatibility
Please see the up-to-date documentation for the most recent features.
Issues
Please report issues here.
Known Issues
The status bar fonts don't render correctly:
This most likely is caused by a missing character in the font.
Fonts from nerdfonts can fix this problem.
Some Options:
| Package Manager | Name |
|---|---|
| apt | fonts-powerline |
| nix | nerdfonts |
Post installation the appropriate environment needs to be aware of the font.
Alt button mapping on darwin systems:
This can be mitigated individually on a terminal emulator level, some inspiration can be found here.
Pane frame title has issues with kitty:
This sadly seems to be an issue that can not be mitigated easily, more information can be found here.
Mouse issues:
If mouse_mode is turned on zellij handles these events, zellij provides an
escape mechanism in the form of the SHIFT Key, once it is pressed zellij lets
the terminal handle selection, clicking on links, copying, scrolling.
More information can be found here
Clipboard not working:
This is a known problem which mostly occurs in specific terminal emulators under Linux/OS X such as GNOMEs default Terminal, terminator, and more.
A workaround for this was added in zellij > 0.24.0 and enables the user to
specify a custom command that copies selected text to the system clipboard.
Refer to lines containing "copy_command" from the output of zellij setup --dump-config.
For technical background, refer to this issue and this merge request
Backspace sending ctrl-h (entering into Move mode)
This can happen in some terminal emulators (eg. Xterm). It can be remedied either on the terminal emulator side by getting the terminal emulator to send ^? instead of ^H, or on the Zellij side by remapping ctrl-h to some other key. Here's an example fix in xterm: http://www.hypexr.org/linux_ruboff.php