Using Layouts for Personal Automation
2022-12-08This tutorial walks you through creating Zellij layouts to automate tasks and workflows.
Layouts describe a pre-defined set of panes and tabs with different terminals, commands and plugins. They can be great to automate and formalize workflows and tasks.
If you prefer a written tutorial, or would like to copy/paste the examples, scroll down past this video.
Note: Recent Zellij versions added a dedicated Layout Manager UI to help us more easily manage layouts. See below for more details.
The Goal
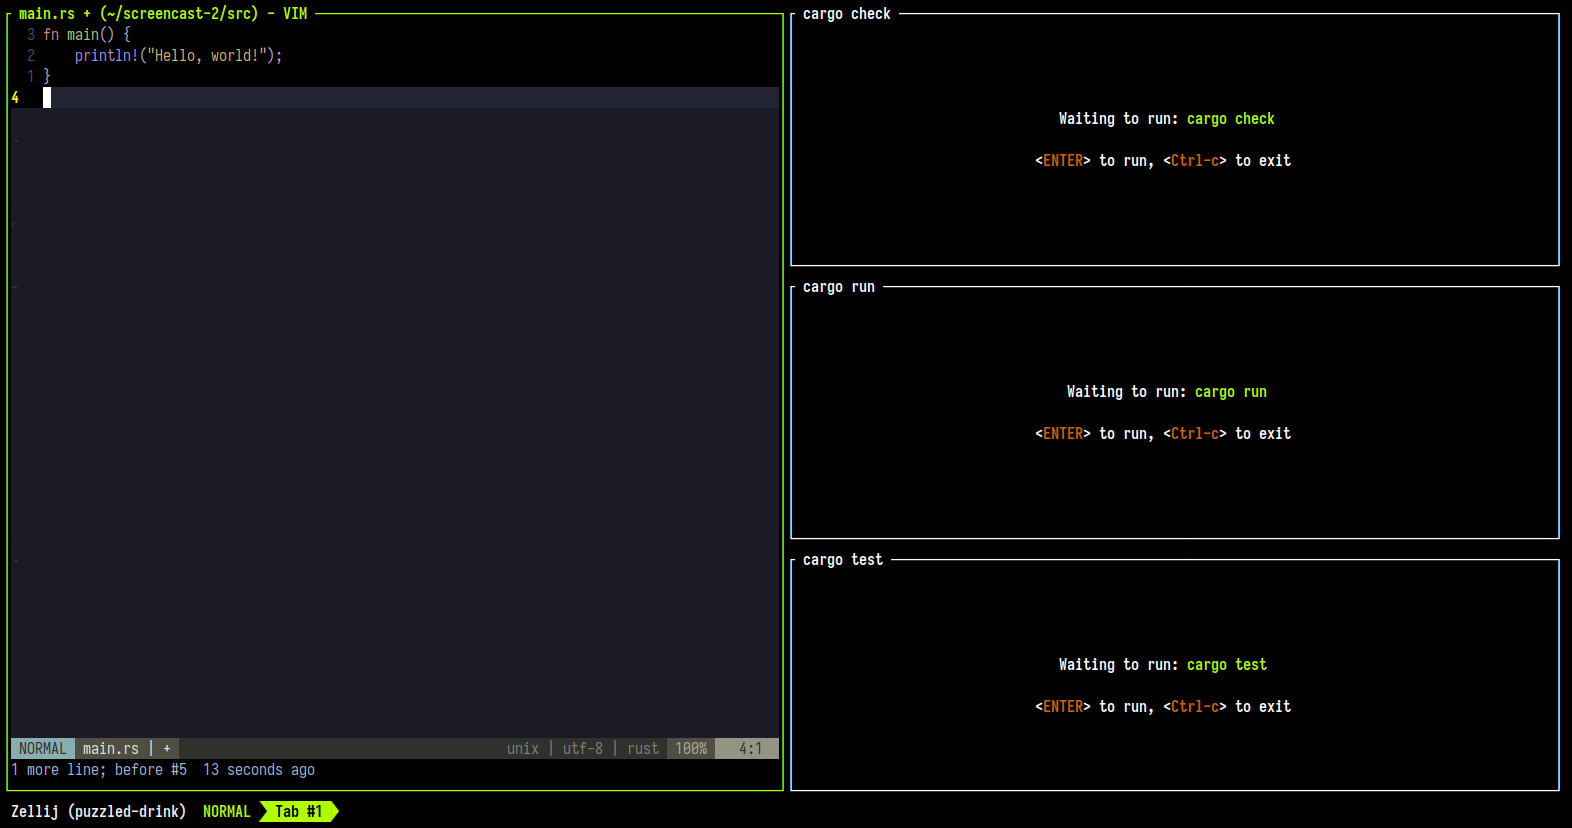
In the above screenshot: on the left, we have our default editor (vim in the author’s case) opened to the main file (src/main.rs), and on the right we have three often-used commands - one in each pane. These are Command Panes, meaning they’re first-class citizens of Zellij rather than a command run in a terminal. This means we get to see their Exit Code as well as re-run them by pressing Enter.
What we’ll cover
- Creating and Opening a Basic Layout
- Edit and Command Panes
- Changing Pane Orientation
- Avoiding Repetition with Pane Templates
- Automating this process with the Layout Manager
- Do you like Zellij?
Getting Started
To follow along, you can clone the repository.
Zellij uses KDL as its configuration language. You can get syntax highlighting for your favorite editor on the KDL website.
OPTIONAL: If you don’t have cargo installed, you can install it through rustup so that the layout we’re creating will work on your computer. This step is not necessary to benefit from this tutorial.
Creating and Opening a Basic Layout File
Let’s start by creating an empty layout file and add a singlelayout node to it:
basic-rust-layout.kdl
layout
Now let’s navigate to our Rust project and open the layout, in a new Zellij session if we’re not inside one already:
zellij --layout /path/to/basic-rust-layout.kdl
Or in a new-tab if we’re in an existing Zellij session:
zellij action new-tab -l /path/to/basic-rust-layout.kdl
Here we are greeted with one terminal window, which is the default single-pane for an empty layout file.
Layout Manager
If we desire a friendly UI, we can also use the Layout Manager, see below for more info.
Edit and Command Panes
Let’s add some content to our layout. First, let’s add an edit pane:
basic-rust-layout.kdl
layout {
    pane edit="src/main.rs"
}
Opening this layout now, we’re greeted with a single editor pane. This pane uses our default $EDITOR (vim in the author’s case), opened to the main.rs file: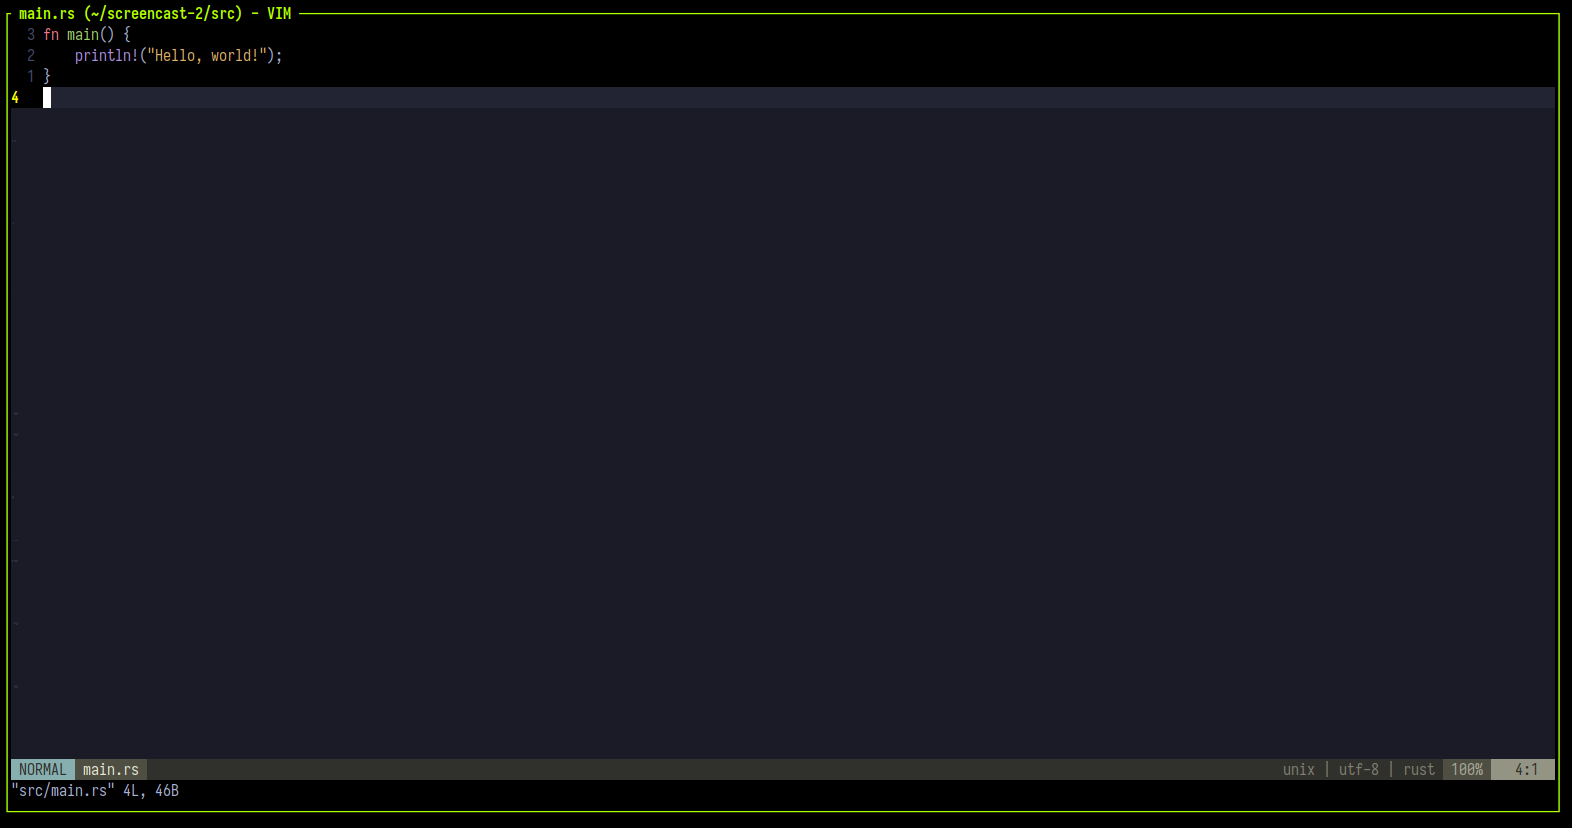
Moving onwards, let’s add three Command panes to run 3 often used commands:
cargo check- to see if our code compiles without running itcargo run- to compile and run our projectcargo test- to run our tests
In our layout file, this looks like this:
layout {
    pane edit="src/main.rs"
    pane command="cargo" {
        args "check"
    }
    pane command="cargo" {
        args "run"
    }
    pane command="cargo" {
        args "test"
    }
}
Opening this layout now, we get:
We now have all the panes we need, but their content is not very easy to read or manage. We could definitely take better advantage of our screen real-estate!
Changing Pane Orientation
To change pane orientation between vertical and horizontal, we need to create logical containers around the panes whose orientation we’d like to change.
Our first container is around the entire layout, and out second container is around just the three Command panes.
layout {
    pane split_direction="vertical" { // first logical container
        // all these panes will be laid out vertically next to each other
        pane edit="src/main.rs"
        pane split_direction="horizontal" { // second logical container
            // all these panes will be laid out horizontally next to each other
            pane command="cargo" {
                args "check"
            }
            pane command="cargo" {
                args "run"
            }
            pane command="cargo" {
                args "test"
            }
        }
    }
}
Opening this layout now, we get: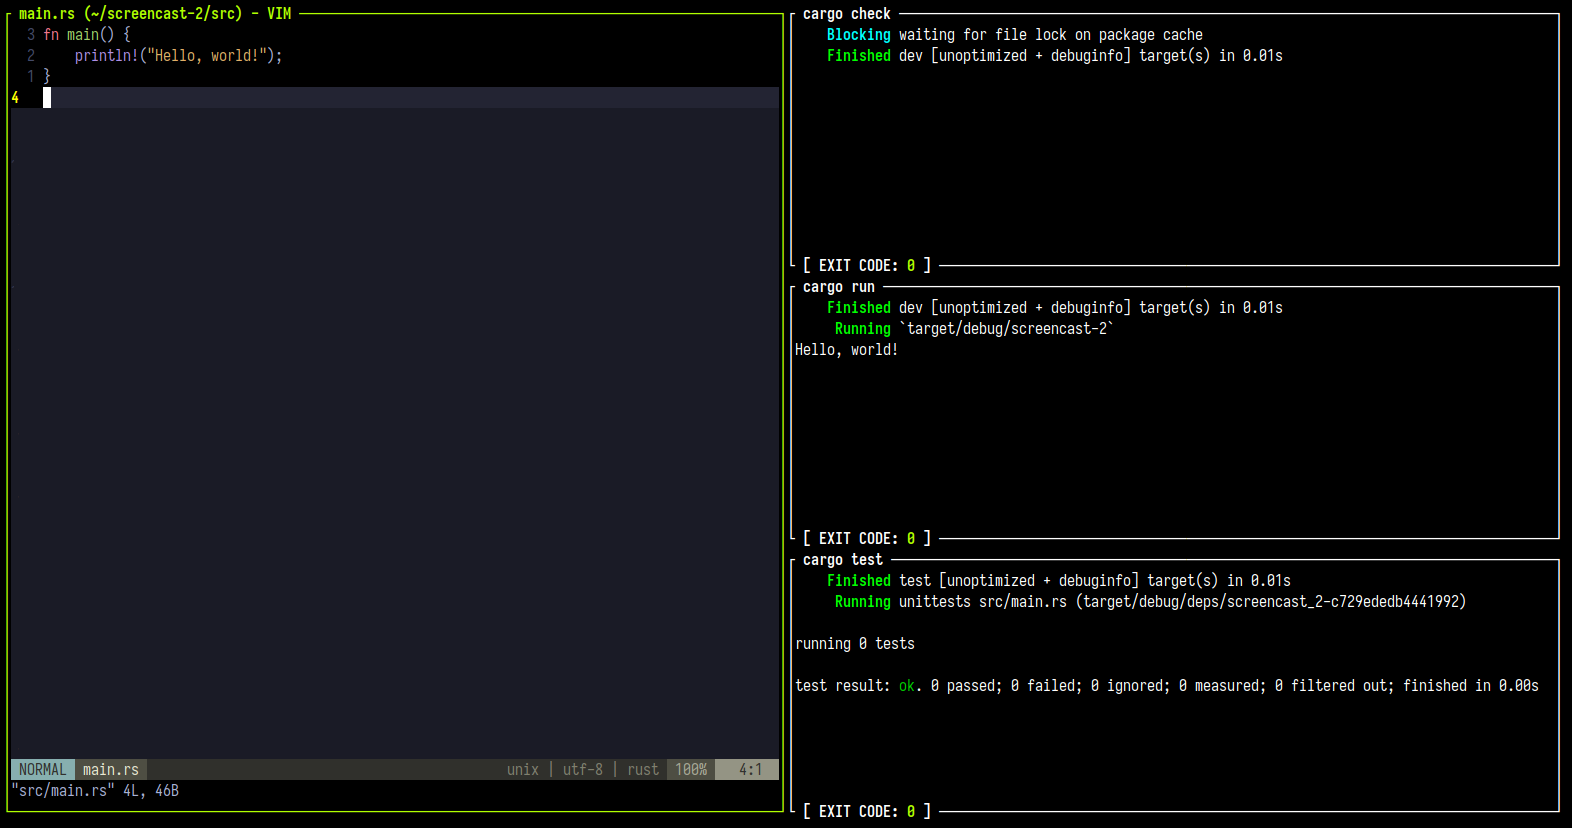
Suspending Pane Command Startup
While the commands we added are relatively short lived, there might be occasions where we’d like to add a pane with a resource-intensive command that we’d only like to run on demand, and not immediately when we open the layout.
To do this, we add the start_suspended attribute to our Command panes:
layout {
    pane split_direction="vertical" {
        pane edit="src/main.rs"
        pane split_direction="horizontal" {
            pane command="cargo" {
                args "check"
                start_suspended true
            }
            pane command="cargo" {
                args "run"
                start_suspended true
            }
            pane command="cargo" {
                args "test"
                start_suspended true
            }
        }
    }
}
Now, when we open the layout, these three commands will be patiently waiting for us to press Enter to run them for the first time: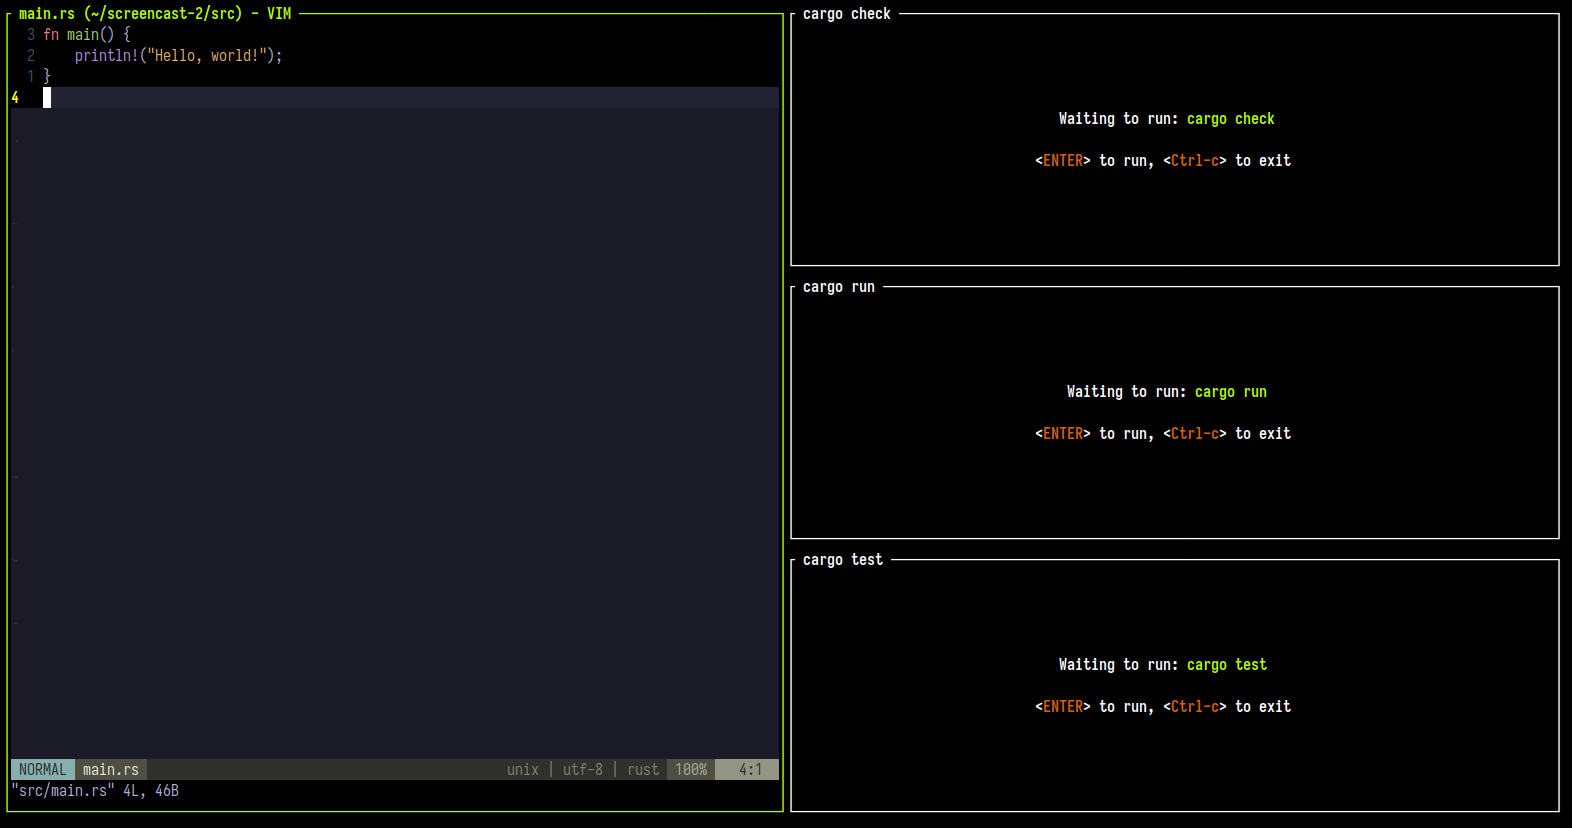
Adding the Zellij UI (plugins)
When we open the layout we created above, we don’t see the Zellij UI. This is because the Zellij UI is made up of plugins that, while they come built-in with Zellij, need to be specified in the layout. So let’s add them.
We’re going to add the compact-bar, which is the minimal Zellij UI showing the session name, the current input mode and the open tabs. To do this, we can take a look at one of the default layouts (the compact layout) and copy it from there: zellij setup --dump-layout compact.
Here’s what we’ll end up with:
layout {
    pane split_direction="vertical" {
        pane edit="src/main.rs"
        pane split_direction="horizontal" {
            pane command="cargo" {
                args "check"
                start_suspended true
            }
            pane command="cargo" {
                args "run"
                start_suspended true
            }
            pane command="cargo" {
                args "test"
                start_suspended true
            }
        }
    }
    pane size=1 borderless=true {
        plugin location="zellij:compact-bar"
    }
}
And now we get:
Avoiding Repetition with Pane Templates
We could make the above layout more succinct by using a pane_template. We have 3 panes which all run cargo, all have the start_suspended true attribute and only differ in the arguments passed to the command.
If we create a template like this:
pane_template name="cargo" {
    command "cargo"
    start_suspended true
}
We would be able to shorten each pane declaration to:
cargo { args "test"; }
So finally, our layout looks like this:
layout {
    pane split_direction="vertical" {
        pane edit="src/main.rs"
        pane split_direction="horizontal" {
            cargo { args "check"; }
            cargo { args "run"; }
            cargo { args "test"; }
        }
    }
    pane size=1 borderless=true {
        plugin location="zellij:compact-bar"
    }
    pane_template name="cargo" {
        command "cargo"
        start_suspended true
    }
}
Automating this Process with the Layout Manager
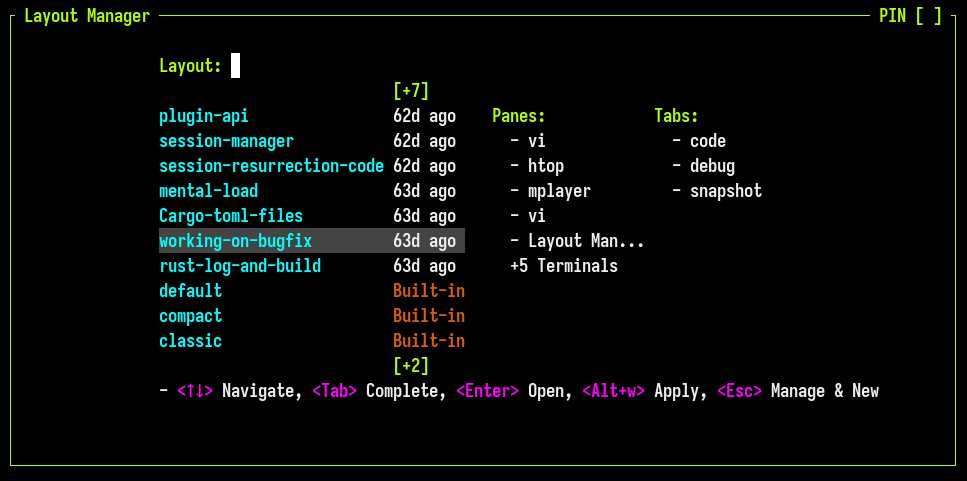
Ctrl o + l.
The Layout Manager allows us to:
- Save the current session or tab as a new layout (through the
Escmore options menu) - Open existing layouts as new tabs (by choosing a layout and pressing
Enter) - Override the current session or tab with one of our saved layouts (through the
Escmore options menu by choosing a layout and pressingAlt w).
When overriding the current session, we can reach situations where we have panes opened that do not fit our layout. We can choose what to do with those panes with the advanced ? options. We can choose to retain only the extra terminal panes (useful if we have running processes that we’d like to keep), only the extra plugin panes (useful if our layout does not include a UI and we’d like to keep the one we have open), or both.
Conclusion and Further Reading
Here we learned how to create a basic layout to facilitate working with a Rust project through the terminal. There are plenty additional layout features to explore, such as tabs, tab_templates and cwd composition. Check out more in the official docs.
Do you like Zellij? ❤️
Me too. So much so that I spend 100% of my time developing and maintaining it and have no other income.
Zellij will always be free and open-source. Zellij will never contain ads or collect your data.
If the tool gives you value and you are able, please consider a recurring monthly donation of 5-10$ to help me pay my bills. There are Zellij stickers in it for you!